Assigning Multiple Assets to GeoTag
Asset management is handled in the Assets section of the GeoTag Properties panel.
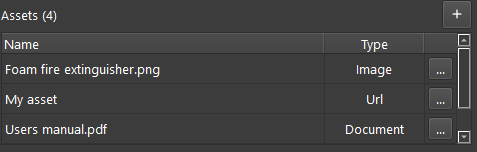
Note: At the top of the Assets section, a counter displays the current number of assets linked to the selected GeoTag. This provides a quick overview of how many files or resources are associated with the GeoTag.
This functionality allows multiple assets to be attached to a single GeoTag. This enables users to enrich GeoTag annotations with additional materials that support documentation, inspection, or analysis.
Asset Sources
Assets can be sourced from different locations, including:
-
Existing resources within the current project
-
User's local disk
-
External resources
Users can attach a link to any resource available on the web (e.g., technical documentation, cloud-hosted images, instructional videos).
Supported Asset Types
|
Type |
Format |
|---|---|
|
Images |
|
|
Documents |
|
|
Video |
|
|
Audio |
|
|
URL links |
Any valid web address |
Adding Asset to GeoTag from Project Repository
To link an existing asset to a GeoTag, follow the steps below:
-
In the Assets section of the GeoTag Properties panel, click the ➕ icon.
-
In the Choose Asset dialog, select the Select Project Asset check box and click OK.

The selected asset will now appear in the Assets list associated with the GeoTag. The asset counter in the section header will update to reflect the new total.
Adding Asset to GeoTag from Local Disk
This feature allows users to enrich GeoTags with external resources and documentation.
To attach a file saved on a computer to a GeoTag, follow the steps below:
-
In the Assets section of the GeoTag Properties panel, click the ➕ icon.
-
Browse for the necessary file. Optionally, use the file type filter to display supported formats:
-
Image files
-
Video files
-
PDF files
-
Audio files
-
Text files
-
All files
-
-
Locate and select the file you want to attach as an asset.
-
Click OK.
The selected file will be added to the Assets list for the GeoTag. The asset counter in the section header will update to reflect the new total.
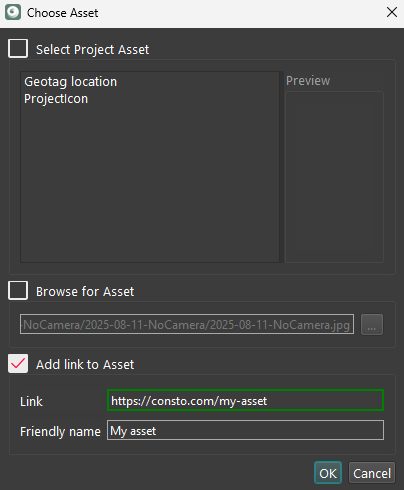
Adding URL Asset to GeoTag
This feature is useful for referencing external documentation, media, or network resources directly from within the project.
To attach a link to an external resource—whether from the web or a local network—as an asset to a GeoTag, follow the steps below:
-
In the Assets section of the GeoTag Properties panel, click the ➕ icon.
-
In the Choose Asset dialog, select the Add link to Asset check box.
-
In the Link field, enter a valid URL.
-
In the Friendly name field, enter a descriptive label that clarifies the link's purpose or content.
-
Click OK.
The link will be added to the Assets list for the GeoTag.
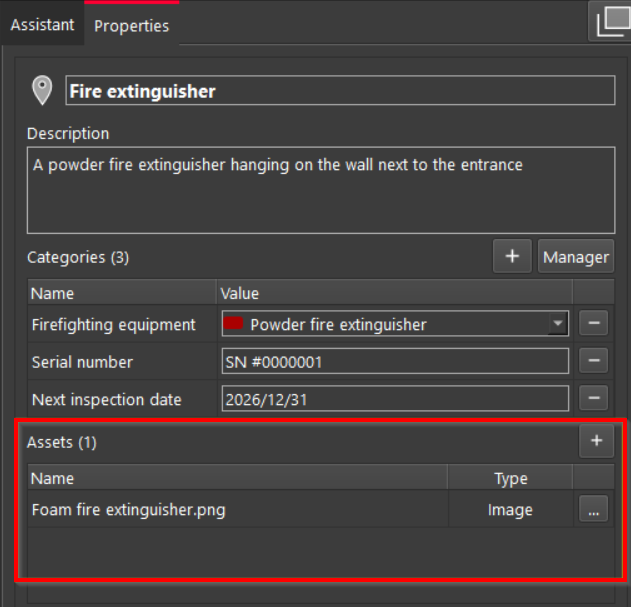
Viewing Assets in GeoTag
The image below shows the current state of the Assets section within a GeoTag.
Each asset is displayed in a list with the following details:
-
Name – The file name or friendly name of the asset.
-
Type – Indicates the asset type (e.g., Image, URL, Document).
-
Context Menu Button – Opens a menu with additional actions for each asset.
By default, three assets are visible in the list. For instance, the following information can be found in the image below:
-
Foam fire extinguisher.png– Type: Image -
My asset– Type: URL -
Users manual.pdf– Type: Document
If more assets are linked to the GeoTag, they can be accessed using the scrollbar on the right side of the list.
Quick Preview of Image Assets
To quickly verify image-type assets linked to a GeoTag, follow the steps below:
-
Click any asset of the Image type in the Assets list.
-
The image will automatically appear in the Asset Preview section located below the Assets list.

Opening Assets
Assets linked to a GeoTag can be opened directly from the Assets section using the context menu as follows:
-
Select the desired asset, click

-
Regardless of the asset type (image, document, video, etc.), the file will be opened using the default application configured in your operating system.
Editing Assets
To modify the details of an asset associated with a GeoTag, follow the steps below:
-
Select the desired asset and click
-
From the context menu, select the Edit Asset option.
Removing Assets
To delete an asset linked to a GeoTag, follow the steps below:
-
Select the desired asset and click
-
From the menu, select the Remove Asset option.
-
In a confirmation dialog that will appear, confirm the deletion to permanently remove the asset from the GeoTag.
Setting Default Preview Image for GeoTag
This feature helps users quickly identify a GeoTag based on its associated image.
Note: The feature applies only to image-type assets.
To define a default image preview for a GeoTag, follow the steps below:
-
Select the desired asset and click
-
From the menu, select the Set as GeoTag Preview option.
Once set, the image will appear in the GeoTag Preview section, providing a visual reference for the tag.