Function
Evidence Marker allows you to attach a marker to your drawing showing the location of a key piece of evidence. This marker can be linked to an existing evidence point or to a new point in the evidence log. You can customize the appearance and placement of the icon and you can attach photos, audio files or files of any other type to this point so they can easily be referenced from your map. Evidence markers will be compiled into a legend when you run the Evidence Legend Command. Evidence markers and all related attachments will be referenced if you create an Evidence Report.
Procedure
Launch the command while in model space to see the Evidence Marker configuration dialog
Select the options
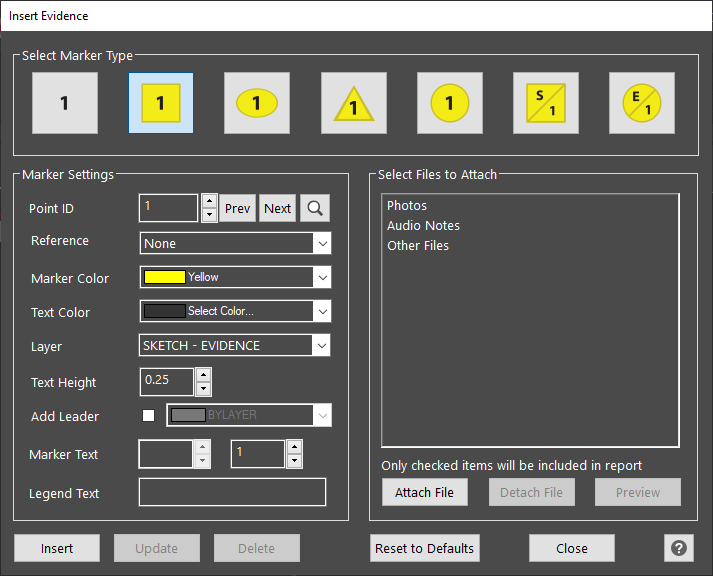
Select Marker Type
Once you have selected a Point ID for your marker (this can be an existing or new point) you can select a style for your icon. Select the style you require. The chosen style will be shown with a dark outline.
Marker Settings
You can set the properties that control how your marker appears in the map:
Point ID: Select or create a point in the evidence log to connect to your marker. Properties for the Point ID that is selected will be displayed.
-
Enter a new number in the field if you need to create a new point ID and chose the location in the map after picking "Insert."
-
Pick "PREV" or "NEXT" buttons if you wish to cycle through existing markers to review their attributes.
-
Pick the arrow icons to cycle through points in the evidence log
Marker Color: Select a color for your marker from the pull-down. Default color is yellow. Select BYLAYER if you wish the color to match the current layer.
Text Color: Select a color for your marker text from the pull-down. This will be black by default.
Text Height: Set the text height for the marker text. The marker size is controlled by this setting.
Add Leader: Select this option when you intend to place your marker with an offset from the evidence point location. A leader will be drawn to connect your marker location to the evidence point.
Marker Text: Set a code of no more than 4 characters to be displayed on marker styles shown with only one attribute field.

Marker Text: Set a code of no more than 4 characters to be displayed on marker styles shown with two attribute fields.

Legend Text: Create a description of your marker that will be displayed in an Evidence Legend. This description is usually a more descriptive version of the code used in the marker text field(s).
Select Files to Attach
A list of file types that can be attached to your marker will be displayed. Once you have attached files the individual file name will be displayed. A check box is displayed that allows you to decide if this file will be included when you generate an evidence report.
Attaching files:
-
Photos: Pick "Photos," pick "Attach File," and browse to the photo that is to be attached. A link to the file location will be recorded but the file will not be modified.
-
Audio Notes: Pick "Audio Notes," pick "Attach File," and browse to the audio file that is to be attached. A link to the file location will be recorded but the file will not be modified.
-
Other Files: Pick "Other Files," pick "Attach File," and browse to the file that is to be attached. There is no limit to A link to the file location will be recorded but the file will not be modified.
Detaching files:
-
Photos: Pick "Photos," pick "Detach File." The link to the file will be removed but the original file will be unmodified.
-
Audio Notes: Pick "Audio Notes," pick "Detach File," The link to the file will be removed but the original file will be unmodified.
-
Other Files: Pick "Other Files," pick "Detach," The link to the file will be removed but the original file will be unmodified.
Previewing files:
-
Photos: Pick "Photos," pick "Preview." Your computer's default image viewing software will launch so you can view the image. If the image does not appear you may need to install or configure your image viewing software.
-
Audio Notes: Pick "Audio Notes," pick "Preview." Your computer's default audio playback software will launch so you can play the audio note. If the audio note does not play you may need to install or configure your playback software or adjust your computer volume settings.
-
Other Files: Pick "Other Files," pick "Preview." The software that your computer is configured to use to open this type of file will launch and allow you to view and edit the file. If this file type is not recognized by your computer you will be asked "How do you want to open this file?" by your computer operating system.
Insert
Once you have configured the marker pick "Insert" to create the marker. You will be prompted to pick a location if you have enabled "Add Leader."
Update
Pick Update if you have modified the settings for the marker identified in the "Point ID" field and wish to save the changes in the drawing.
Delete
Pick Delete to delete the marker identified in the "Point ID" field.
Close
Pick Close to close this dialog and not save any edits you may have performed.
Help
Pick Help to display this article.