Function
Evidence Legend allows you to insert a legend in your map which lists all evidence markers in a table.
Procedure
Launch the command while in model space to see the Evidence Legend configuration dialog.
Select the options
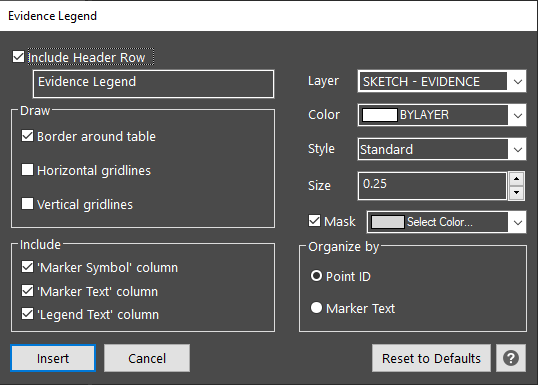
Include Header Row: Select this option to include a label at the top of your legend. Enter the text you would like used for the title. the default "Evidence Legend" is entered for you.
Draw
Draw border around table: This will draw a rectangle border around the table
Draw horizontal gridlines: This draws lines between rows
Include
Include "Marker Symbol" column: Select this to include an image of your evidence marker
Include "Marker Text" column: Select this to include the code added to your marker
Include "Legend Text" column: Select this to include the "Legend Text" defined in the evidence marker dialog
Layer: Set the layer you would like the table drawn on. The default "Evidence Legend" is selected for you. Enter
Color: Set the color that will be applied if you create a new layer for the legend. This will affect the lines and text that is created.
Style: Set the text style that will be used to create the legend
Size: Set the text height that will be used to create the legend
Organize by
Point ID: Orders the evidence markers in the legend in numerical order and alphabetical order based on their point ID.
Marker Text: Orders the evidence markers in the legend in numerical order and alphabetical order based on the marker text.
OK: Closes the dialog and prompts you to position the legend
Cancel: Closes the dialog and creates nothing
Reset to Defaults: The values and options in the dialog will be set back to default
Help: Opens this article
When you select your options and pick "OK" you will be prompted to select a location for your evidence table: