Function
Evidence Report generates a PDF document which compiles all items and all attached files associated with evidence markers. The PDF document options can be configured to customize the appearance of the evidence report.
Procedure
Launch Command and the evidence report configuration dialog will be displayed. Configure your options and select "OK." You will be prompted to set a location and name for your evidence report. Select Save and the PDF document will open in your default pdf file viewer for your review.
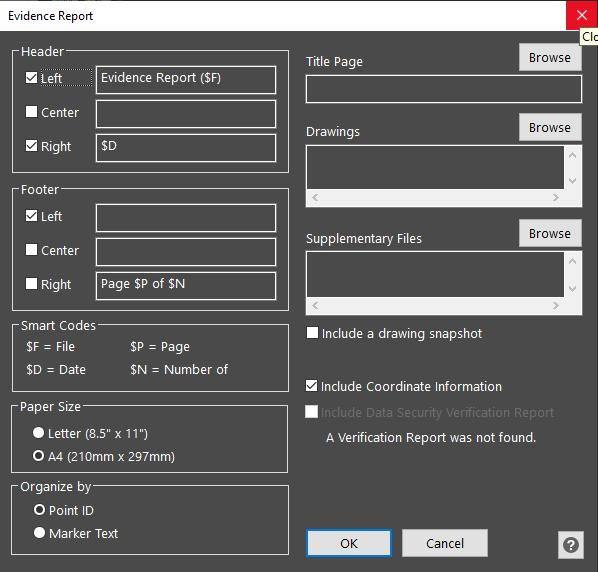
Header
Left: Allows you to set the contents of a left justified entry at the top left of your header
Center: Allows you to set the contents of a center justified entry at the center of your header
Right: Allows you to set the contents of a right justified entry at the top right of your header
Dynamic entries, such as $D (current date) can be specified using "$" entries as explained in the "Smart Codes" section.
Footer
Left: Allows you to set the contents of a left justified entry at the bottom left of your footer
Center: Allows you to set the contents of a center justified entry at the center of your footer
Right: Allows you to set the contents of a right justified entry at the bottom right of your footer
Dynamic entries, such as $D (current date) can be specified using "$" entries as explained in the "Smart Codes" section.
Smart Codes
The Header/Footer dialog allows you to enter both literal text such as your company name or project name, or you can use tokens such as $D (current date) that will be substituted for a value at printing time.
Currently, the following tokens are supported:
$F - Document PDF file name
$P - Current page number
$N - Total number of pages
$D - Current date
Paper Size
Select either Letter or A4 size to be assigned to your pdf file properties
Title Page
(Optional) Select a PDF file that will serve as the title page.
Drawings
(Optional) Select a PDF file of a drawing.
Supplementary Files
(Optional) Select a PDF file containing supplementary information
Include a drawing snapshot
If you select this item, you will be prompted to window a section of your drawing after you pick "OK." The window you select will be included as a snapshot in your report.
Include Coordinate Information
This option allows the user to include coordinate information. If checked, the Point ID, X Coordinate, Y Coordinate, and Z Coordinate will be displayed for each evidence marker.
Include Data Security Verification Report
If your .LGS pointcloud contains a PDF report of the verification of the scan data security, this checkbox will be checked on automatically. In your Evidence Report, that PDF will be included as part of your report.
Otherwise, this option will be greyed out and unchecked.
Organize by
Point ID: Orders the evidence markers in the report in numerical order and alphabetical order based on their point ID.
Marker Text: Orders the evidence markers in the report in numerical order and alphabetical order based on the marker text.
OK
After you select "OK" will will be prompted for:
A window for your drawing snapshot (if required)
A location for your report
A name for your report
Cancel
After you select "Cancel" the dialog will close, none of your options will be saved and no report will be created.
Help
Opens this article
A Note About Organizing your Supporting Files
The preferences you select will be stored for future recall when you create another evidence report. This allows to establish a standardized style for your report for a professional result. Any supporting files, such as title page or a NIST calibration report should be stored somewhere on your computer or network so that they can be accessed any time, not just in your current case folder. Note that only files which are present when they were attached to an evidence marker will be accessible when you generate an evidence report.