This guide explains the import procedure within the best practice registration workflow, with a focus on handling large datasets. It outlines the recommended settings to ensure a quick and straightforward import process and provides instructions for effective data import.
The data used in this workflow was collected with FIELD 360 to pre-align the Setups when dropped into the import area of Cyclone REGISTER 360 PLUS. The same workflow can also be used for the BLK360 data.
Settings Impacting Import
-
Before importing a dataset into Cyclone REGISTER 360 PLUS, go to Settings and adjust the options that affect the import process and can greatly influence the import speed.

Pano Image Resolution
-
In Settings | General | Pano Image, specify the resolution of images.
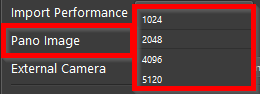
When considering image resolution for import, it’s important to recognize that 5K resolution images will require considerably more time to import compared to 2K or 1K images. A practical solution is to opt for 2K resolution. This choice provides a balance of good quality and manageable file size, ultimately saving you both time and database space.
Import Performance
-
In Settings | General | Import Performance, select the import performance option to set the number of threads used during import.
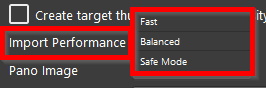
Using the Safe Mode or Balanced option is a reliable choice, as they utilize either a single thread or a balanced number of threads. However, this might increase the import time.
The Fast option can significantly speed up the import process by utilizing the maximum number of threads available, which is beneficial when importing large datasets. However, this setting uses all available CPU cores and RAM to ensure quick completion of the import. Consequently, if you are running other tasks on the computer at the same time, their performance may be affected.
Link Creation Criteria
-
In Settings | Links | Link Creation Criteria, deselect the Apply During Import check box to not apply the specified link creation criteria during import.
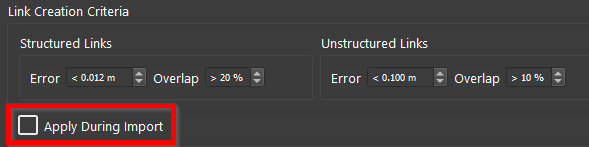
While this option can be beneficial in some cases, it is generally advisable to keep it deselected during import. This allows Cyclone REGISTER 360 PLUS to link all the data as efficiently as possible. If a poor link occurs, it can always be rectified later.
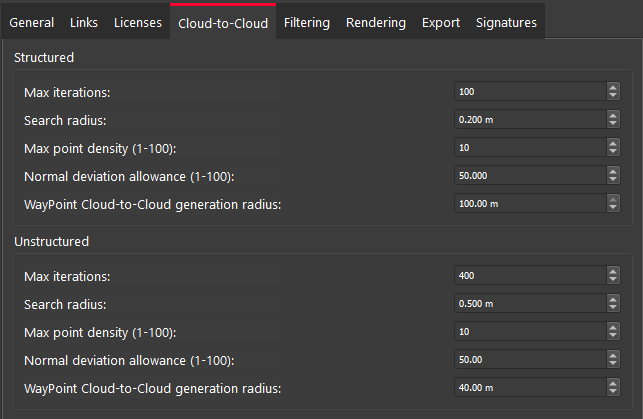
Cloud-to-Cloud Generation
-
In Settings | Cloud-to-Cloud, specify the Max iterations and Search radius values.
The Max iterations setting refers to the number of attempts made to achieve zero convergence. The default value for Max iterations is 400. However, the required number of iterations—whether higher or lower—depends on the type of data you are working with. If there is less overlap or lower point density in your data, you will likely need more iterations to allow the program enough opportunities to find a solution. Keep in mind that increasing the Max iterations will result in longer processing times.
The Search radius determines how much space the program can explore to find matching points in the overlap area of neighbouring point clouds. To optimize the matching process, it might be beneficial to widen the search radius when necessary. A smaller search radius is more suitable for situations that require precision, such as in areas that are uncertain, uneven, or have low density. In these cases, a larger search radius may lead to incorrect matches.
-
In Settings | Cloud-to-Cloud, specify Max point density and Normal deviation allowance. These settings define the number of points included in the algorithm used for Cloud-to-Cloud creation.
The Max point density can be set to 30, which is a good level that covers a wide variety of available Cloud-to-Cloud needs.
The Normal deviation allowance is a parameter that starts at 1, indicating how selective the algorithm is in including points in the cloud. It also measures the accuracy of each point's normal vector, which indicates the direction from which it was collected.
If you find that your scans lack sufficient points in the Cloud-to-Cloud visual alignment area, consider increasing the normal deviation allowance. However, this adjustment is typically unnecessary unless you deal with very noisy or organic environments, such as forests or areas with abundant grass, where more points are needed regardless of their quality.
Prioritize Targets in Cloud-to-Cloud
-
In Settings | Cloud-to-Cloud, select the Prioritize targets in cloud-to-cloud check box if you a high degree of confidence in your targets. If both Cloud-to-Cloud and targets are used during import, this setting ensures that targets are prioritized over Cloud-to-Cloud.

Preparing and Configuring Data for Import
-
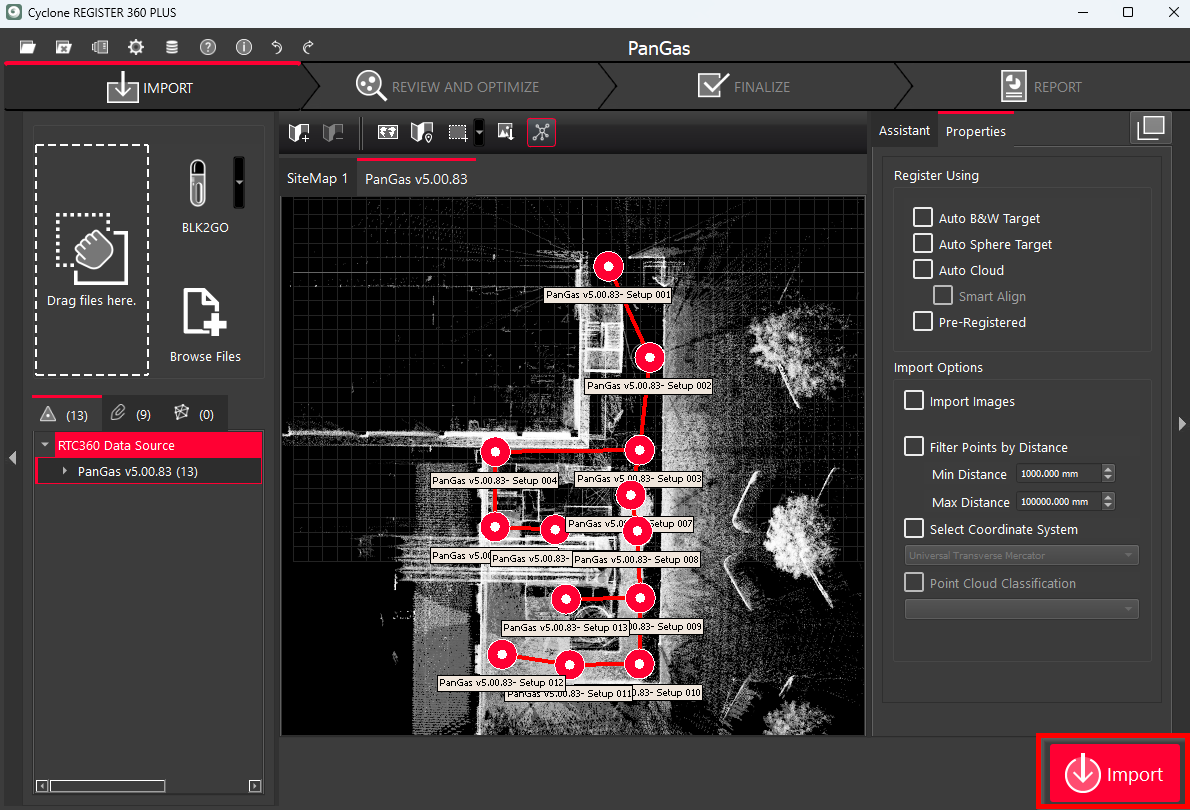
After settings are adjusted, add project data into the import area by dragging files into the import area or browsing to their location and selecting them in the windows explorer.
-
When a dataset is available in the import area, you may represent it according to your needs using the options below:
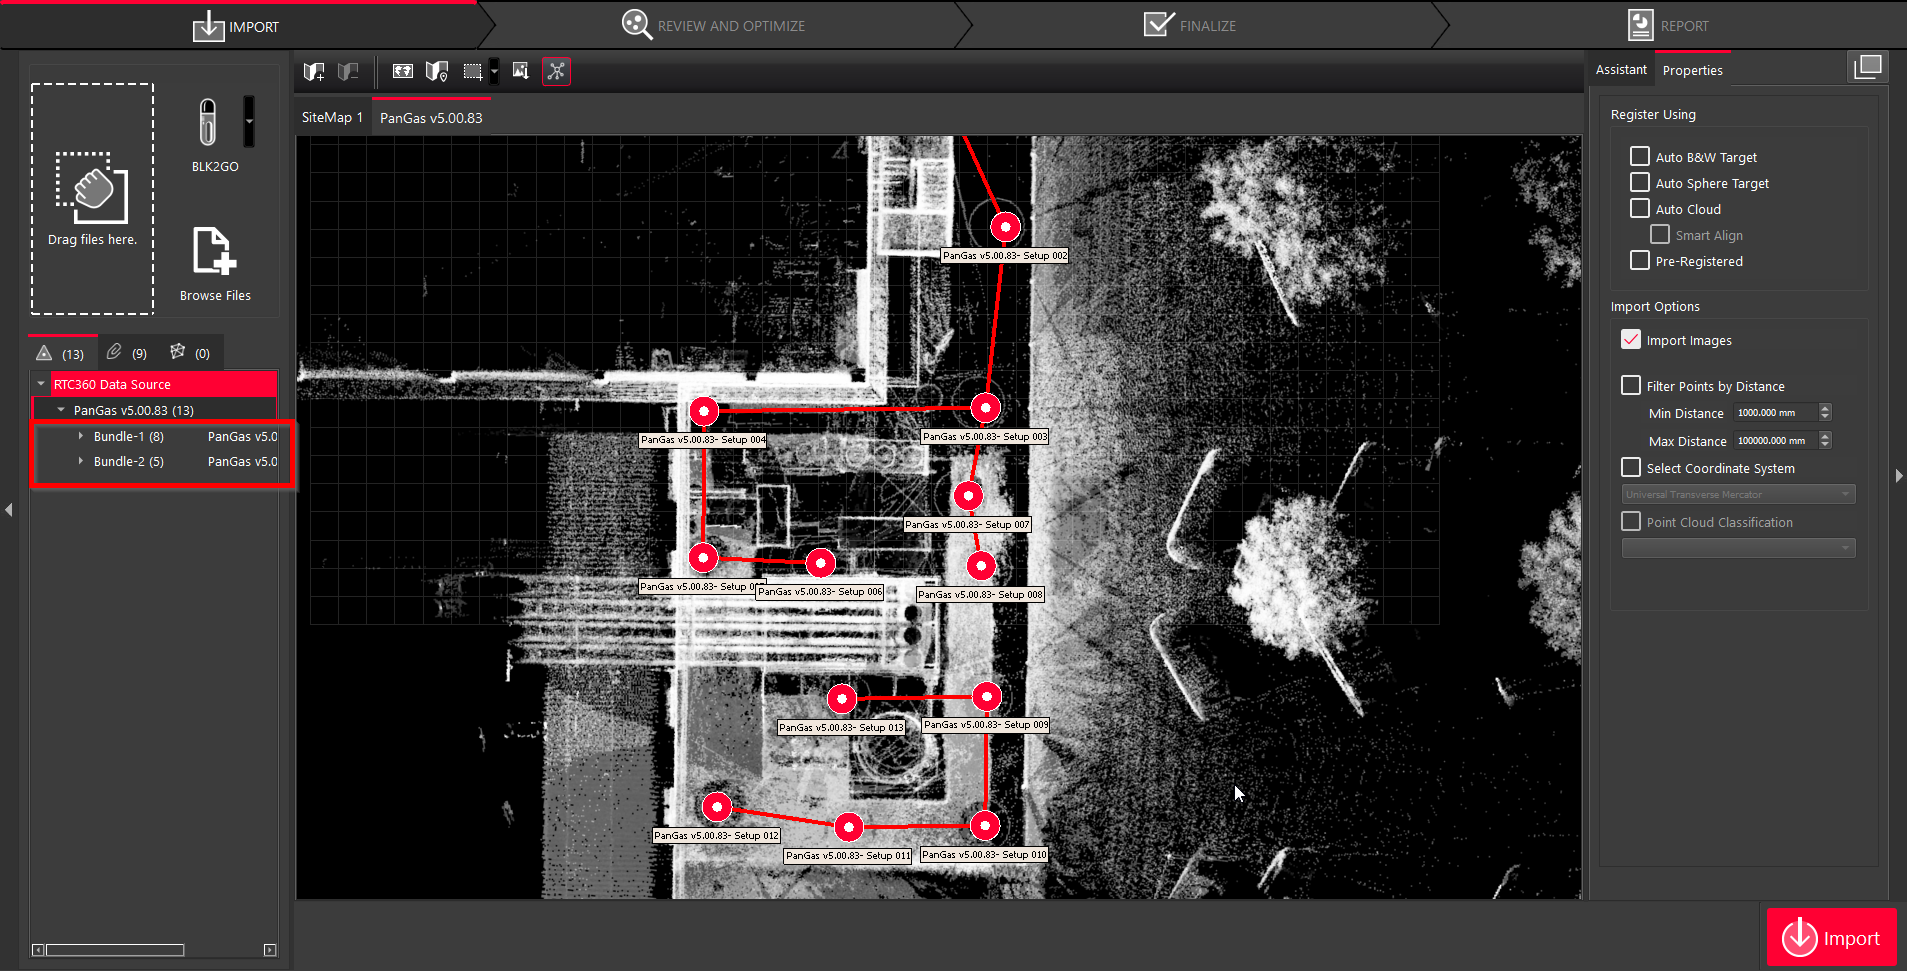
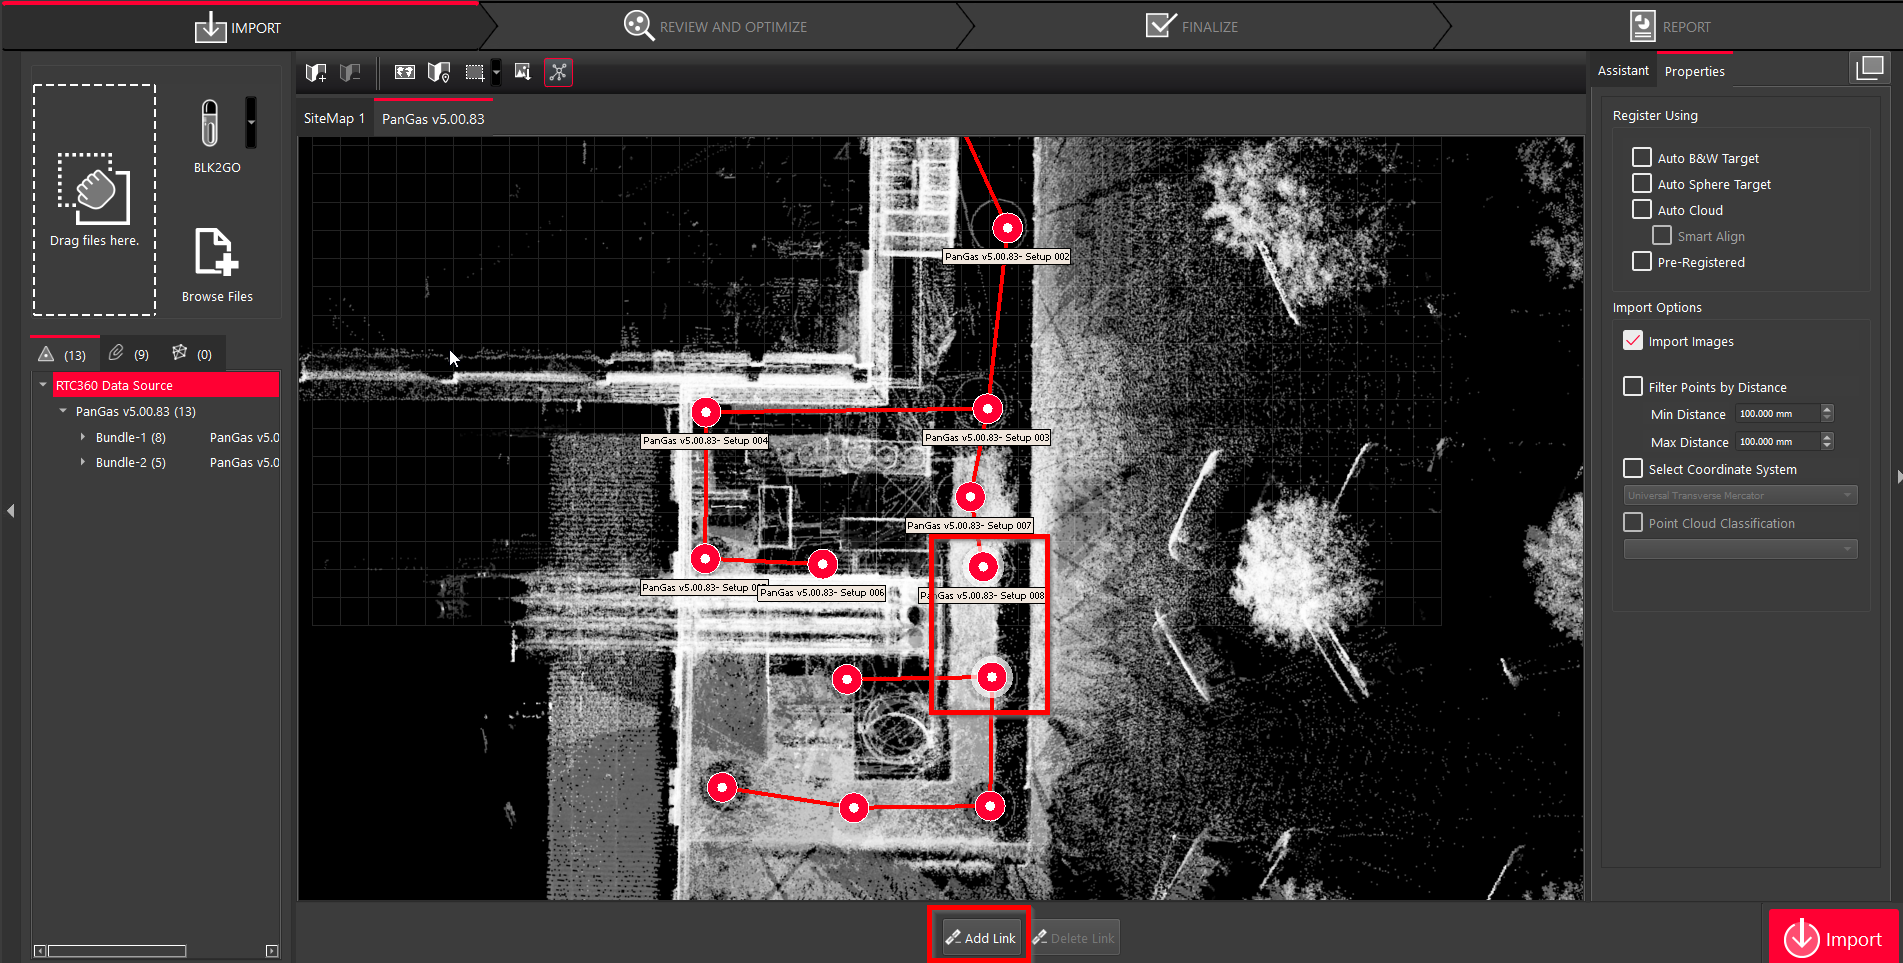
Breaking Up Bundle
9.1. Cyclone REGISTER 360 PLUS will attempt to link all Setups in a project as a single Bundle. To divide a Bundle into two separate Bundles, select a link in the Graphical area and click the Delete Link button that will appear.
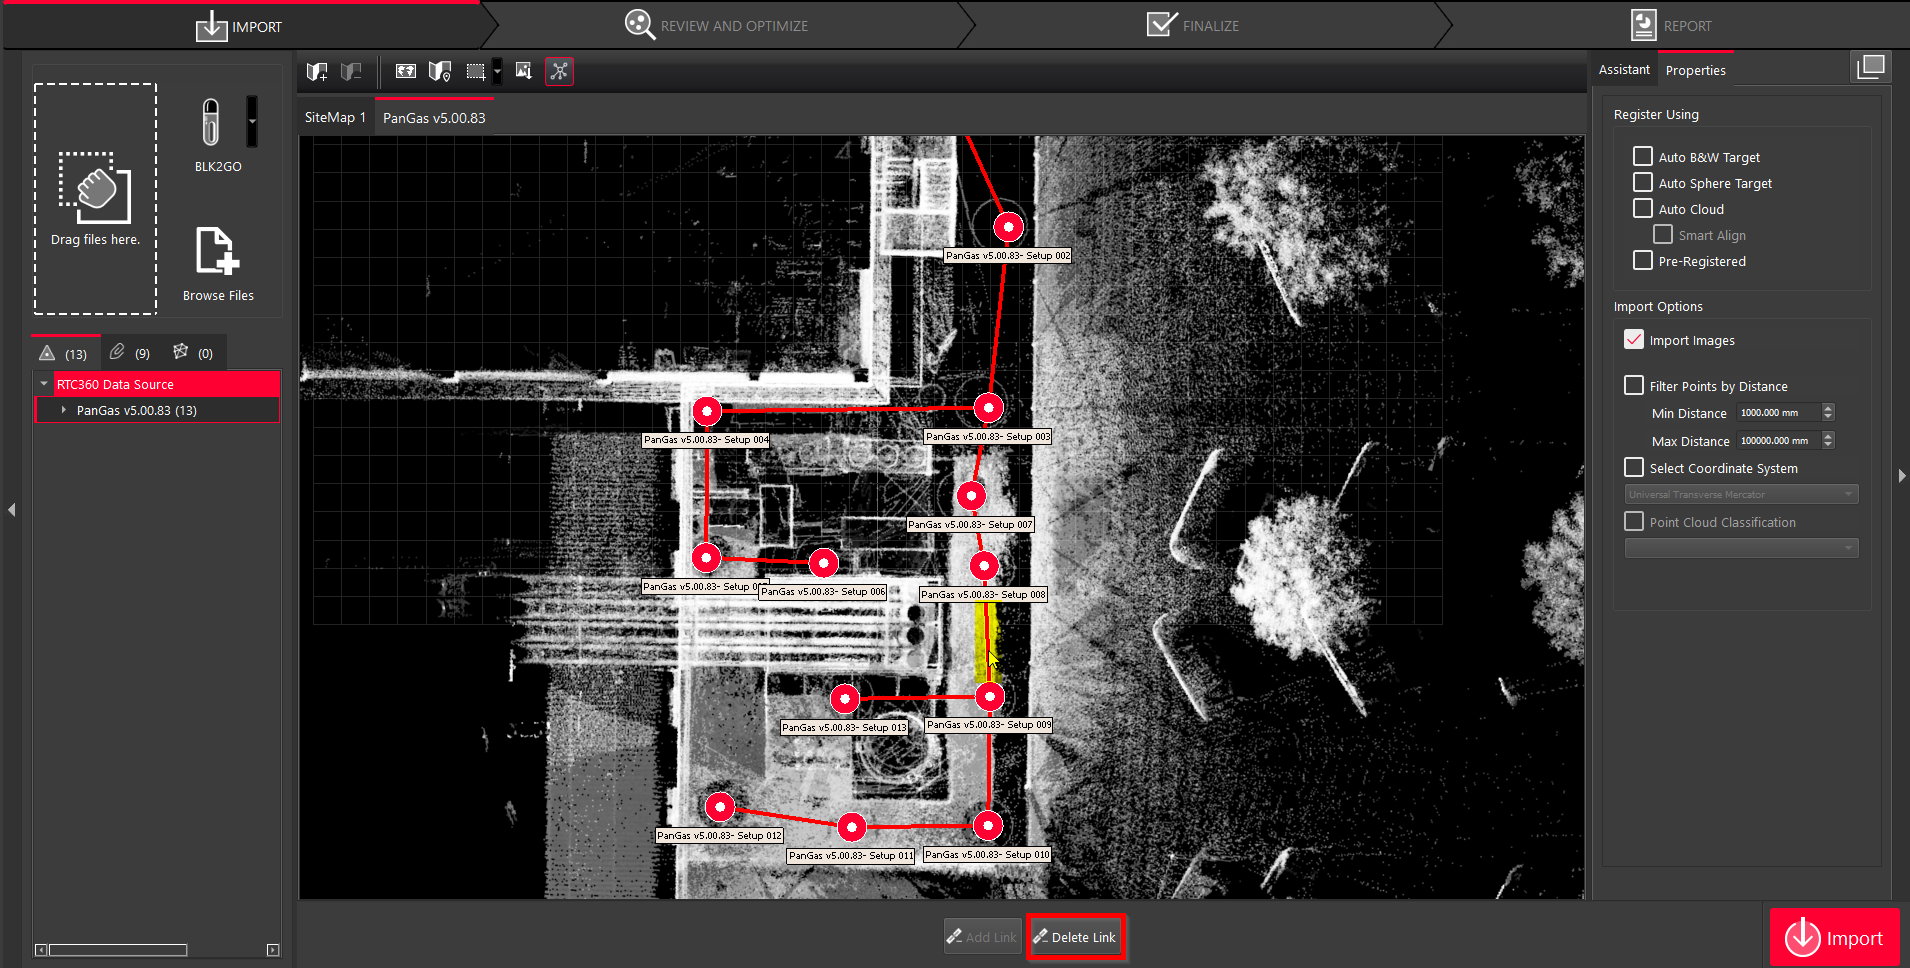
By removing the link between the two subsets of Setups, you will see two Bundles now listed in the import area.
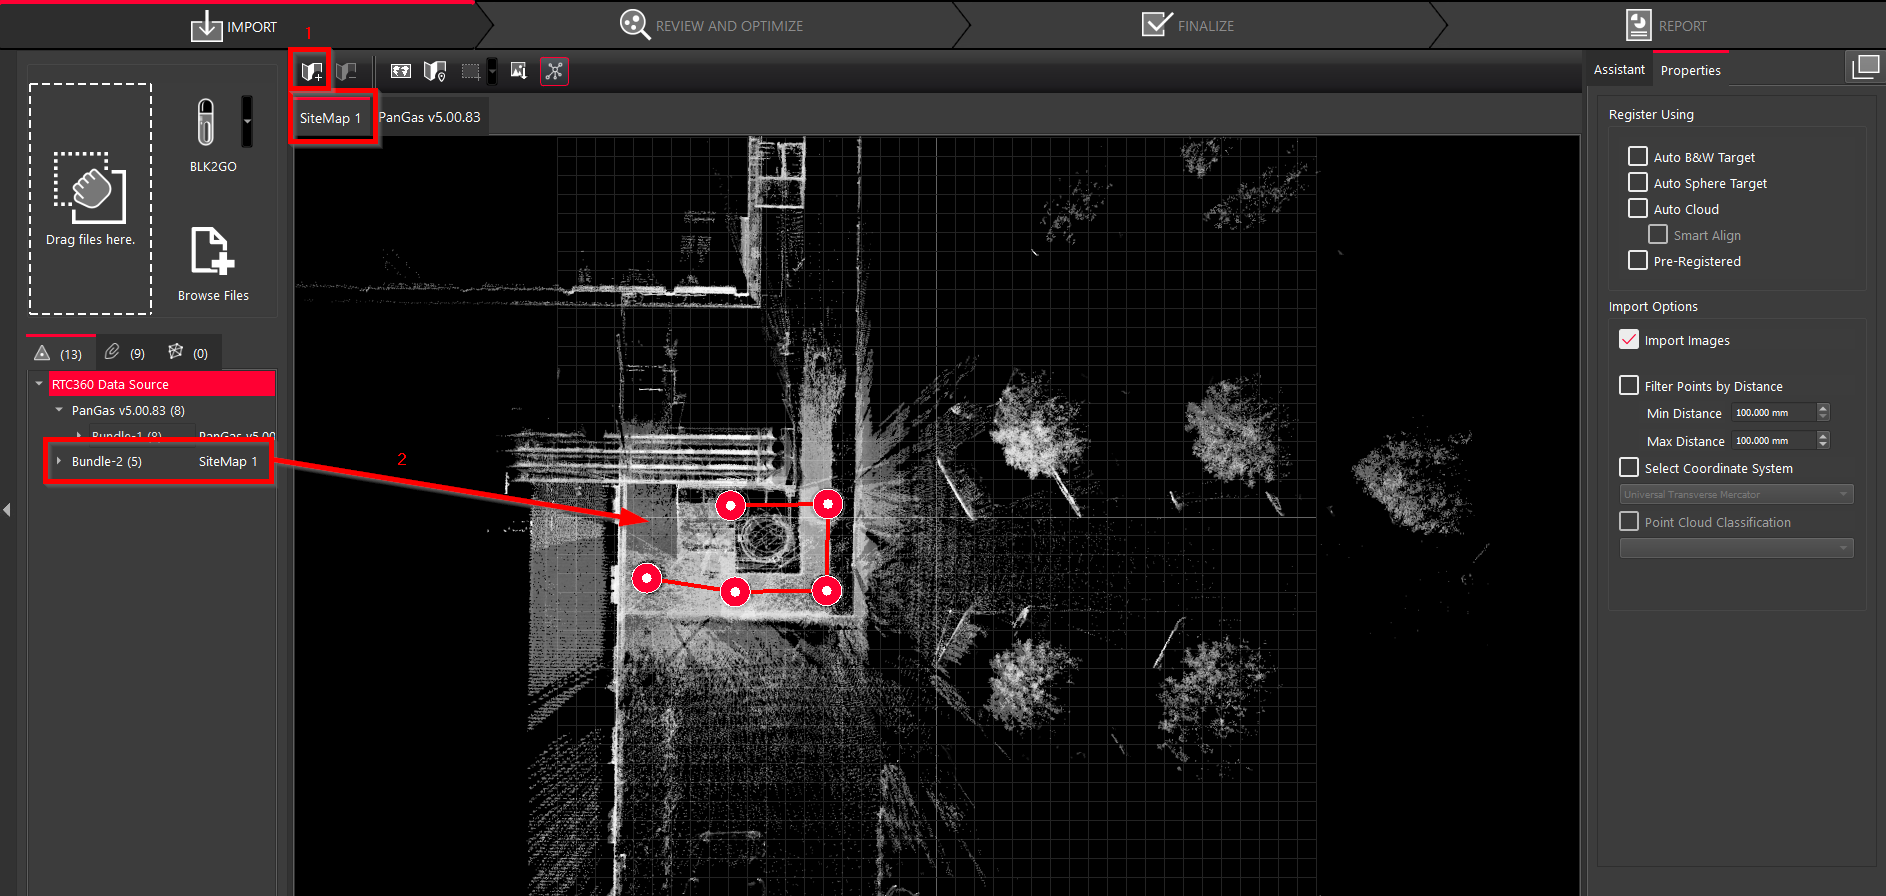
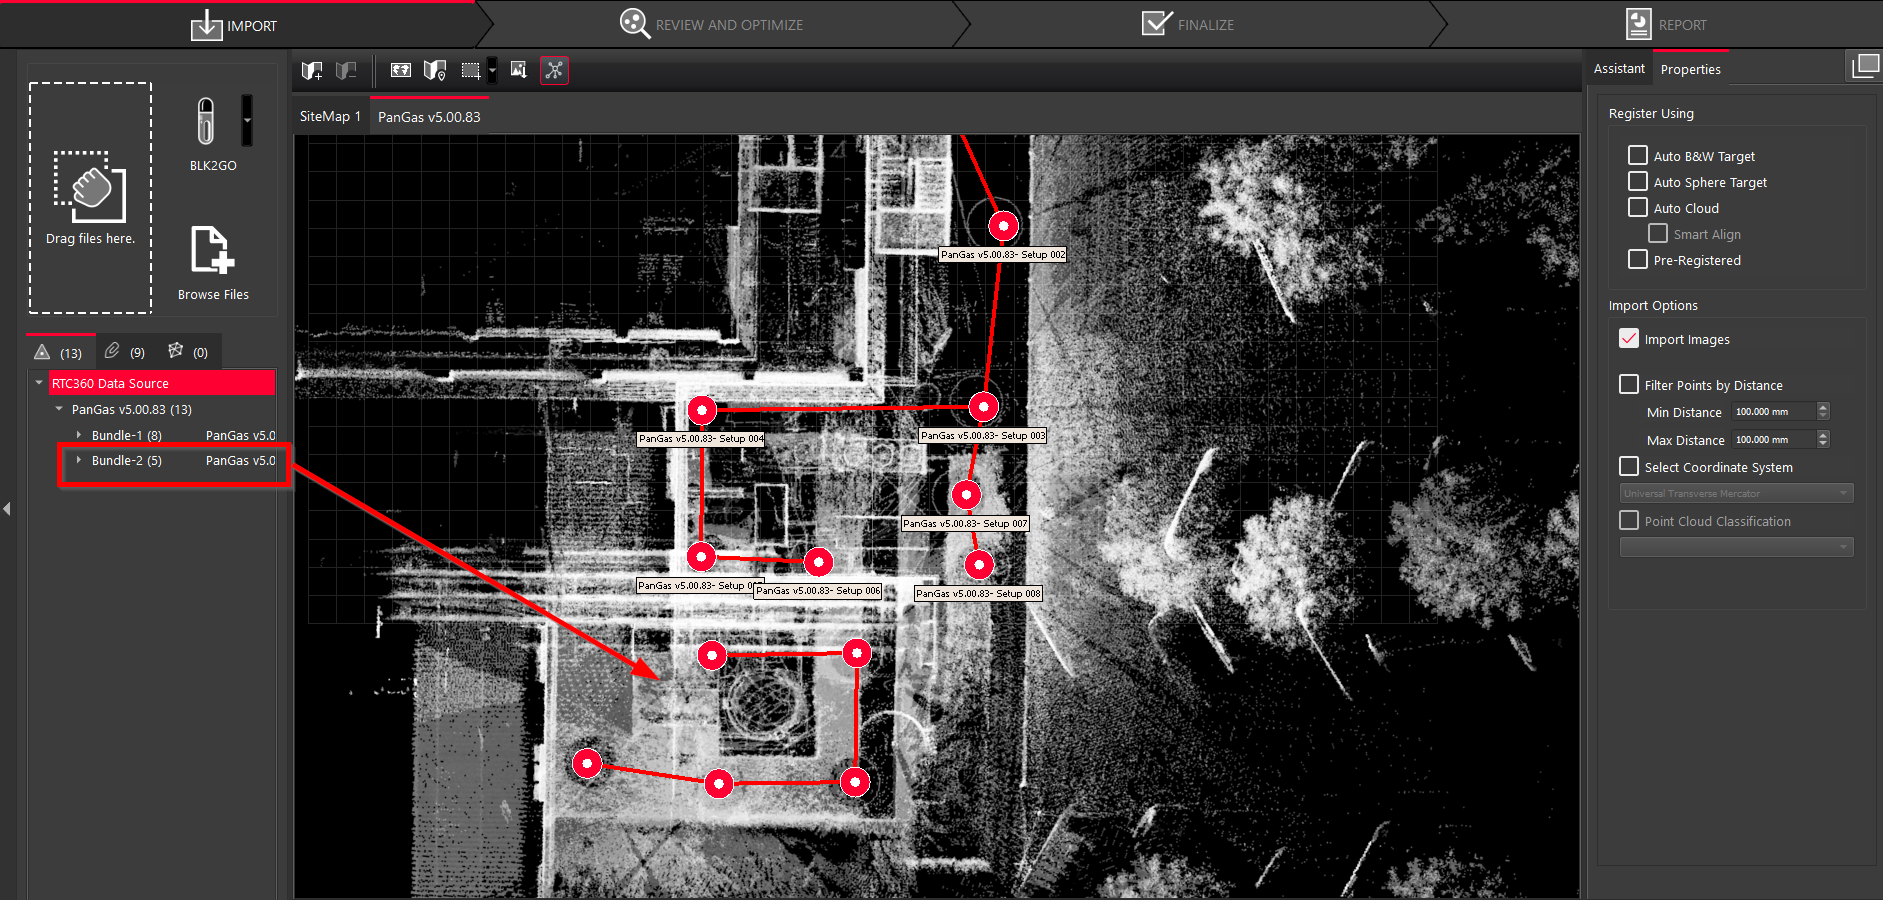
Moving Bundles to Different SiteMaps
9.2. To move a Bundle into another SiteMap, create a new SiteMap by clicking the Add SiteMap button. A new SiteMap will be visible in the import area. Drag and drop the selected Bundle into the new SiteMap.
Combining SiteMaps and Bundles
9.3. To create a single point cloud from several Bundles located in different SiteMaps:
9.3.1. Drag and drop the selected Bundle into the original SiteMap.
9.3.2. If possible, align the Bundles. After that, select two Setups that should be linked and click Add link.
Creating Geo Image
With GPS Enabled
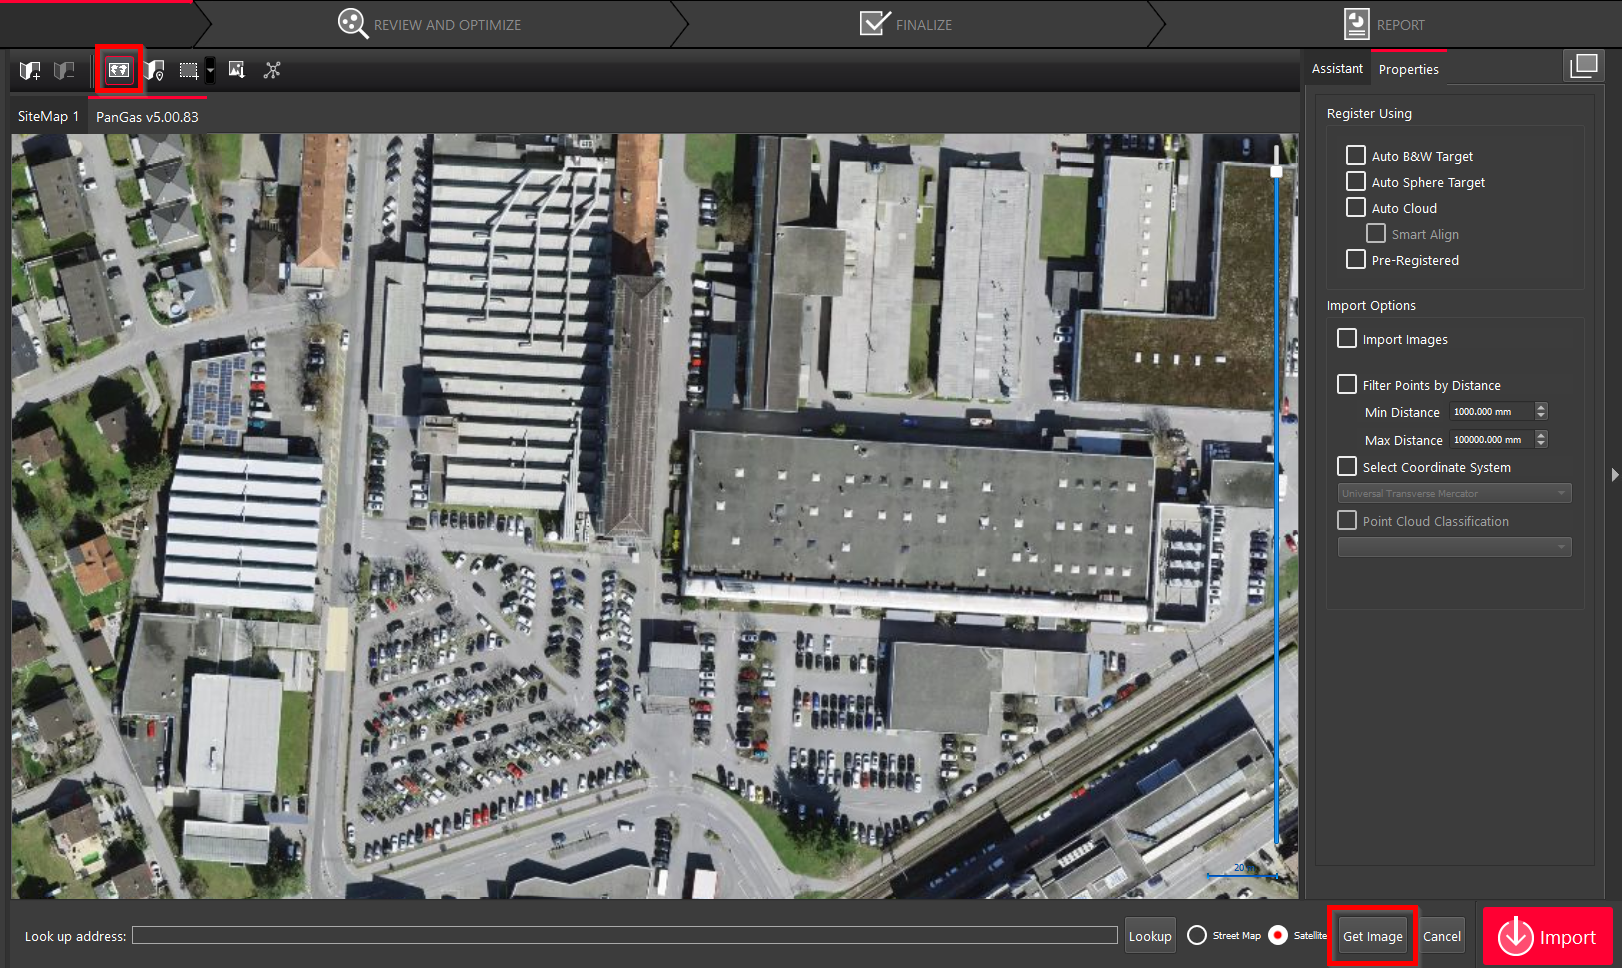
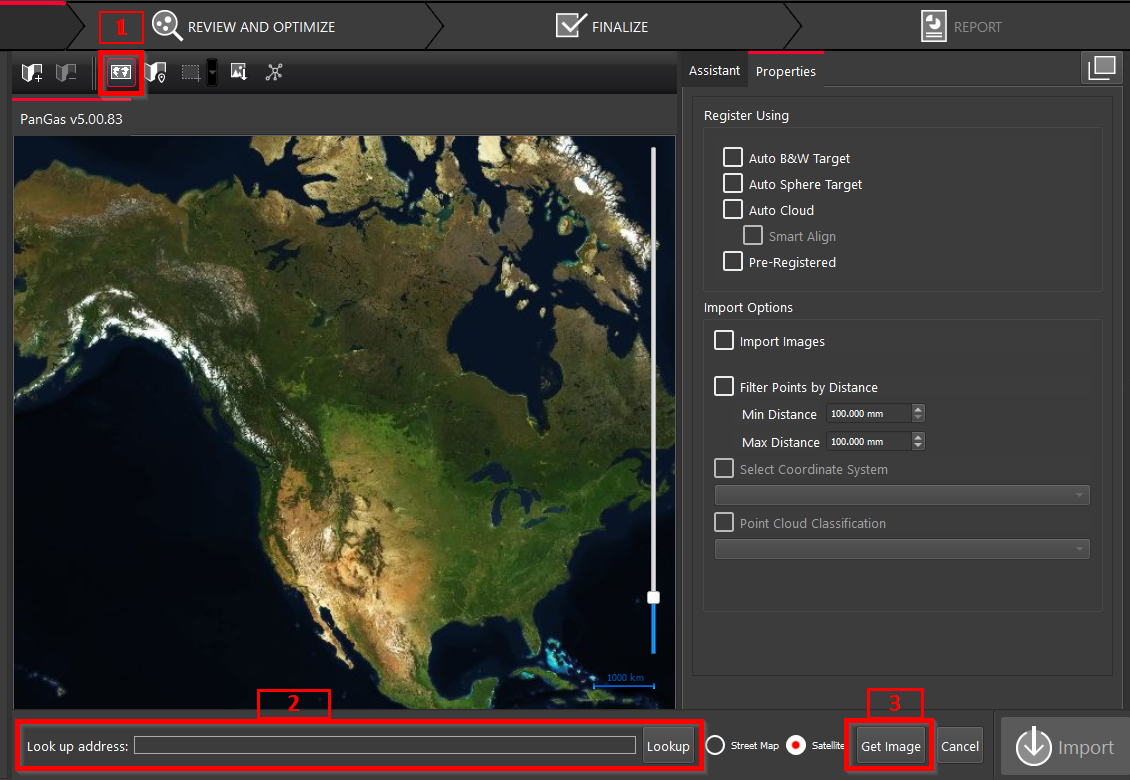
9.4. If a GPS was turned on while capturing data with the RTC360, you can add a geo image from the available map as follows:
9.4.1. Click Show Geo Image Bar to view the map and then click Get Image.
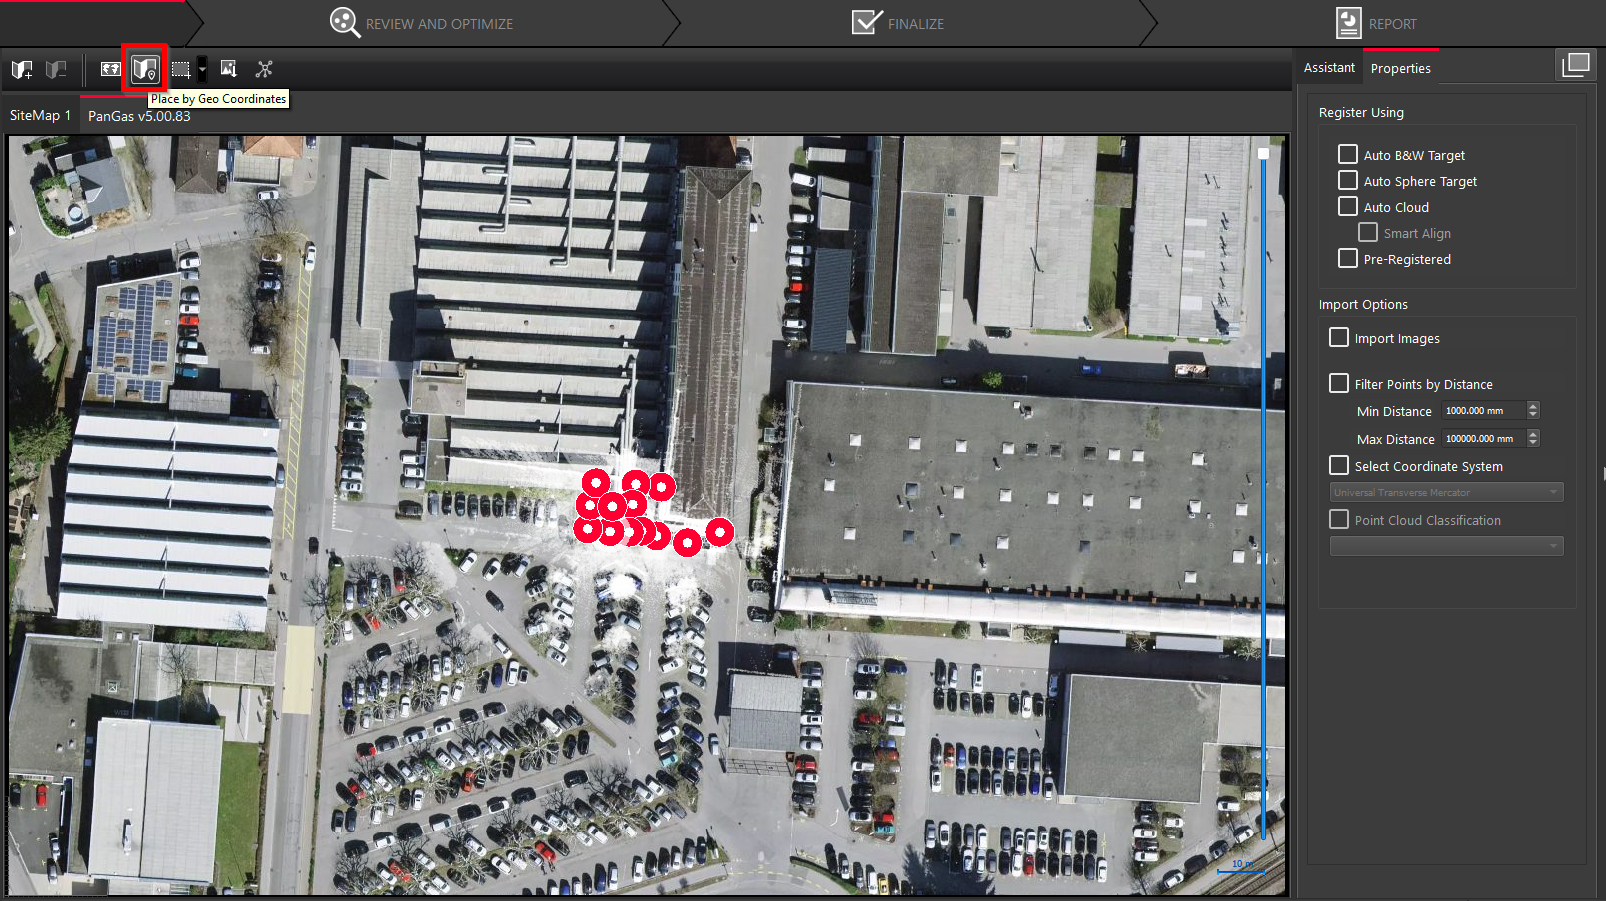
9.4.2. Click Place by Geo Coordinates to insert the data into the area where it was captured.
Without GPS Enabled
9.5. If a GPS was not turned on while capturing data with the RTC360, or a device without a GPS was used, you can add a geo image from the available map as follows:
9.5.1. Click Show Geo Image Bar to view the map, then enter the address or location of the project in the Look up address field and click Get Image.
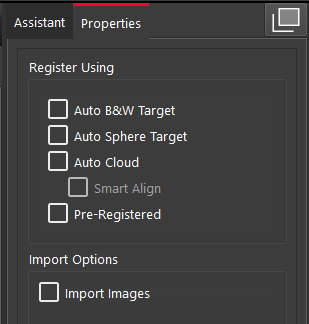
Properties Panel Options
-
In the Properties panel, under Register Using, select the required import options based on the conditions under which the data was captured.
-
Auto B&W Target and Auto Sphere Target options are used for data with targets.
-
Auto Cloud relates to creating relationships between Setups. So, if Setups are already linked, this option should not be selected.
-
Pre-Registered is primarily used for E57 files that are already registered. This occurs when you import separate E57 files that have been registered with another program. Cyclone REGISTER 360 PLUS simply looks up the registration information and imports the registered data.
-
Import Images: It is highly recommended to turn off this option to reduce the import time, especially if you're doing a lot of importing and you want to do a lot of registration right away. You can import images later post import.
Note: Since all Setups are already linked, no options under Register Using should be checked.
If you want Cyclone REGISTER 360 PLUS to import the Setups exactly as they are, without moving them, select Pre-Registered. This will ensure you have the same Bundle as on the FIELD 360 tablet.
Importing Data
-
Once the settings are adjusted and the dataset is verified, click Import to bring it into Cyclone REGISTER 360 PLUS and move to the Review and Optimize step.
Summary
To maximize the efficiency of importing large datasets and keep the registration manageable:
-
Aim for Bundles of no more than 50 scans.
-
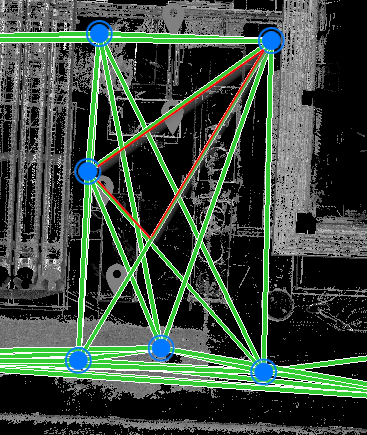
Start off with a minimum spanning tree, avoid importing loops.
-
Minimum spanning tree is a set of Setups connected with the minimum required number of Links that do not intersect with each other.

-
Loop is a set of Setups connected by multiple Links that may intersect, forming triangles.
-
-
Create a project version in the Version Manager immediately after import.