revit
Fitters | Wall
The Wall fitter allows creating walls in 3D in a semi-automated fashion to speed up the modelling process. This fitter supports vertical or slanted walls of varying thicknesses.
Using the Tool
To fit a wall, follow the steps below:
-
Click the Wall icon in the Fitters panel.
-
The Fit Wall dialog will appear.
-
-
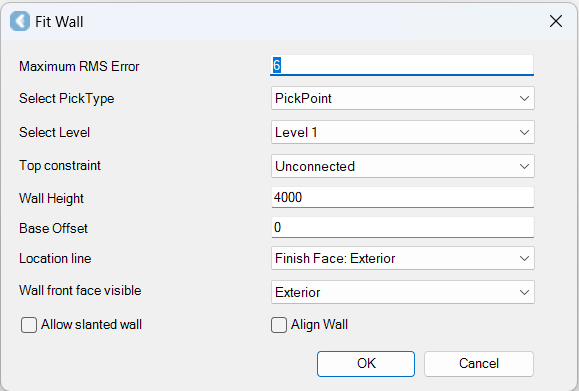
In the Fit Wall dialog:
-
In the Maximum RMS Error field, specify a maximum allowable error for the fit.
-
In the Select PickType field, select a desired PickType.
-
In the Select Level field, select a level to set as the lower plane for fitting the wall. Levels are set within a Revit drawing prior to inserting modelled objects. Please refer to Revit help for instructions on setting levels.
-
In the Top constraint field, select a top constraint to define the upper plane for fitting the wall.
-
In the Wall Height field, specify the height of a wall.
-
In the Base Offset field, specify the base offset.
-
In the Location line field, select a location line that corresponds to the precise point on the scanned wall to which the wall should be matched.
-
In the Wall front face visible field, specify whether the wall's visible side faces the outside or the inside of the structure.
-
If you believe that the wall you are fitting to is slanted (a wall is considered slanted if it exceeds a 5-degree tilt between two levels), select the Allow slanted wall check box.
-
Click OK.
-
-
Pick a point on the point cloud to grow a wall.