AUTOCAD PRO REVIT bricscad pro ULTIMATE
Fitters | Patch
Command Line
-
AutoCAD / BricsCAD: CWFITPATCH
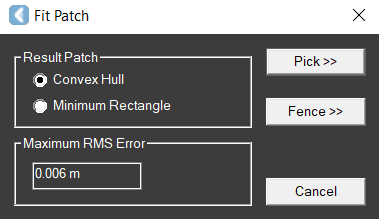
This command opens the Fit Patch dialog, which best fits a patch from one or more pick points in the point cloud.

Using the Tool
To fit a patch by selecting a cloud point:
-
Either click the Fit Patch button in the Fitters panel or type a command line prompt specific to the preferred CAD system and press ENTER.
-
The Fit Patch dialog appears.
-
-
Select the Result Patch options to determine the shape of the patch:
-
Convex Hull produces a convex polygon that surrounds the points.
-
Minimum Rectangle produces a rectangle with the minimum surface area that surrounds the fit points.
-
-
Click the Pick button, then pick a point on the cloud.
-
The patch will be fitted using the points in the region that best define a planar surface, and the results will be displayed.
-
If the fit quality does not meet the Maximum RMS Error, the fit will be rejected.
-
-
Continue picking points for each patch that needs to be fitted, and then press ENTER.
To fit a patch via a fence:
-
Follow Steps 1-2 described in the To fit a patch by selecting a cloud point section.
-
Click the Fence button.
-
To change the type of fence to be drawn, type POLYGON, CIRCLE, or RECTANGLE at the CAD command line and press ENTER.
-
-
Draw a fence.
-
The patch will be fitted using the points within the fence, and the results will be displayed.
-
If the fit quality does not meet the Maximum RMS Error, the fit will be rejected.
-
-
Continue drawing fences for each patch you want to fit, and then press ENTER.