2025.0.0 | Cyclone REGISTER 360 Release Notes
What’s New
The 2025.0.0 version is a major release of Cyclone REGISTER 360 PLUS packed with powerful new features and improvements, such as
Enhanced support for mobile data, enabling numerous capabilities for managing Tracks and WayPoints.
Granular support for unstructured clouds to make them easily identifiable from structured data.
Publishing point clouds in vivid colours.
Support for Cyclone FIELD 360 survey workflow for RTC360, BLK360G1, and BLK230G2 targets and georeferencing.
Introduction of Target Pole and Target at Setup positions workflows.
Improvements in point cloud consolidation and upgraded back-end dependencies for smoother performance.
Support for nested registrations enabling the creation of unified point clouds in the Review and Optimize area, and many more.
Additionally, this release presents enhancements to the program settings, capabilities for multi-version installations of Cyclone REGISTER 360 PLUS, exposed project names in Windows Explorer, and numerous bug fixes.
IMPORTANT:
Please make a backup from the projects that you intend to use in older versions.
Importing LGSx files from Cyclone REGISTER 360 PLUS 2025.0.0 that contain Track data (mobile trajectory data) is not supported in TruView Enterprise and TruView Cloud.
Granular Support for Unstructured Cloud
New User Experience for Unstructured Cloud
In this release, Cyclone REGISTER 360 PLUS improves the user experience for support of Unstructured Setups. The program now uses different visualization for unstructured data to make is easily identifiable form the structured data. The following table list the Cyclone REGISTER 360 project components, including the revised definition and new icons for Unstructured Setup, Track, and WayPoints.
Icon | Object | Description | Level |
 | SiteMap | A mandatory top-level container. | L0 |
 | Bundle | A group of connected Setups by Link. | (L1) |
 | Structured Setup | A standalone data unit of structured point cloud data. | L1 |
  | Unstructured Setup | A standalone data unit of unstructured point cloud data. A Track Setup is a standalone data unit of editable data from BLK kinematic mobile scanners; it is a type of unstructured point cloud data. | L1 |
 | Uneditable Track | Uneditable mobile data that is included in an Unstructured Setup. | L2 |
 | WayPoint | A panoramic viewpoint in a Setup. A WayPoint (WP) can exist within structured or unstructured Setups. If it is associated with mobile data, it is called a Track WP. | L2/L3 |
 | Link | A 1:1 connection can be established between two Setups. Links can be formed between Setup-to-Setup, Setup-to-WP, and WP-to-WP within the two identical Setups. | L2/L3/L4 |
Examples of Structured and Unstructured Setups
| Structured Setup | Unstructured Setup |
Project Panel |  |  |
SiteMap View | 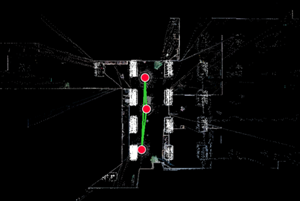 | 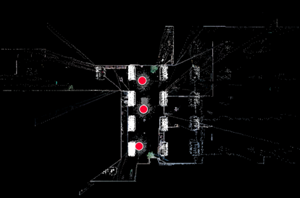 |
Bundle View (coloured by Setup) | 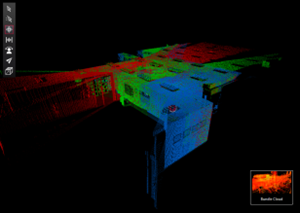 | 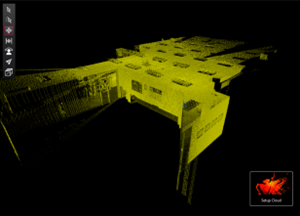 |
Separated Settings for Unstructured Data
With the latest update, separate Cloud-to-Cloud and Links metrics for structured and unstructured have been introduced in Cyclone REGISTER 360 PLUS Settings. This enhancement addresses the unequal quality requirements and metrics for structured vs. unstructured point cloud data.
Structured point cloud can support more strict criteria for minimum overlap and maximum error to achieve highly accurate Link using Cloud-to-Cloud registration. However, unstructured point cloud data may require different thresholds and different requirement to be considered optimal Cloud-to-Cloud link results.
Cloud-to-Cloud Settings: Settings provide options to modify the parameters for Cloud-to-Cloud registration algorithms for structured and unstructured point cloud data. The options include max iterations, search radius, max point density, normal deviation allowance, and WayPoint Cloud-to-Cloud generation radius.
Links Settings: These settings are optimized for unstructured point cloud data, providing the necessary flexibility to handle varying overlap and error criteria effectively.
Refer to the Changes to Application Settings section for more details.
Unified Point Cloud Creation
Cyclone REGISTER 360 PLUS provides a feature that allows the creation of a single unstructured Setup from an existing Bundle. This is particularly useful for large or complex projects, such as multi-day scans or projects with multiple teams, as it helps keep everything organized and manageable.
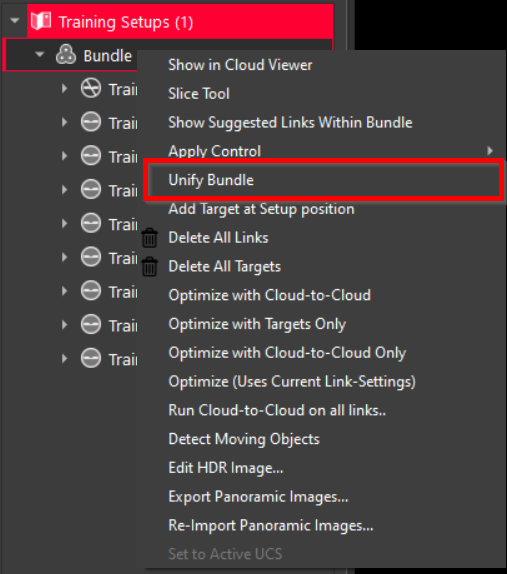
The Unify Bundle command is accessible from the Review and Optimize area and provides the following Unified Cloud options:
Reduce the point cloud by resampling at desired gridded distance.
Include the depth image at the exported Setups to allow measurements in downstream applications.
Workflow of Creating a Unified Point Cloud in Cyclone REGISTER 360 PLUS
Right-click the selected Bundle and choose Unify Bundle from the context menu.
In the Unified Cloud Options dialog, choose the desired Unified Cloud option.
A new unstructured Setup will be created that includes the point cloud, where the Setups from the Bundle will be converted to WayPoints, and the data will be in a single unified cloud (without the Links).
As a best practice, move it to a new SiteMap where you can Link the unstructured Setup with other data.
Feature Benefits
Complex projects: Ideal for projects with multiple stages, such as multi-day scans or different sections of a site, allowing better management and tracking of progress.
Large projects with too many Setups: Helps handle very large projects by splitting them into sub-projects, reducing processing times, memory usage, and network instability.
Error management: Keeps different stages separate to prevent errors from propagating through the entire project.
Efficiency: Optimizes data storage and speeds up the Finalize and Report steps, making the creation of the finalized registration cloud faster.
Use Cases
Use Case 1
Consider a multi-day scanning project with extensive scanning done each day. The Setups for Day 1 can be bundled together after quality checks to ensure the registration quality. Now that data for Day 2 will continue the work from Day 1. Once collected, the data can be imported and connected to the Bundle formed on Day 1.
While there are benefits to keeping the structured Setups and Bundle, there might be limitations as well. For example, it can be difficult to track project progress based on one Bundle or to separate a specific day to identify an issue or locate a markup. This can be achieved using SiteMaps, but this approach may not be suitable for certain workflows. Additionally, if there is an issue in one of the Links created on Day 2, the error from that Link will propagate to the entire network, including the Day 1 Links that were QA’ed and verified.
In such cases, the project manager may want to keep Day 1 separate and once verified, create a unified cloud for the entire Bundle. Then, the same procedure can be followed for Day 2, and so on, to form a new Bundle with the unified cloud for multiple days.
Use Case 2
Consider a Project is very large and contains many Setups (e.g., 2000), which can lead to long processing times, high memory usage, network instability, and potential data loss or corruption. One simple approach is to split the project into sub-projects, use the Unify Bundle for each subproject, and then form a new large Bundle for the project that connects the subprojects. This way, the stability and accuracy of the project are ensured in subprojects, and then a final Bundle can be formed while addressing some of the major limitations of supporting a large number of Setups.
Point Cloud Consolidation and Improved Project Back-End Dependencies
The latest update to Cyclone REGISTER 360 PLUS introduces substantial improvements in point cloud consolidation and optimization for back-end project dependencies. These updates are designed to streamline workflows, ensure accuracy, and improve the user experience. Specifically, this large effort has resulted in:
Enhanced Cloud-to-Cloud Registration: Optimized back-end project dependencies for improved Cloud-to-Cloud registration and visual alignment processing.
Default Settings for Structured and Unstructured Data: Modified and improved the default Cloud-to-Cloud settings, which are now separated for Structured and Unstructured data to ensure optimal quality for each data type. All settings are adjustable, offering greater flexibility and control over the process. For details, see Cloud-to-Cloud Settings for Structured and Unstructured clouds.
Refined Registration Algorithm: The normal deviation allowance has been updated with a new attribute to enhance Cloud-to-Cloud registration and point smoothness calculation. Point density is now calculated on a linear percentage basis, simplifying the adjustment of density levels. As a result, modifying the Max Point Density and Normal Deviation Allowance settings can significantly impact the Cloud-to-Cloud algorithm, offering greater flexibility in achieving desired results.
Robust Point Cloud Cleaning Masks: Enhanced management of cleaning masks, which are now stored per Finalized Registration and honored upon publishing from existing Finalized Registrations. This improvement makes point cloud cleaning more robust and less prone to issues. Consequently, every time the Finalized Registration is created in the Report area, it looks completely unique.
Faster Imports: Reduced project file dependencies allow for quicker import times and optimized project sizes. Cyclone REGISTER 360 PLUS no longer creates BIN files, which were previously used for Visual Alignment. Instead, the HSPCA files are used for Visual Alignment and exporting, streamlining the process. Additionally, since the HSPCA files now contain all gridding information, they are also used for exporting structured data.
Improved Backup and Repair: Enhanced processes for more reliable backups and repairs.
Better Scan Data Handling: Improved management of main scans and sub-scans, such as detailed target scans in the P-series.
User-Facing Differences: Unlike older versions, which used two separate point clouds for visual inspection and Visual Alignment, version 2025.0.0 now uses a single cloud for both purposes. This change simplifies the process on the back end of Cyclone REGISTER 360 PLUS, making it more efficient.
IMPORTANT: This update introduces changes that affect backward compatibility. Cyclone REGISTER 360 PLUS version 2025.0.0 uses point cloud registration components that are not compatible with older versions of the product. Please review these changes to avoid any disruptions in your workflow.
Cloud-to-cloud registration and Visual Alignment for new projects created in version 2025.0.0 are not available in older versions.
Cloud-to-cloud registration edits made to existing projects in the 2025.0.0 version will not be reflected if opened in previous versions.
Point smoothness is only added to data imported into version 2025.0.0. For older projects, the workaround is to export the Setups after registration to E57, then reimport them, and replace the existing Setups. This process will enable the smoothness function for those Setups.
In summary, projects edited or created in version 2025.0.0 can only be viewed or published in older versions of the product.
Improved LGSx Import
Substantial improvements have been made to LGSx import. With optimized back-end project dependencies, importing an LGSx file is now considerably faster. This enhancement is a result of the point cloud consolidation effort, which makes Cyclone REGISTER 360 PLUS and LGSx project content more similar. This similarity allows certain parts of the data to be copied or moved from LGSx into a Cyclone REGISTER 360 PLUS project without the need for conversion or re-processing of project components.
Classification Viewer Updates
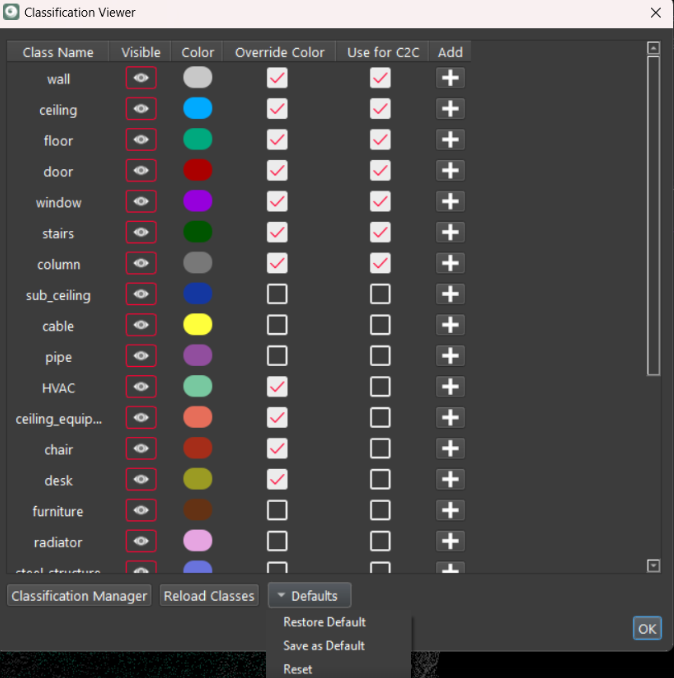
Users can now choose whether to use the classification for Cloud-to-Cloud (C2C) registration in the Classification Viewer. This can be done by either selecting or deselecting a specific class in the Use for C2C column. If the class is deselected, it will be excluded from C2C registration. The best way to test this functionality is to create a link in Visual Alignment. The deselected cloud will not be displayed in Visual Alignment cloud pairs and will not be used for registration.
The Defaults drop-down list is added with options allowing to either save a selected combination of Override Color and Use for C2C as default (Save as Default), restore the stored defaults (Restore Default), or reset to factory settings (Reset).
The Update Cloud-to-Cloud button is removed as redundant.
Vivid Colours Introduction
The Apply Vivid Colors to Point Cloud Option
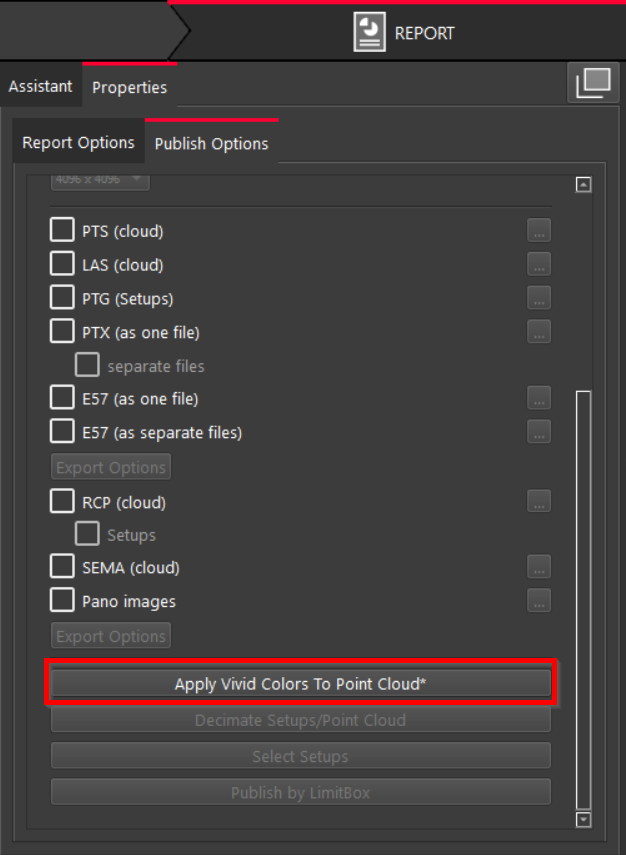
Aimed to enhance the visual quality of point clouds, the Apply Vivid Colors To Point Cloud option is now available among Publish Options of the Properties panel in the Report area. When enabled, it allows publishing point clouds in vivid colours, resulting in more photo-realistic visualizations.
Constraints for Vivid colors:
The feature does not support any unstructured data, such as BLK mobile or MMS.
It cannot be applied to the already created point cloud in a Finalized Registration.
It supports creating a candidate registration with static data (i.e. RTC360 and so on). As a result, the created point cloud will be in vivid colours with the Apply Vivid Colors To Point Cloud option enabled.
If the registration is a combination of static and mobile data, it will only apply vivid colours to the static scans.
Note: When the option is activated, you will notice an asterisk (*) at the end of an option name.
Finalized Registration View Options
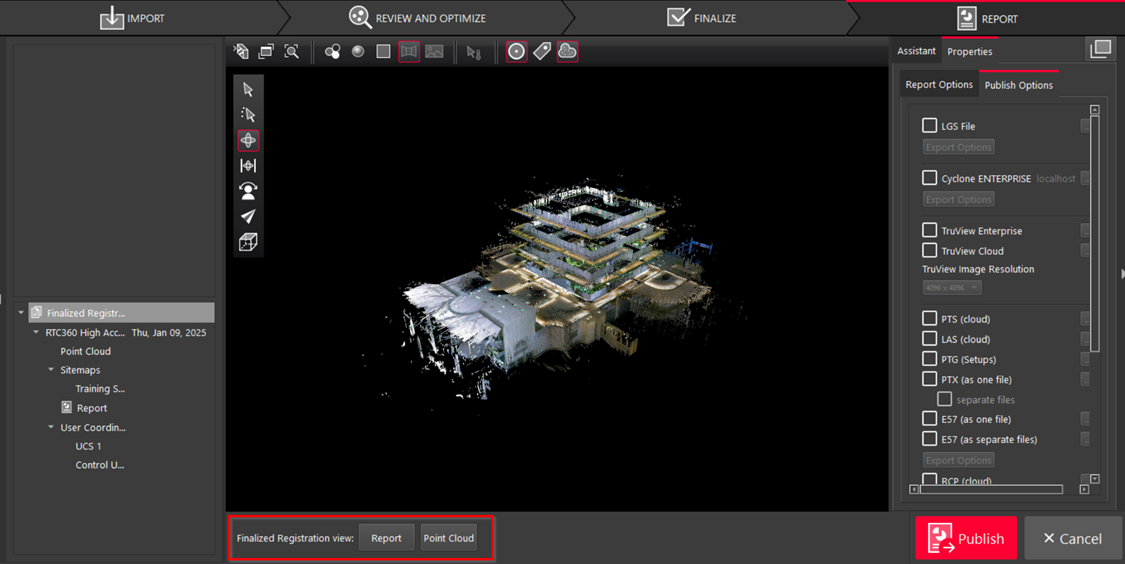
To facilitate quick navigation between the registration report and the corresponding point cloud in Finalized Registration, the Report and Point Cloud buttons are now available in the Report area, ensuring swift and seamless access to the desired view.
New Option for Inclusion of Unused Targets in Reports
The Include unused Targets option is now available among the Report Options of the Properties panel. This option allows you to decide whether to include deactivated targets in your reports when publishing a Finalized Registration. When enabled, all targets, including those that are not in use, will be included in the report. If disabled, the unused targets will be excluded from the report.
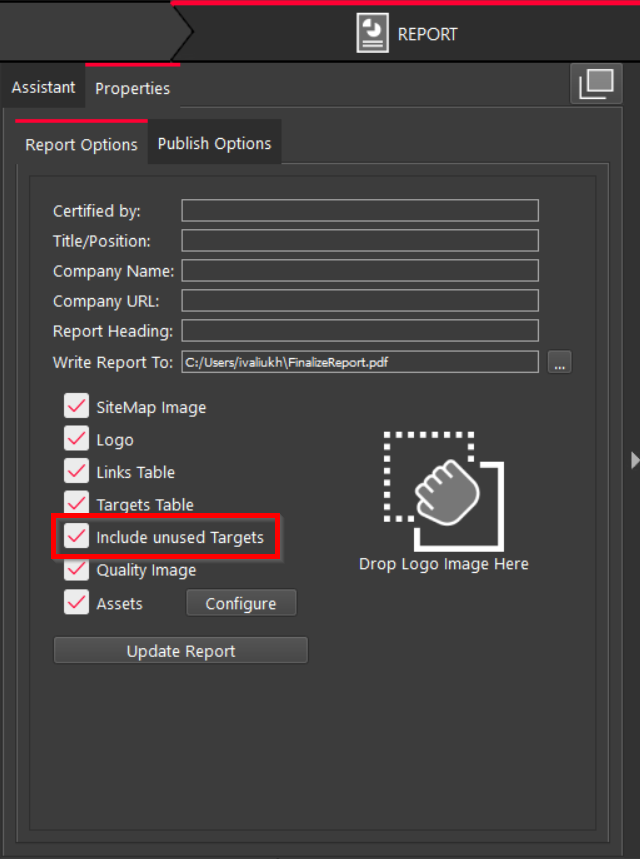
Changes to Application Settings
A series of improvements have been implemented to enhance the Cyclone REGISTER 360 PLUS settings.
The Add Target at Setup Position Option
The Add Target at Setup position option is now available on the General tab in Settings. This command supports adding a target to the Setup position during data import. For Setups of structured or gridded scans, the target will be placed at the scanner position. For Setups of unstructured or non-gridded scans, the target will not be added.
To add targets after the data is imported, the Add Target at Setup position option can also be accessed from the context menu of a Bundle or a Setup. If selected for a Bundle, targets will be added to all Setups within the selected Bundle. If selected for a Setup, a target will be added to that specific Setup.
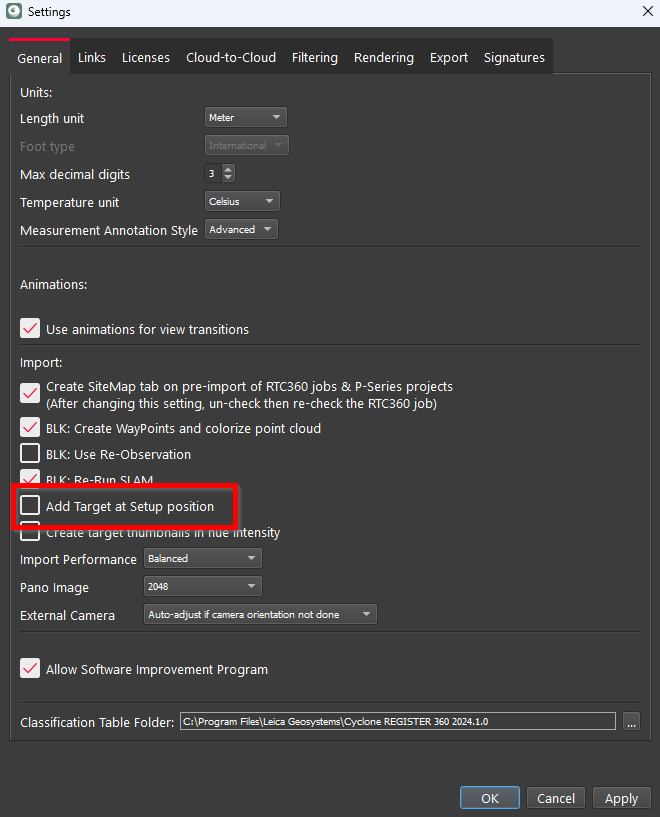
Link Appearance and Link Creation Settings
The Appearance and Link Creation settings on the Links tab have been updated to include link creation and link quality appearance settings for Unstructured Links.
Users will now find these settings conveniently grouped in two columns for Structured and Unstructured Links. This enhancement allows to easily customize the parameters for setting the colour based on the link quality as well as link creation criteria for both types of Links.
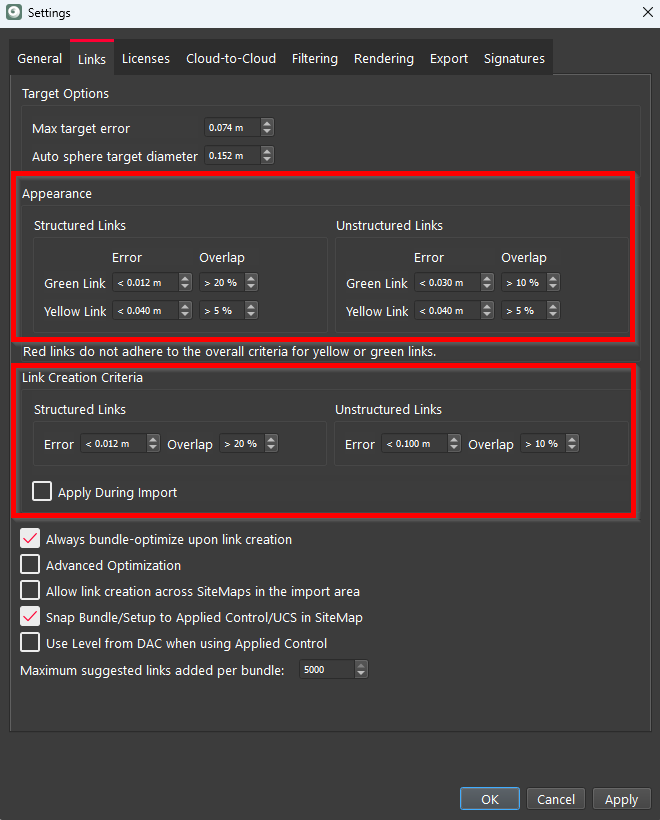
Cloud-to-Cloud Settings
The Cloud-to-Cloud settings have also been enhanced to provide more granular parameters for the registration of both structured and unstructured point cloud data, ensuring optimal precision and efficiency.
Structured Cloud-to-Cloud Settings
Max iterations: The maximum number of iterations the algorithm will perform to improve the alignment of the point clouds. The default for structured data is 100 and the upper limit is 10,000.
Search radius: The radius that software searches for corresponding points between the clouds. The default for structured data is 0.2m and the upper limit is 5.0m.
Max point density: The maximum point density considered during alignment, with a default of 10 for structured data. The settings can be modified in real time, affecting only the Cloud-to-Cloud algorithm and not visual density.
Normal deviation allowance: Scale to filter points based on the angle between their normals. The default value is 50, with a range of 1-100. A value of 1.00 indicates more aggressive filtering, excluding more surfaces with irregular faces, such as vegetation, and those with a sharper angle to the scanner. This noise data is of less value to a Cloud-to-Cloud alignment. A value of 100 indicates less aggressive filtering, allowing more deviation. Using a lower value will result in fewer points being used but also reduce error, making the alignment more accurate.
IMPORTANT: The new Normal deviation allowance parameter is inversely scaled compared to the previous Normal threshold parameter. The default value is now 50, compared to 1 in the previous version.
WayPoint Cloud-to-Cloud generation radius: This parameter sets the radius for Cloud-to-Cloud registration of WayPoints, either during import or afterward. It links multiple point clouds using WayPoints data by finding corresponding points to establish spatial relationships. Specifying this radius controls the size or extent of the Cloud-to-Cloud link. For example, if two separate scans of an object or scene need to be aligned using specific WayPoints, the Cloud-to-Cloud generation radius can be set to determine how large the Cloud-to-Cloud cloud is when generating a link.
Unstructured Cloud-to-Cloud Settings
Max Iterations: Similar to the structured setting but typically set higher due to the complexity of unstructured data. The default value is 400.
Search Radius: The radius for searching corresponding points in unstructured clouds. The default is 0.5m.
Max point density: Same as the structured setting. The default is 10.
Normal deviation allowance: Same as the structured setting. The default is 50, with a range of 1-100.
WayPoint Cloud-to-Cloud Generation Radius: Typically, smaller than the structured setting. The default is 40 m.
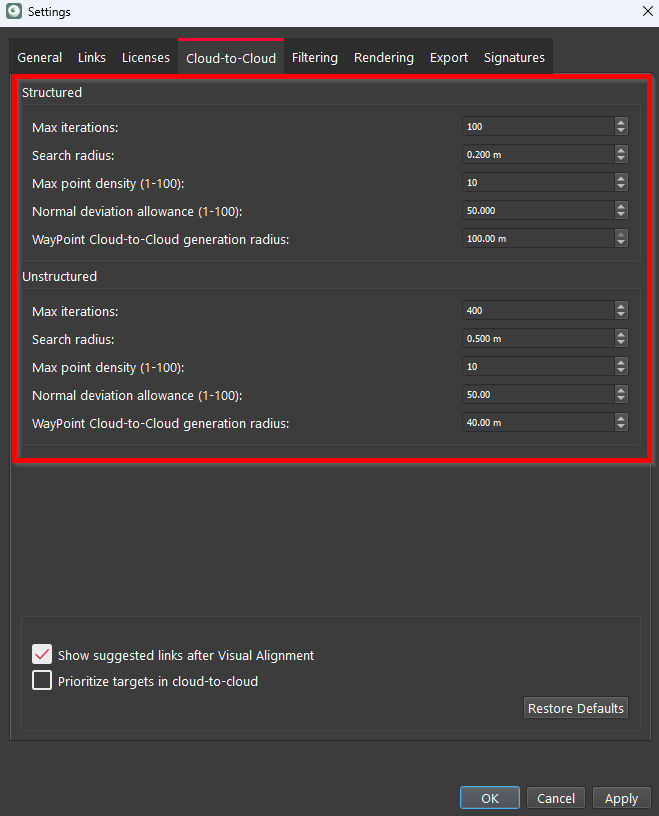
Export Settings
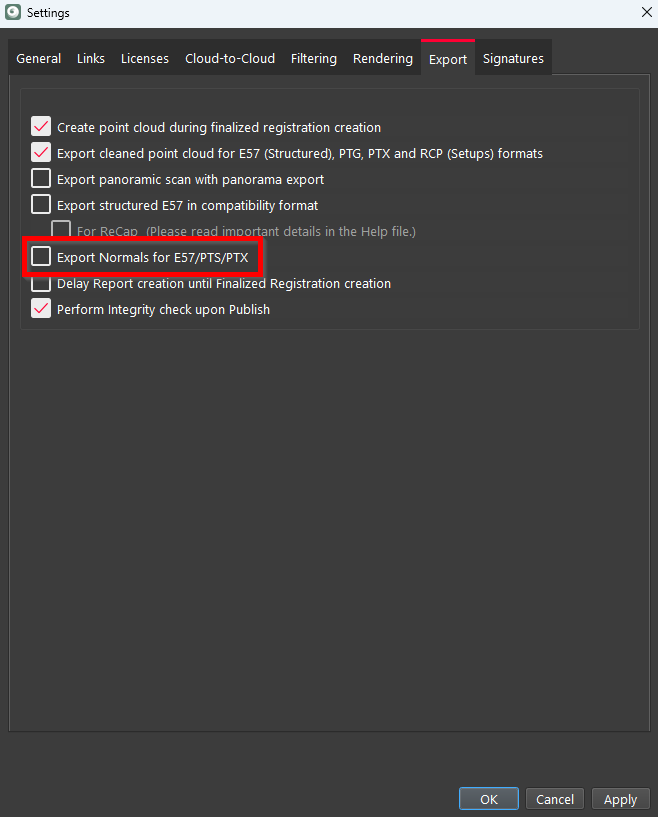
Export Normals for E57/PTS/PTX
The Export settings have been enhanced with the Export Normals for E57/PTS/PTX option. When enabled, it allows adding normals to E57, PTS, and PTX files, providing greater detail and accuracy of the exported data.
Note: Enabling the option also results in increased export time and larger file size.
Auto-Enabled Track Publishing for LGS Export
Track publishing is now applied by default, eliminating the need for users to manually adjust settings when there is a need to incorporate Tracks and their associated data into the LGSx file. As a result, users will automatically see the trajectory in the Review and Optimize area of Cyclone REGISTER 360 PLUS, benefiting from all the capabilities previously associated with the Publish Tracks for LGS Export option, which has been removed from the Export tab as redundant.
Apply Button for All Settings
The Apply button is now available on all tabs in Settings instead of the Rendering tab. It saves all modifications to settings.
Improved Support for Mobile Scan Data
Cyclone REGISTER 360 PLUS now offers enhanced support for importing and visualizing data from BLK kinematic scanners, including BLK2GO, BLK2FLY, and BLK ARC. The update introduces improved import capabilities, a revamped Project panel UI, enhanced visibility and navigation for Tracks and WayPoints, and a powerful Track Editor. These features streamline workflows, enhance data management, and provide greater control and flexibility in handling BLK kinematic projects.
Import Entire BLK Kinematic Scanner Data with Associated Images
The update introduces the ability to import full BLK kinematic scanner data, including all associated images. Previously, importing data allowed for the creation of WayPoints based on specified intervals or GeoTag locations at the Import stage. However, adding new WayPoints post-import was not possible.
Now, importing images from BLK kinematic data includes all images, enabling the creation of WayPoints. Accessing all image data allows adding new WayPoints along the trajectory, where more WayPoints provide many benefits, such as:
Providing snap points for link creation in Cloud-to-Cloud registration.
Improving navigation and visualization for complex datasets by adding a panoramic TruView experience.
Enhancing the creation of textured meshes with colored images in downstream products, such as Cyclone 3DR and Reality Cloud Studio.
Management, Properties, and Navigation for Tracks and WayPoints
Editable and Uneditable Tracks
Depending on the source of mobile data, the data can be editable or non-editable. If a Track is directly imported from the BLK kinematic scanner or as a B2G file, it is considered an Editable Track. In this case, users can delete existing WayPoints, add new WayPoints, or trim the Track. However, if the data source is an LGSx file, the Track is considered Uneditable and a component of an Unstructured Setup. Edit operations are not supported for Uneditable Tracks.

Editable Track

Uneditable Track
Track and WayPoint Visibility
With this update, the Track trajectories are generated upon import and displayed as 3D object splines in Cyclone REGISTER 360 PLUS. When in viewing mode, the trajectory spline is shown in red, and when selected, it changes to blue.
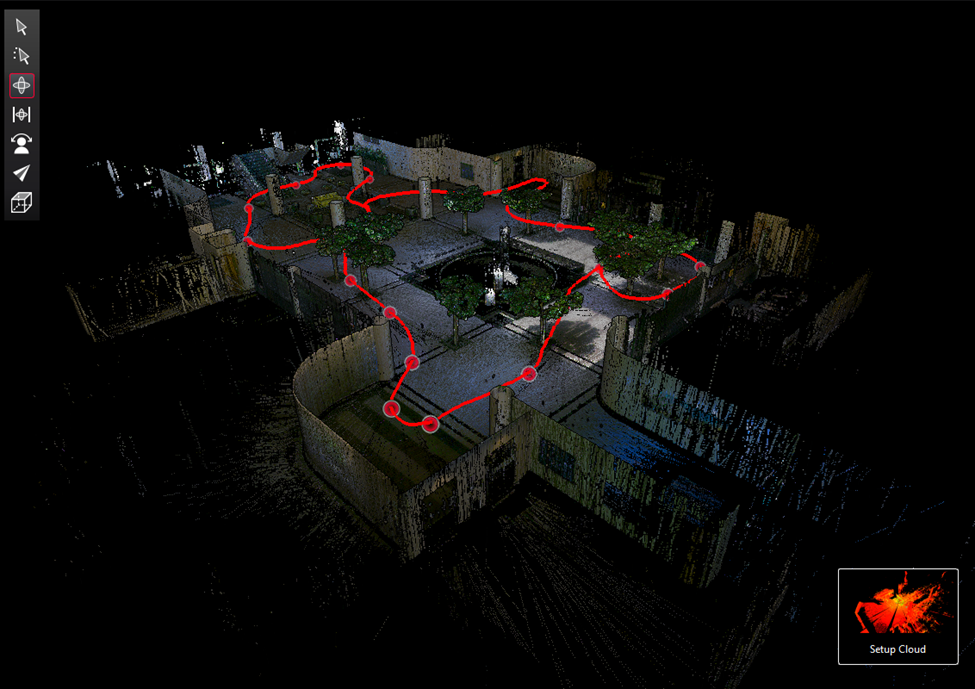
The visibility of tracks can be toggled on or off using the Track button available on the toolbar in the Review and Optimize area of Cyclone REGISTER 360 PLUS. By default, the option is turned on.
.png?inst-v=bf4737bf-c1d0-458e-8bf9-8c2a162323a4)
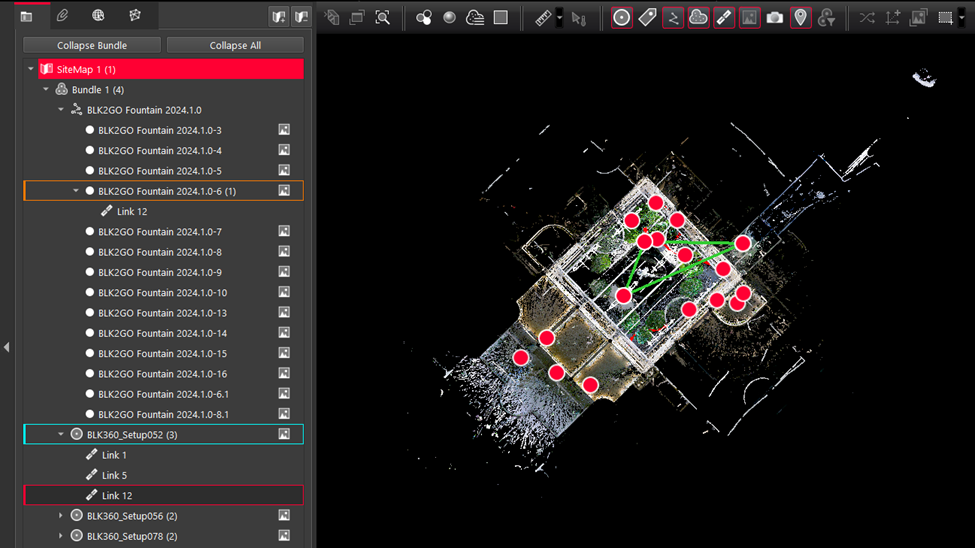
Upon import, Tracks and WayPoints are displayed in the Project Explorer panel, following the same organizational structure used for Bundles and Setups. The Tracks are represented by Track icons and WayPoints are listed as child objects beneath a particular Track, marked by smaller white circle icons. This arrangement ensures a more organized and intuitive interface, offering a clearer hierarchical representation of WayPoints.
If a Link is formed from a WayPoint to other clouds (to a WayPoint or a Setup), the Link will be added under the WayPoint object. This facilitates the creation of Links that include both structured and unstructured data. Links between WayPoints from mobile data to other point cloud data are represented in the panel. This enables easier interaction with these Links and Bundles, similar to the interaction with Setups and Bundles, enhancing the overall user experience.
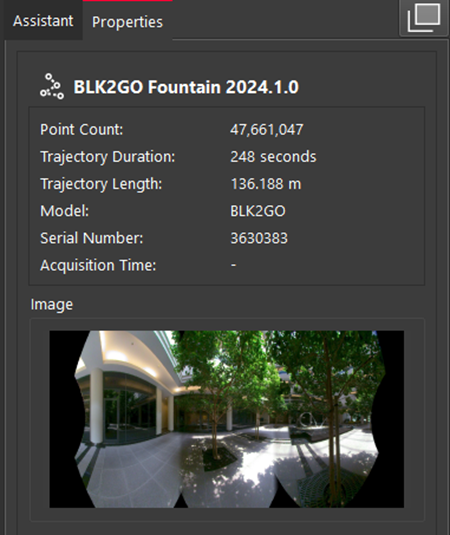
The Properties panel for Tracks and WayPoints provides comprehensive and useful information. Selecting a Track displays details such as name, point count, trajectory duration, trajectory length, scanner type, serial number, and data acquisition date and time, if available. Additionally, the panel includes a panoramic image of the first WayPoint. If a WayPoint is selected, the time and distance of the WayPoint from the start point and a panoramic image will be displayed.
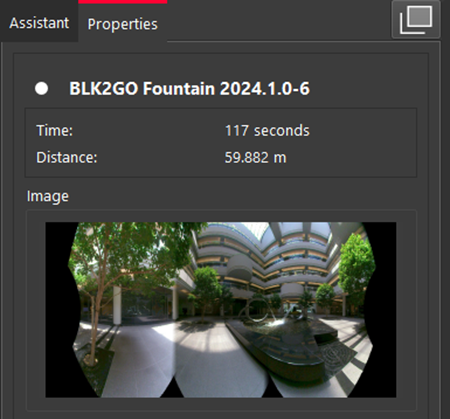
After selecting Tracks and WayPoints, they can be viewed in TruSlicer, Setup Cloud, or SiteMap views.
The behavior is the same as for the selected cloud. The main difference is that when choosing the Setup Cloud view for Tracks, the viewer navigates to the pano view of the first WayPoint. In contrast, when selecting a WayPoint, the viewer is taken directly to that specific WayPoint.
Track and WayPoint Context Menu Options
When right-clicking a Track, the following context menu options are available:
Show in Setup Cloud View: Navigates to the panoramic view of the first WayPoint, similar to the Setup Cloud viewing option.
Export Panoramic Image: Exports all WayPoint pano images to the local folder.
Delete Track: Deletes a Track and the associated WayPoints.
Note: To delete a Track, there should not be any Links to the WayPoints or a UCS set at a WayPoint.
Edit Track: Opens the Track Editor tool, allowing Track editing. This option is not available for non-editable Tracks.
Restore Deleted Points: Restores deleted points for visual, Cloud-to-Cloud, or both point cloud data.
When right-clicking a WayPoint, the following context menu options are available:
Show in Setup Cloud View: Navigates to the panoramic view of the selected WayPoint, similar to the Setup Cloud viewing option.
Show Suggested Links: Cyclone REGISTER 360 PLUS will search for and display potential links from the WayPoint to nearby Setups or WayPoints in different clouds.
Edit Image Blur: This tool allows users to edit panoramic images by manually adding blur or automatically blurring car plates and human faces.
Export Panoramic Image: Exports all WayPoint panoimages to the local folder.
Delete WayPoint: Deletes a WayPoint. It is also possible to delete WayPoint using the Track Editor tool.
Restore Deleted Points: Restores deleted points for visual, Cloud-to-Cloud, or both point cloud data.
Navigation for Tracks and WayPoints
Navigation for Tracks and WayPoints are very similar. Upon choosing the Show in Setup Cloud Viewer context menu option, the user will be navigated to the selected WayPoint or the first WayPoint (in case of a Track). The Setup Cloud view of a WayPoint includes a panoramic view option, similar to a static Setup. This view is centered at the WayPoint location, allowing users to easily navigate and pan across the pano image. Project visibility controls and navigation tools and viewing orientation options are available.
The main difference for kinematic mobile data is the display of the trajectory line in the view. Moreover, navigation along this trajectory is possible using the Next and Previous WayPoint options. When transitioning between WayPoints, the forward viewing direction is preserved, meaning the view will face the direction of the BLK kinematic scan at the time of data capture at each WayPoint.
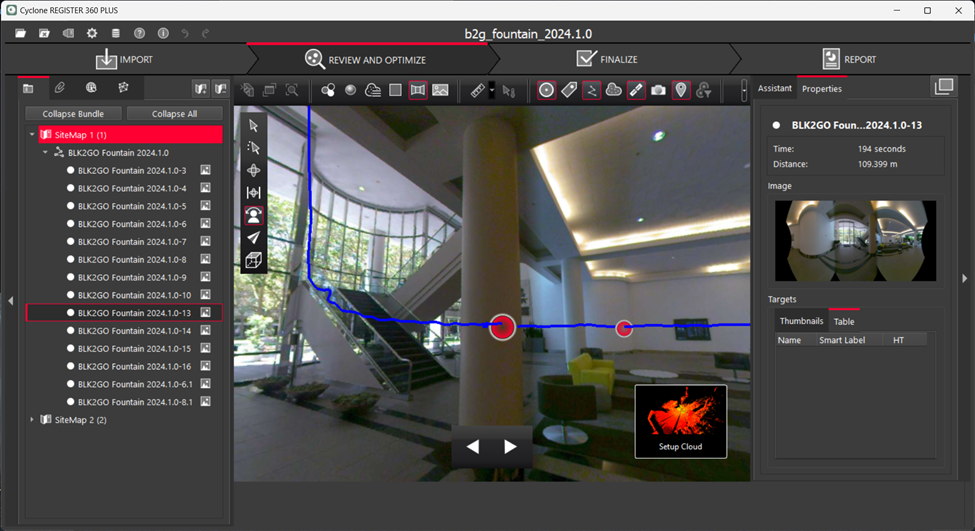
Track Editor
Depending on the source of mobile data, the data can be editable or non-editable. If a Track is directly imported from the BLK kinematic scanner or as a B2G file, it is considered an Editable Track. In this case, users can delete existing WayPoints, add new WayPoints, or trim the Track. However, if the data source is an LGSx file, the Track is considered Uneditable and a component of an Unstructured Setup. Edit operations are not supported for Uneditable Tracks.
SLAM Confidence Estimate | Color |
0.00 – 0.70 | #FF7400 |
0.71 – 0.85 | #FFF400 |
0.86 – 1.00 | #24FF13 |
User interface elements:
Map View: Displays a top-down map view of the Track. Users can select points using the Trajectory Selector or the WayPoint Selector.
Time Slider: Corresponds to the map view but uses time as the scale instead of distance. It allows users to select points when the trajectory is complex.
Selectors:
Trajectory Selector: A green circle that moves along the trajectory, allowing users to select a new point on the trajectory.
WayPoint Selector: A blue circle with a white border indicating the selected WayPoint.
Track Start & Endpoint: The start and end points of the trajectory marked by purple circles with white borders.
Undo/Redo Stack: Allows users to revert deletion or creation of WayPoints.
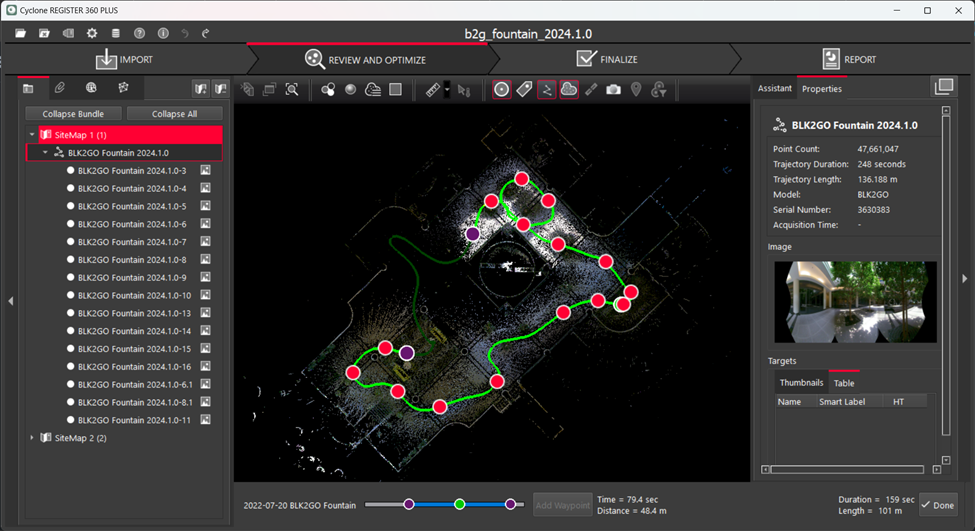
Key functions of track editor:
Trim Tracks: Adjusts the duration and length of tracks based on time or location by moving the start and endpoint. A Track cannot be trimmed beyond an existing WayPoint. To further move the start and endpoints, the WayPoint should be deleted first. For the trimmed Track, the trajectory of the trimmed section will be shown with a dimmed colour. Additionally, the point cloud associated with the trimmed section of the Track will be hidden.
Add WayPoint: Adds new WayPoints using the Trajectory Selector. This option is available when an adequate image set is available for constructing a WayPoint.
Delete WayPoint: Deletes a selected WayPoints.
These features collectively provide robust tools for editing and handling BLK kinematic data within Cyclone REGISTER 360 PLUS, enhancing both efficiency and precision.
Cyclone FIELD 360 Support for Control Files and Field-Extracted Targets from the RTC360 Data
A streamlined solution has been implemented to support the survey workflow for RTC360 data using Cyclone FIELD 360. In addition to the existing capability of capturing RTC360 scans with FIELD 360 and creating links with Cloud-to-Cloud (C2C), the new features include extracting targets in the field (with optional Target heights), importing Control files, and geo-referencing to control points in the field.
Importing RTC360 Data with Fitted Targets from Cyclone FIELD 360
Cyclone REGISTER 360 PLUS now includes support for importing fitted targets alongside the RTC360 scan data collected via Cyclone FIELD 360, enhancing accuracy and efficiency in data processing.
This new capability means that targets identified and fitted during the scanning process can be imported without the need for additional processing. Cyclone REGISTER 360 PLUS will read the existing thumbnails from RTC360 data, so there is no need to create new thumbnails. The target fitting step can also be skipped as the targets are already fitted.
Importing RTC360 Control-to-Target Assignments from Cyclone FIELD 360
This feature enables importing Control-to-Target assignments made directly in the field using Cyclone FIELD 360. After import, the data includes a Control file and Cyclone FIELD 360 target tags converted to black-and-white (B/W) targets. Additionally, it is possible to apply the Control that utilizes smart labels connected to FIELD 360 targets.
Importing and Editing Control Points
The Control file can be imported by:
Connecting directly to the BLK360G2 scanner and downloading the Control file that was previously transferred to the scanner from Cyclone FIELD 360.
Importing the Control file from Cyclone FIELD 360.
Importing the FAF file from Cyclone FIELD 360 to support the import of Control points and Target heights from the BLK360G2 Scanner.
Note: The BLK Data Manager does not support downloading Control point files or Target heights.
After import, Control points can be edited directly in Cyclone REGISTER 360 PLUS. To enter editing mode, simply double-click the desired cell of the Control Points table in the Properties panel.
Additionally, it’s also possible to copy the table values into a text editor, using the following context menu options:
Copy selected cells
This option copies the values of the selected table cells in the active unit of measurement. It’s also possible to use the Ctrl+C shortcut right after selecting the desired cells, eliminating the need to open the context menu.
Copy all data in base unit (m)
This option copies the entire Control Points table in its base unit of measurement (meters). It is particularly useful when you need to create a new Control file with the updated values and export it in the same project.
Note: The parameters of Control points cannot be edited if the Control file is already applied.
Error Vectors for Target Constraints
Error vectors are now displayed for target-to-target registrations, showing the slope distance and error vector between targets. Error vectors are listed in the Target Constraints table within Link Properties, offering detailed metrics on the slope and the combined average of Cloud-to-Cloud constraints.

Height of Target (HT): Introduction of Target Pole Workflow
The latest update introduces the use of target poles in Cyclone REGISTER 360 PLUS. This enhancement allows target poles to be used over ground control points (GCPs) in the field with a known Height of Target (HT). With this workflow, control or survey data can be imported without modifying the Z-values to adjust for the HT. Instead, the HT adjustment can be done within Cyclone REGISTER 360 PLUS, where the easier input of the HT, along with graphical representation of the target pole and GCPs, provides an enhanced experience and streamlined workflow.
Workflow Overview:
Import scan data and extract targets:
Import the project that includes scans using the existing workflow.
Use the automatic target extraction tool to extract the targets, where some or all targets are placed on a GCPs using a target pole.
Cyclone REGISTER 360 PLUS may automatically form a Bundle using the in-field pre-alignment Links or using the Auto Cloud option.
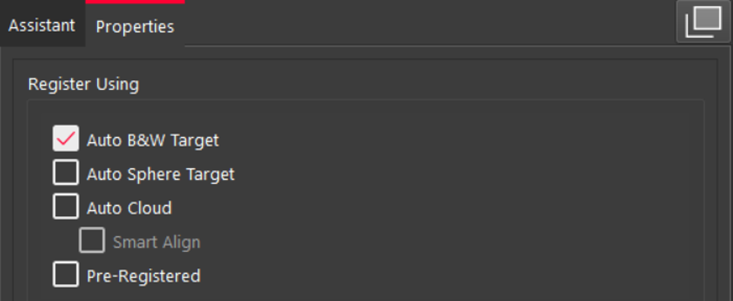
Import the Control file:
Import the control file, using the existing workflow ensuring it is formatted correctly. See Importing .txt for details.
No need to adjust the target pole height in the control file.
Target Smart Labels can be entered beforehand or matched geometrically by the Control.
Enter the Target Height (TH) value:
After import, click on the Setup to see the extracted targets.
In the Targets table, enter the HT for all targets. Projects may use the same pole height across the project or varying heights, as noted in your field notes.
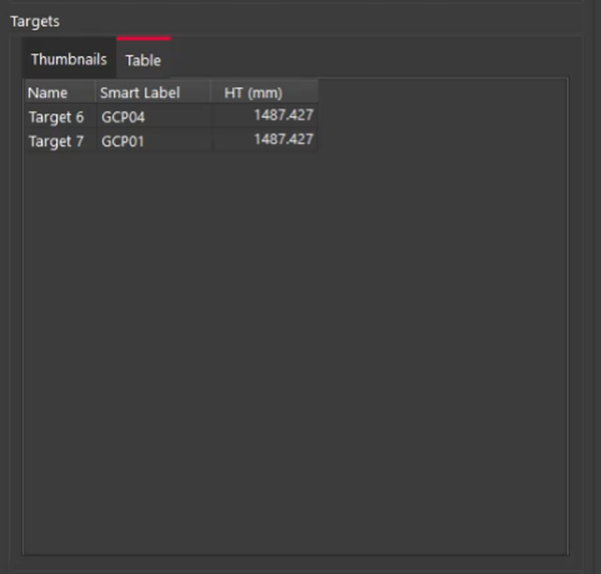
Visualize the Target Height:
In the Setup Cloud view, extracted Setup Targets (actual position) are always shown at the Setup center, regardless of the HT value. The Setup Cloud view is used to ensure the target extraction was successful and to adjust the HT values.
The Bundle Cloud view will show the projected point (projected position) on the ground accounting for the height of thee target pole. Targets are shown at their height-adjusted positions in the Bundle Cloud view. It ensures accurate target matching and HT alignment.
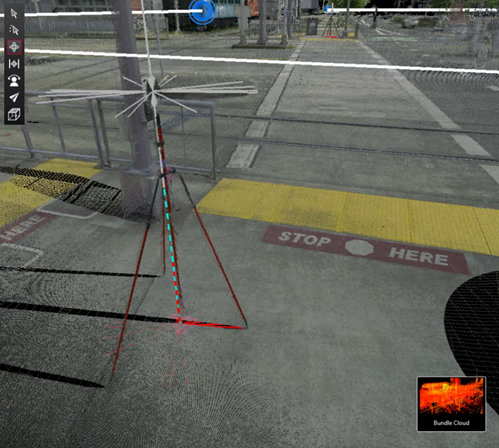
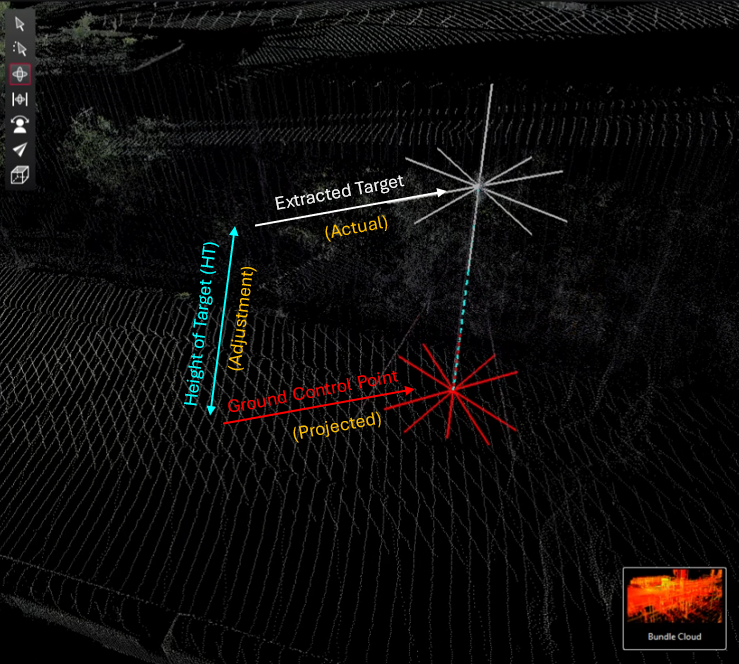
Apply Control:
Apply control to the Bundle. Please see Applied Control for details.
After applying Control, the Control is properly designated on the ground to the projected target pole value. The data is now registered to the Control coordinate system.
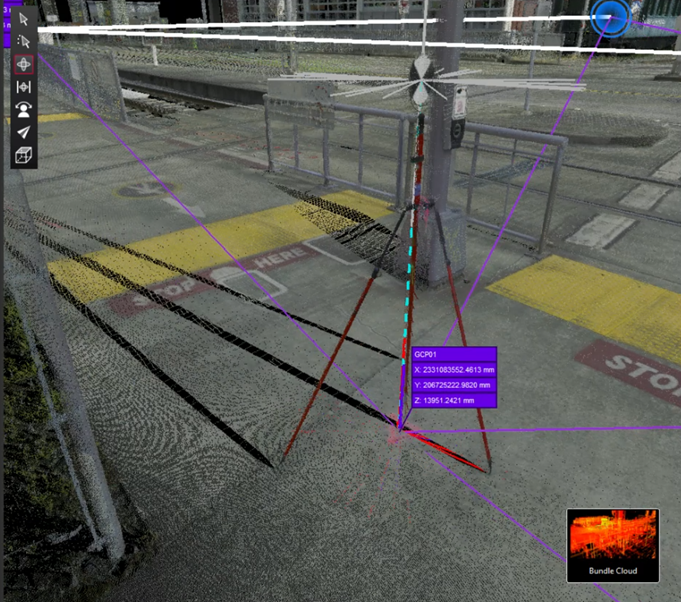
Height of Instrument (HI): Target at Setup Position Workflow
This feature allows for registration control using the workflow when the scanner is set up on a GCP with known coordinates and the height of the instrument is measured in the field. The workflow includes adding a target at the Setup position (i.e., 0,0,0 of the scanner), then adding the height of the instrument. The adjustment is then applied to the target position, projecting it on the ground from the Setup center.
The workflow is very similar to the target pole workflow, except that the target is added to the Setup center rather than the B&W of the sphere target.
Workflow Overview:
Import scan data and extract Setup position targets:
For automatic extraction upon import, go to Settings | General and enable the Add Target at Setup Position option.
It can also be added later after import using the Add Target at Setup Position context menu option of the Bundle or individual Setup.
Note: This option is only available for static Setups.
c. Cyclone REGISTER 360 PLUS may form a Bundle using pre-alignment Links or Auto Cloud.
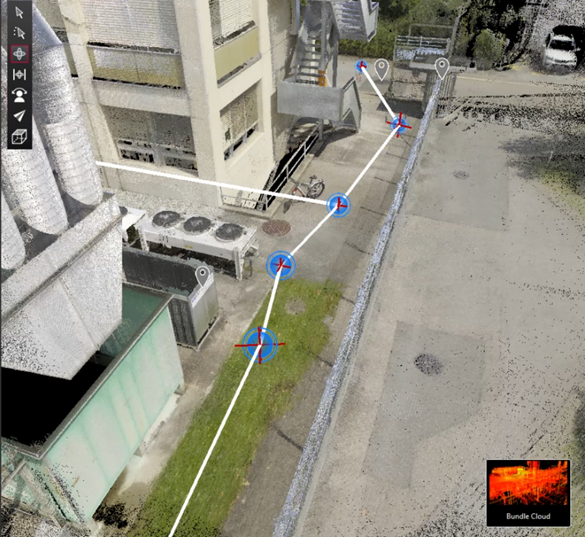
Import the Control file:
Import the Control file without adjusting for HI/HT.
Match Smart Labels: Target Smart Labels can be pre-entered or matched geometrically. For this workflow, the Smart Label will assign the relevant Setup name.
Enter the Height of Instrument (HI) as Height of Target (HT):
Enter HI/HT for all targets. This is the value measured in the field for the Height of Instrument.
Visualize the Target Height:
Setup Cloud: Shows extracted targets at the Setup center.
Bundle Cloud: Shows targets at height-adjusted positions for accurate matching.
Apply Control:
Apply control to the Bundle.
Control is designated on the ground to the projected target pole value.
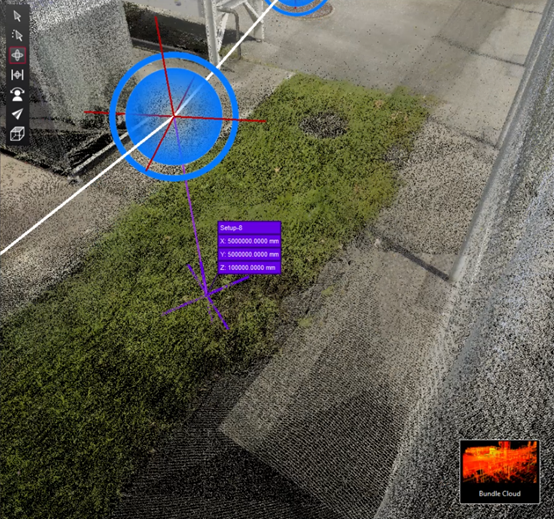
Review and adjust:
Review the Bundle and make any necessary adjustments.
Confirm that the targets are correctly positioned and labeled.
Support for Multiple Versions of Cyclone REGISTER 360 PLUS on a Single Computer
Multiple versions of Cyclone REGISTER 360 PLUS can now be installed on the same computer, ensuring seamless switching between different versions without the need to uninstall and reinstall the software.
For versions 2025.0.0 and later, a new installation folder will be created for each version. For versions 2024.0.2 and older, the default directory will be used, replacing the existing version.
All versions will utilize the same database server and can share the same Project Storage folder. However, only one version of Cyclone REGISTER 360 PLUS can run at a time.
IMPORTANT: Projects created or edited in version 2025.0.0 or later are incompatible with versions 2024.0.2 and earlier. Please avoid making changes to projects in 2025.0.0 if you plan to complete work on the project in an older version.
Identifying Cyclone REGISTER 360 PLUS Projects in Storage Folder
To easily identify project folders by project names within the Storage folder, users can now view project names in the Comments column of Windows Explorer. After installing and opening version 2025.0.0, all attached projects will receive a mark allowing the project name to be displayed in the Comments field. This feature is available only for connected projects. When reconnecting to a project that was not previously connected, simply close and reopen Cyclone REGISTER 360 PLUS and refresh the Comments column in Windows Explorer.
Note: Non-Ascii characters in project names are not supported in the Comments column.
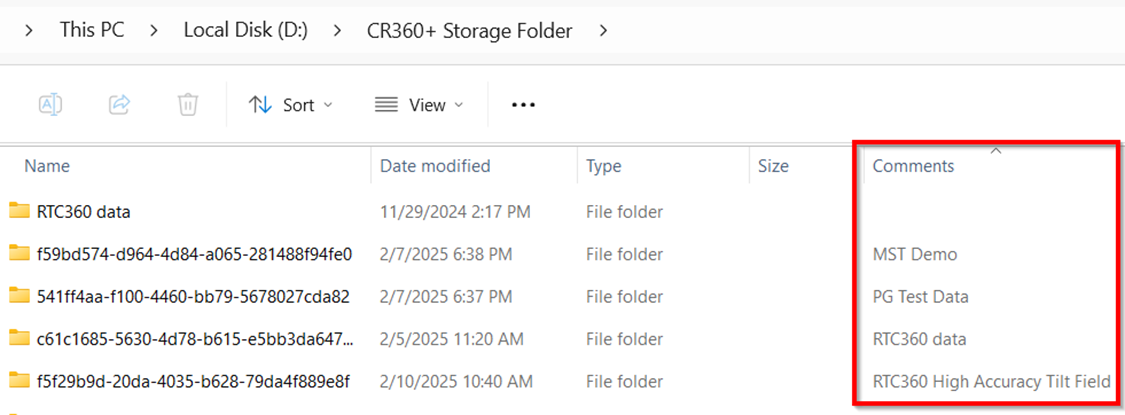
To add the Comments column in Windows Explorer, follow these steps:
On the View menu, set the view to Details.
Right-click any column name and then click More.
In the Choose Details dialog, select the Comments field from the list and click OK.
.png?inst-v=bf4737bf-c1d0-458e-8bf9-8c2a162323a4)
WARNING: This feature is not fully supported in older versions of Cyclone REGISTER 360 PLUS, and attempting to delete a project in any older version, after version 2025.0.0 has been installed and opened, may cause the program to stop functioning unexpectedly. However, the contents of the project folder will still be deleted.
Geo Map Feature Installation
With this release, the option to install the support for the Geo Map is available while setting up Cyclone REGISTER 360 PLUS. During installation, users will be prompted to choose between two options. Clicking Yes will include the necessary components for the Geo Map functionality, making it available in the Import area. Selecting NO will exclude these components, resulting in the Geo Map feature being non-functional.
.png?inst-v=bf4737bf-c1d0-458e-8bf9-8c2a162323a4)
Importing BLK360G2 GNSS Tags From Cyclone FIELD 360
Cyclone FIELD 360 PLUS is now equipped with the capability to create GNSS tags for the BLK360G2 scanner. When importing data into Cyclone REGISTER 360 PLUS, the GNSS information will ensure that a proper GPS coordinate system is added to each Setup.
To import the BLK360G2 data with GNSS tags into Cyclone REGISTER 360 PLUS:
Drag and drop the Job folder in the Import area of Cyclone REGISTER 360 PLUS.
After the dataset appears in the Import area, click the Show Geo Image Bar button to access a map within the accuracy provided by the GNSS information.
Note: If you get the world map, it means no geographic information is available.
Get an image of a GeoMap and click Place by Geo Coordinates. Adding geo coordinates to the Setups will enable the selection of the coordinate system.
In the Properties panel, enable the Select Coordinate System check box and select the required coordinate system from the drop-down list.
Click Import.
After the data is imported, in the Properties panel, you will see the UCS with the proper GPS coordinates applied to Setups.
Georeferencing of BLK ARC Scans Collected During the BLK ARC-UI Outdoor Missions
Scans collected with BLK ARC during autonomous outdoor missions with the GA03 GNSS antenna (BLK ARC-UI) can be now georeferenced using the positioning information collected and stored in the B2G file.
With this feature, it is possible to have the global coordinates available for each point of the processed point cloud.
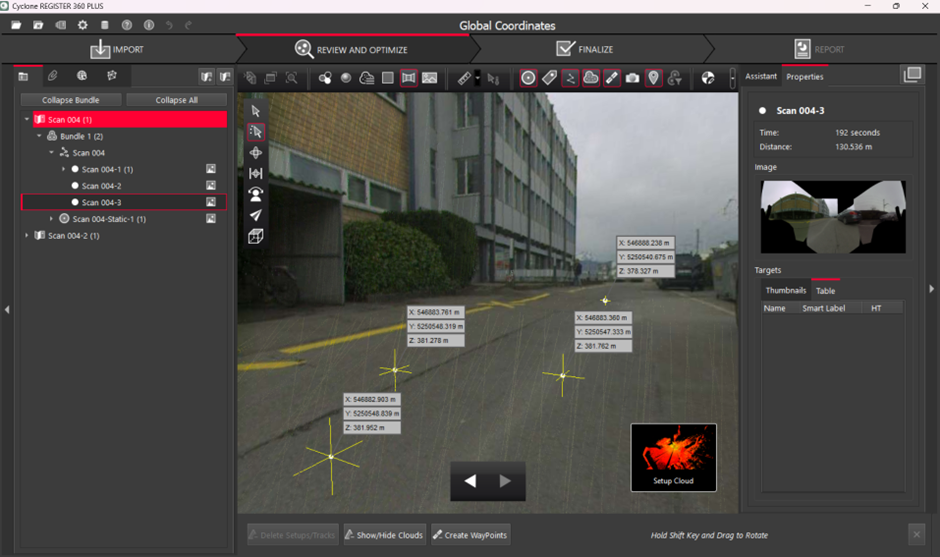
Preview of the global coordinates available after import
Workflow Overview
To import BLK ARC scans containing georeferenced data into Cyclone REGISTER 360 PLUS, follow the steps below:
Download the job from BLK ARC using the Data Manager.
Drag and drop the data contained in the job folder into Cyclone REGISTER 360 PLUS.
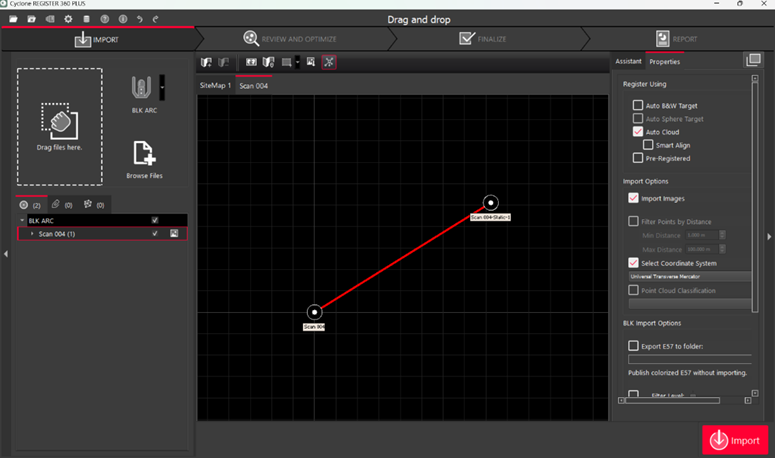
(Optional) Use the map to visualize the scans on a satellite map:
Click Show Geo Image Bar to visualize the satellite view.
Locate your site and click Get Image.
Click Place by Geo Coordinates to automatically place the scan according to the global coordinates.
Double-click the SiteMap to centre the view.
Select the Coordinate System in the Import Options and define other Import and Registration settings.
Select Auto Cloud in Import settings to automatically align multiple scans.
Import the data.
Alternative Workflow
If the global coordinates are not read upon the first import of the raw data into Cyclone REGISTER 360 PLUS, it is required to import scans twice using specific import settings mentioned in the workflow below:
Download the job from BLK ARC using the Data Manager.
Navigate to Settings | General and define Import settings in Cyclone REGISTER 360 PLUS. Ensure SLAM recalculation upon the import is enabled by choosing one of the settings below:
BLK: Re-Run SLAM
BLK: Use Re-Observation
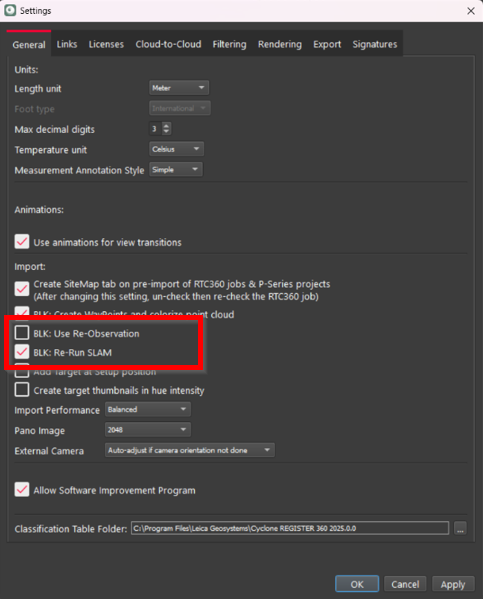
Drag and drop the job folder into Cyclone REGISTER 360 PLUS and import the data.
Remove the imported scan from the project or delete the project altogether.
Import the same B2G file again:
Drag and drop the B2G file into Cyclone REGISTER 360 PLUS.
(Optional) Use the map to visualize the scans on a satellite map.
Click Show Geo Image Bar to visualize the satellite view.
Locate precisely the environment and click Get Image.
Click Place by Geo Coordinates to automatically place the scan according to the global coordinates.
Double-click the SiteMap to centre the view.
Select the Coordinate System in the Import options and define other Import and Registration settings.
Note: SLAM recalculation is not mandatory this time to retrieve the GNSS data.
a. Select Auto Cloud in Import settings to automatically align multiple scans.
Import the data.
RTC360 FW 7.0 Compatibility with Cyclone REGISTER 360 PLUS 2025.0.0
RTC360 FW 7.0 requires Cyclone REGISTER 360 PLUS version 2025.0.0 or higher for full feature functionality, including target extraction and tagging, pole height integration, and control file addition.
The data format remains unchanged. While older versions of Cyclone REGISTER 360 PLUS can import RTC360 FW 7.0 data, the new features won't be supported.
Data from RTC360 FW versions earlier than 7.0 is fully compatible with Cyclone REGISTER 360 PLUS version 2025.0.0.
Controlled Publishing with Detailed Error Logging
A valuable improvement has been introduced to ensure a seamless publishing process. Now, Cyclone REGISTER 360 PLUS will continue publishing a project to LGSx despite encountering errors. Upon completion, the log file will contain a list of failed top-level objects, including Setups, SiteMaps, UCS, and so on, empowering users to swiftly identify any errors that occurred during publishing.
This enhancement aims to give users more transparency throughout the publishing process, empowering them with greater control over the resulting outcomes.

Optimized Fence Tool Operations
The Fence tool performance has been improved to decrease the time required to delete or restore points when editing multiple Setups in the Bundle Cloud view. Whether the user deletes points or restores them outside or inside the fence, these operations now run simultaneously rather than sequentially for multiple Setups, resulting in fast processing and minimized waiting times.
Importing Shapefiles as Control
This feature simplifies the process of adding control points and SRS data to projects by enabling the import of shapefiles (.shp) as Control directly from a ZIP file.
When a ZIP file is added to the Import area, Cyclone REGISTER 360 PLUS will automatically inspect its contents for shapefiles. If shapefiles are detected, the user will be prompted to decide whether to import the control points as Applied Control along with the SRS.
If the user unzips the files and creates a folder containing a shapefile, Cyclone REGISTER 360 PLUS will also import this folder as a single Control.
Updated Coordinate Export Behaviour
Previously, when exporting datasets with both an active UCS and an applied Control, Cyclone REGISTER 360 PLUS prioritised the Control coordinate system. Starting from version 2025.0.0, the active UCS takes precedence over the applied Control, ensuring better management of exported data.
Bug Fixes
Fixed an issue where TruSlicer appeared to display Setup icons only due to the Setup position of BLK2FLY data being above the point cloud; now, the slice center is based on the average height of the point cloud rather than the Setup.
Fixed an issue where the tilt of the Setup or Bundle at the time of the UCS creation wasn’t maintained and changed every time the Bundle was modified. Now, any changes made to the Bundle do not affect the UCS tilt, maintaining a consistent UCS as initially set.
Fixed an issue where renaming a pre-registered UCS from E57 files resulted in changes to the UCS coordinates.
Fixed an issue where applying the same control to several independent Setups on the same SiteMap did not align the Setups correctly, even though the ‘Snap Bundle/Setup to Applied Control/UCS’ setting was enabled.
Fixed an issue where limit boxes were excluded from an LGSx file when only a single SiteMap in a multi SiteMap project was published. Limit boxes are now included in an LGSx file as expected.
Fixed limit box export issues in projects with multiple SiteMaps. Previously, limit boxes associated with Setups and Bundles were incorrectly exported when publishing SiteMaps separately. Now, only limit boxes associated with Setups or Bundles in the accepted SiteMaps are available in the Publish by LimitBox list. Additionally, users will be notified if a certain limit box remains unavailable for publishing in the Finalized Registration.
Fixed an issue where deleted points reappeared in a cleaned point cloud after exporting it to PTX, PTG, RCP, or E57 (as one file).
Fixed an issue where publishing RTC360 or P-Series scan data to a single cloud in E57 failed to export panos with the point cloud.
Fixed a compatibility issue between LGSx files converted from LGS and downstream products.
Fixed an issue with the Command Line Interface (CLI) tool that resulted in incompatible LGS files being produced when attempting to convert to LGSx.
Fixed an issue where Setups in E57 were tilted upon importing to Cyclone REGISTER 360 PLUS for the E57 files generated using BLK LIVE or Cyclone FIELD 360.
Fixed an issue that prevented users from downloading BLK360 or BLK2GO Setups using BLK Data Manager when they tried to select multiple Setups by holding down the left mouse button and moving the cursor over the Setup field instead of selecting the entire Setup row. To ensure successful downloads, users can confidently select individual Setups and then use the Ctrl key to select additional Setups for download.
Fixed an issue that affected the rendering of points for the project where Setups were connected by Links after enabling the ‘Show all Setups/Bundles linked by Control in Cloud view’ option.
Fixed an issue that caused the storage location to become invalid due to trailing spaces in its path. As of now, the spaces will be either removed automatically, or the user will receive a warning to verify the path.
Fixed an issue where the ‘Publish Complete’ timestamp in the Cyclone REGISTER 360 PLUS log file captured the user click interaction timestamp at the end of the publishing workflow instead of the actual completion time of the publishing process for LGSx files.
Fixed an issue where GeoTags, captured without using BLK Live or Cyclone FIELD 360, were missing from the BLK2GO data imported to Cyclone REGISTER 360 PLUS directly from the scanner.
Fixed an issue where Cyclone REGISTER 360 PLUS was unable to download BLK360 data via BLK Data Manager due to its inability to read the battery level. Now, users can confidently import large projects without any interruptions or cancellations.
Fixed an issue that caused irregular Pano image cropping created by Cyclone REGISTER 360 PLUS from BLK360 G2 when inverted.
Fixed an issue where the scans from the BLK2GO PULSE scanner did not get selected or deselected along with the Bundle when importing the BLK2GO PULSE job.
Fixed an issue that caused Cyclone FIELD 360 links to remain invisible in the Import area of Cyclone REGISTER 360 PLUS when adding scans from the BLK2GO PULSE scanner.
Fixed an issue that caused image assets duplication on the ‘Assets’ tab upon importing the BLK360 job.
Fixed an issue where the enabled ‘Wall Aligned UCS’ option was ignored upon importing BLK2FLY data.
Fixed an issue where a BLK2GO job was not checked although the child Setups within the job were checked in the Import area after adding the BLK2GO job into Cyclone REGISTER 360 PLUS.
Fixed an issue where the ‘Shaded’ option deactivated after selecting the ‘Measurements’ or ‘Pick Points’ option, requiring users to reselect it.
Fixed an issue where the ‘Publish Complete’ timestamp in the Cyclone REGISTER 360 PLUS log file captured the user click interaction timestamp at the end of the publishing workflow instead of the actual completion time of the publishing process for LGSx files.
Fixed a minor issue with the naming of LGSx files in a message generated by the LGS Converter to inform users about the already existing LGSx file.
Fixed an issue that prevented Spanish users from contacting the Support team via an email address specified in Cyclone REGISTER 360 PLUS Crash Report.
Fixed an issue where the LGS Converter tool was unable to convert LGS to LGSx if an LGS file contained non-Latin characters in project component names. With this enhancement, LGS Converter can now effectively handle special characters in LGS filenames, enabling seamless and error-free project conversions.
Fixed an issue where changing the ‘Length unit’ setting and then applying the changes under the Rendering tab would set an incorrect Setup radius in the graphical view.
Fixed an issue that affected the performance of the Smooth Surface tool. As a result, the tool has been optimized to eliminate slowdowns, resulting in faster and more efficient performance.
Fixed an issue where the radius specified in the ‘WayPoint Cloud-to-Cloud generation radius’ setting did not apply to the point cloud when comparing WayPoints from two different walks in Visual Alignment.
Fixed an issue that prevented the correct creation of the DFX file when using the Create Ortho-Image tool in Cyclone REGISTER 360 PLUS and caused images to be unopenable in different CAD software.
Fixed an issue with a nonfunctional keyboard shortcut for scaling a background image. Users can now hold down the Alt key while rotating the mouse wheel to make smaller zoom increments and better adjust the fit of the background image to the scan data.
Fixed an issue that caused Setup names to display incorrectly when batch importing panoramic images. Consequently, Setup names now appear accurately in the Batch Image Importer, allowing users to effortlessly match a panoramic image with a corresponding Setup.
Fixed an issue that caused discrepancies between project coordinates in Cyclone REGISTER 360 PLUS and TruView after viewing the exported LGSx file in TruView and then reimporting it to Cyclone REGISTER 360 PLUS.
Fixed an issue where a thumbnail for a black-and-white target created from a pick point on the colorless scans appeared white making it impossible to assess the quality of the fit. The target now displays the expected black-and-white coloration.
Fixed several issues with the SiteMap resolution. Previously, changing the SiteMap resolution while a point cloud was invisible did not take effect. However, changing the resolution when the point cloud was visible caused the background image to move or even disappear, particularly for high-resolution SiteMaps. Now, the SiteMap image resolution can be properly adjusted, and all changes are accurately applied upon publishing the LGSx file.
Fixed an issue where a point cloud became rotated 90 degrees in the top view after resetting its tilt in the side view during Visual Alignment. Now, the cloud remains properly aligned and oriented in both views.
Fixed an issue that caused Cyclone REGISTER 360 PLUS to crash unexpectedly when exporting an imported LGS file to LGSx.
Fixed an issue where a limit box created in the Bundle Cloud view was unavailable for inclusion in the LGSx file when only a specific SiteMap in a multi SiteMap project was accepted in the Finalize step and selected for publishing. Now, a limit box created in the Bundle Cloud view is available in all related SiteMaps when they are published separately.
Fixed an issue where image layers were unavailable in TruView Cloud after publishing a project with BLK2GO data, containing panoramic images, directly to TruView Cloud.
Fixed an issue where a final registration cloud was created from a single Setup cloud of a new format even if no points were deleted from it. With the fix, Cyclone REGISTER 360 PLUS now copies the cloud, reducing unnecessary processing and significantly improving LGS/LGSx publishing time.
Fixed an issue where multiple E57 files with pre-registered data from the NavVis scanner couldn’t be exported all together to LGSx.
Fixed an issue where Cyclone REGISTER 360 PLUS failed to convert a project due to the absence of a finalized point cloud.
Fixed an issue where trajectory points in the E57 files exported from Cyclone REGISTER 360 PLUS were offset horizontally from their correct position when viewed in Cyclone 3DR.
Fixed an issue that caused text GeoTags to not appear in Cyclone REGISTER 360 PLUS when importing BLK360 scans created using BLK Data Manager.
Fixed an issue where the PNG image file associated with the Ortho image DFX file couldn’t be read properly by the CAD system. The referenced image file now opens automatically without the need for manual reconfiguration.
Fixed an issue where TruView assets were created even if the 'Allow Measurements in TruView Enterprise/Cloud' option was unchecked during LGS export, slowing down the publishing process. Now, the option is disabled by default and can be enabled when measurements of TruView data are needed.
Fixed an issue where the Polygonal Fence tool could remain active, preventing users from finalizing the fence selection or exiting the command. With the applied fix, users can disable the fence tool using any of the typical methods:
Pressing the ESC key.
Disabling the Fence tool from the toolbar by clicking the Fence tool icon again.
Enabling another Fence tool.
Switching to another view (SiteMap, Setup Cloud, Bundle Cloud).
Proceeding with the registration workflow, such as moving to the Finalize step.
Fixed an issue where a limit box was disregarded during the export of structured data as an unstructured E57, causing the entire point cloud to be exported.
Fixed an issue in BLK Data Manager that caused slow preparation for downloading Setups, particularly when a scanner contained large datasets. Now, after selecting a path folder, the progress bar indicating preparation for downloading will appear briefly, ensuring a smoother and faster download experience.
Fixed an issue that caused black artefacts to appear in the imagery upon importing E57 files from Faro and Realworx into Cyclone REGISTER 360 PLUS.
Fixed an issue with the incorrect positioning of a WayPoint within the trajectory when importing a B2G file with only one WayPoint. The WayPoint will now be located in the expected position.
Fixed an issue where Setups were misaligned after moving them from the existing SiteMap to the new one. Now Setups are properly aligned when moved between SiteMaps.
Fixed an issue that caused incomplete cleaning of points inside a circular fence when using the Delete Inside fence command in the Bundle Cloud view. All points within the defined radius are now fully removed from the scene.
Fixed an issue where changing the Setup radius in settings had no effect on the Setup radius size in the Setup Cloud view. Now, the Setup size correctly adjusts according to the value specified in the Setup radius setting.
Fixed an issue where importing LGSx or B2G files into a selected SiteMap via the Import tab resulted in importing data into the wrong SiteMap. Now, the data is correctly imported into the chosen SiteMap, ensuring that the user’s selection is honoured.
Fixed an issue where Pano images lost positional information when exported with many significant digits. To maintain accuracy and prevent the conversion of position numbers to scientific notation, the number of significant digits after the decimal point has been limited to 5.
Fixed an issue where a point cloud was created incorrectly while converting large-extent projects to the new project format. This improvement ensures the seamless conversion of older project formats that contain large extents.
Fixed an issue where the Create Quick Limit Box command, when executed after the Pick Points command, created a limit box at the location selected by Pick Points instead of the location intended for quick limit box creation.
Known Issues
General Issues
Some new dialogs will not have translations.
F1 contextual help will not work with the Microsoft Edge browser as the default browser. The workaround is to set Chrome or Firefox as the default browser.
Non-ASCII characters are not allowed in the following conditions:
Import temp path
On computers with non-Latin user names. The user will not be able to create any project if the source data is stored anywhere under the user profile name. This issue will manifest itself in Japanese, Chinese, or any other language containing special non-Latin characters in the user name.
The SiteMap name cannot have non-Latin (Japanese, Chinese, etc.) characters for publishing to TruView Enterprise or TruView Cloud.
Japanese OS language preference is not selected by default and causes issues with some Cyclone REGISTER 360 PLUS imports. The user can fix this by manually selecting the language within preferences:
On the Japanese OS machine, launch the Control Panel.
Select the region (地域) and click the Accept button.
Select the Use Unicode UTF-8 for worldwide language support check box.
Reboot.
Screen Resolution Issues
Cyclone REGISTER 360 PLUS does not support display resolutions beyond 4K.
The Project & Storage dialog in Cyclone REGISTER 360 2024.0.2 may not fully fit certain screen resolutions. As a workaround, use the highest resolution available on your display and set the taskbar to auto-hide.
Scaling Issues
Windows scaling works best when set to 100%. Setting it to 150% or higher causes some graphical errors.
In some cases, Setup icons are misplaced when data is published to TruView Cloud. The workaround is to set Windows scaling to 100% as there seems to be an issue when set to 150%.
Some dialog boxes cannot be rescaled correctly and the OK button is not shown in the dialog box.
Scaling of 175% and 200% collapses the left side panel and cannot resize after collapse.
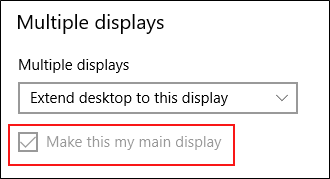
If experiencing problems with multiple monitors using Windows scaling higher than 100%, set the monitor running Cyclone REGISTER 360 PLUS as the main display.
Some panels have a dialog that does not fit correctly.
Graphics Card Issues
Cyclone REGISTER 360 PLUS will not detect the dedicated graphics card on computers with multiple graphics cards. Users must manually set the dedicated card for use with Cyclone REGISTER 360. This is done with the Nvidia Control Panel for Nvidia graphics cards, or with the ‘Catalyst Control Centre’ for ATI/AMD graphic cards.
Some graphic card anomalies can be caused by power management software. Please turn it off by setting the power management profile to High Performance.
Data Storage and Memory Issues
Cyclone REGISTER 360 PLUS projects located on NAS drives are NOT recommended.
Cyclone REGISTER 360 PLUS projects located on NAS drives show <1MB on the Projects & Storage tab.
If memory issues arise, check that the virtual memory size is set to the same size as RAM.
30 GB of temp space is needed for every billion points exported to a single RCP cloud.
Using Export to Separate Setups does not use the same level of temp space. Temp space is not generally a problem when exporting separate Setups.
Files written to the temp folder at C:\Users\(user name)\AppData\Local\Temp\Register360, will be deleted after the program closes. These files will NOT be deleted if the program freezes or crashes.
The currently active project should not be re-named from the Projects & Storage settings. Close the project before renaming it.
The use of LGSx files is only supported when the files are saved locally. Due to variations between network deployments, LGSx files may be unreliable when published to a network location.
Projects that have been accessed or modified using any version of Cyclone REGISTER 360 PLUS 2025 or later should not be relocated using any earlier version of Cyclone REGISTER 360 PLUS (e.g., 2024). Doing so will result in the deletion of the project and permanent loss of all associated data. The project will not be found in either the original or target location, leaving only an empty project folder.
To avoid this issue, use one of the following methods:
Perform the relocation using the latest version of Cyclone REGISTER 360 PLUS.
Manually move the project using Windows Explorer and then use the Reconnect function in Cyclone REGISTER 360 PLUS to reconnect the project.
Compatibility Issues
Mac OS’s running Windows Boot Camp is not officially supported. Cyclone REGISTER 360 PLUS supports Windows 11 on Windows-native devices only.
Virtual Machine (VM) environments are not supported.
Importing data over a network can cause issues, especially on Windows 10. The workaround is to copy the scan data to a local disk.
Some customers have reported Cyclone REGISTER 360 PLUS stops running when using AMD Ryzen 7 processors.
Due to variations between network deployments, Cyclone REGISTER 360 PLUS projects may be unreliable or slow to respond when accessed from a network location.
Remote Desktop is only supported if Cyclone REGISTER 360 PLUS is opened in the remote computer first. Trying to open Cyclone REGISTER 360 PLUS through a remote desktop is not supported.
LGS files from Pegasus OFFICE are not supported. Pegasus OFFICE was updated along with TruView and CloudWorx products to support the special LGS file that is produced by Pegasus OFFICE. The LGS file includes a trajectory, new image WayPoints positions, and image set rendering. These objects are not supported yet in Cyclone REGISTER 360 PLUS or Cyclone CORE. Cyclone CORE can import just the point cloud, but the depth maps, special images, trajectory, and new icons are not included.
FARO no longer shares the required SDK to support the import of FARO raw scanner files from the newest FARO Scanners. The workaround is to import into FARO Scene and export an FLS or E57 file.
CLM Issues
When using a standalone CLM installer, some EnterpriseElite users may find that the usage file (year-month.db) normally located at C:\Leica Geosystems\CLM\LogFiles does not get produced. Please ensure your LGS.opt file (located at C:\Program Files (x86)\Common Files\Leica Geosystems\License-Server\lgs.opt) looks like this:
DEBUGLOG +"C:\Leica Geosystems\CLM\LogFiles\lgs.log"
NOLOG IN
TIMEOUTALL 240
ENABLE_DB_HISTORY 1
PATH_DB_HISTORY C:\Leica Geosystems\CLM\LogFiles
ENABLE_DB_HISTORY should be set to 1 in this file. Please copy the file to a new location, edit it, and re-save it if the file says it’s read-only.
During the installation of CLM, users may encounter the following message. This is commonly due to a service like JetStream Enterprise running in the background.
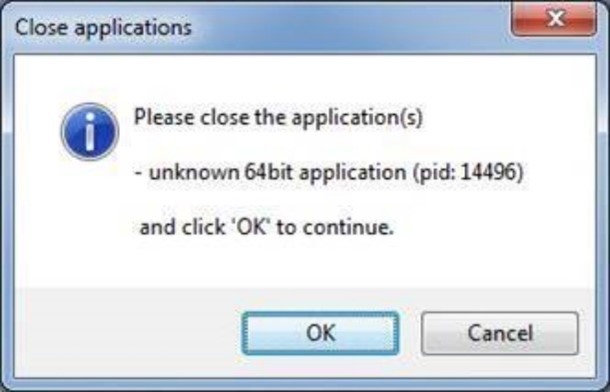
To enable the successful installation of CLM, please follow these steps:
1. Launch the Task Manager.
2. Navigate to the Services tab.
3. Look up the process with the PID (Process ID) shown in the Close applications dialog. In this case, it is JetStream.
4. Terminate the process so that CLM can be installed.
5. After CLM is installed, click the Services button in the Task Manager and restart the service.
Note: As of Cyclone REGISTER 360 PLUS 2023.0.0, Jetstream Enterprise is no longer supported.
Import Issues
In rare cases, when importing using Auto Cloud, Cyclone REGISTER 360 PLUS may hang. The data is imported correctly with links created. The workaround is to close Cyclone REGISTER 360 PLUS and open it again.
When importing BLK2FLY GPS data with the Wall Aligned UCS option, it ignores the UTM/State Plane coordinate UCS. The workaround is to not use Wall Aligned with UTM.
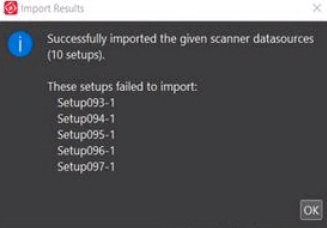
After importing from a BLK scanner (BLK360, BLK2GO, or BLK2FLY), if there were Setups that were not selected for import, there is a dialog box that states Failed to import on the un-selected Setups. The expected behavior is that these Setups should not be mentioned.
If FARO scans fail to import, please contact Leica support. The scans collected from the newest FARO scanner may not be imported. Please contact Leica support for the newest FARO SDK. It may be the case that new software from FARO needs to be downloaded and installed separately.
Once imported into 2021.0, B2G files are changed and are not compatible with older versions of Cyclone REGISTER 360 PLUS. Please make a backup copy of the B2G file BEFORE import.
After downloading Setups from the scanner, the dialog will show if the number of Setups selected is less than the total Setups on the scanner. While correct, this dialog should be ignored.
Export Issues
To publish a unified point cloud, ensure that the Create a point cloud during finalized registration option is checked to avoid incompatibility.
In rare cases, exports to LGS and RCP show different elevations on point cloud points than in Cyclone REGISTER 360 PLUS.
In Cyclone REGISTER 360 PLUS 2023.1.0, structured exports, such as RCP, E57, PTX, and PTG, may include deleted points on a second export, despite settings to export only cleaned point clouds. A workaround is available to restore point cloud cleaning from version 2023.1.0:
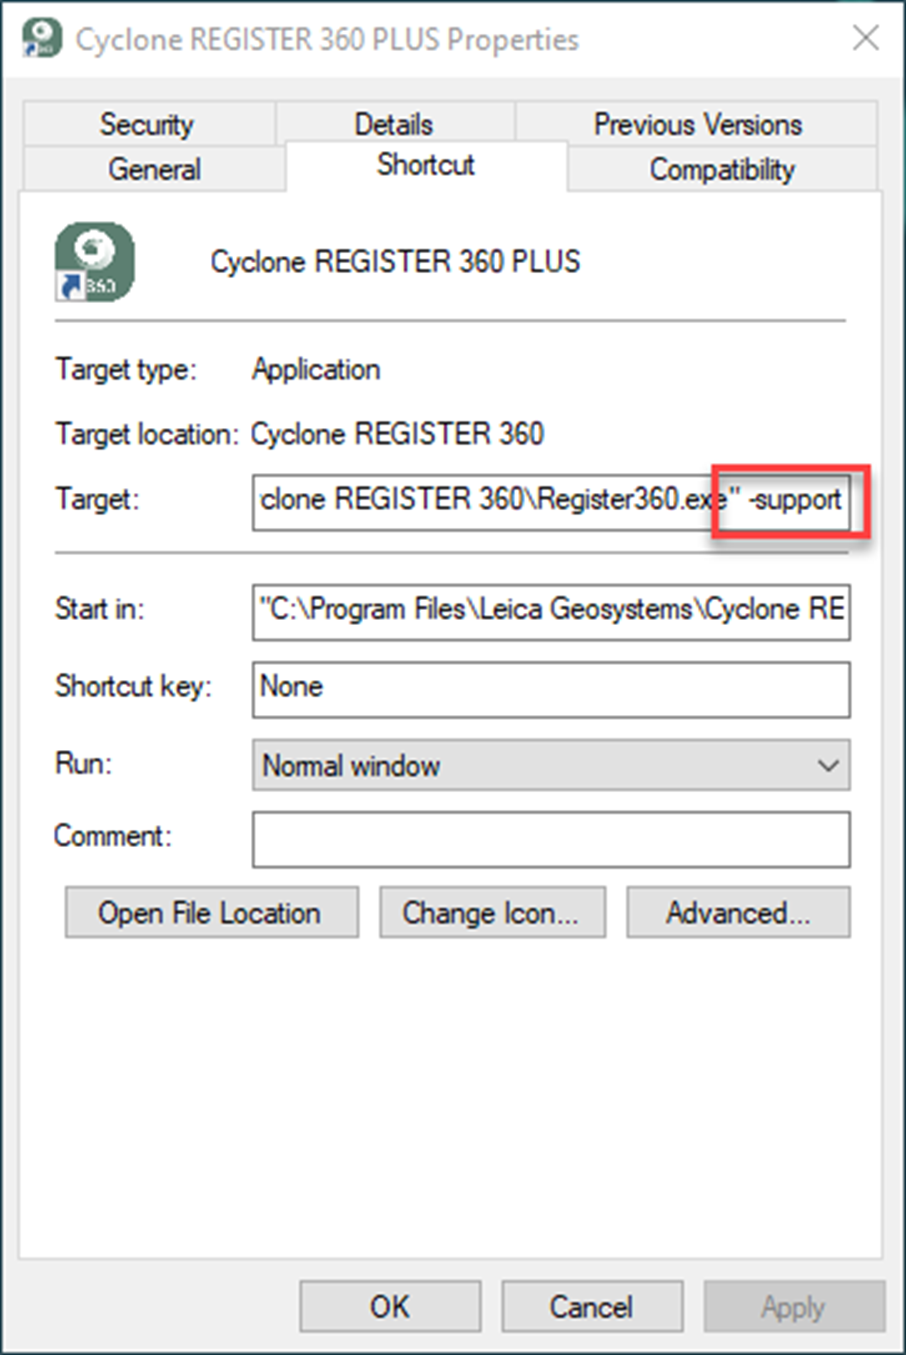
Create a shortcut to Cyclone REGISTER 360 PLUS on the desktop if one does not exist.
Right-click the shortcut and select Properties.
Append
-supportto the Target field entry, separated by a space as shown below:
d. Launch Cyclone REGISTER 360 PLUS via the shortcut.
e. Open a project that needs the cleaning restored.
f. Open the project requiring cleaning restoration.
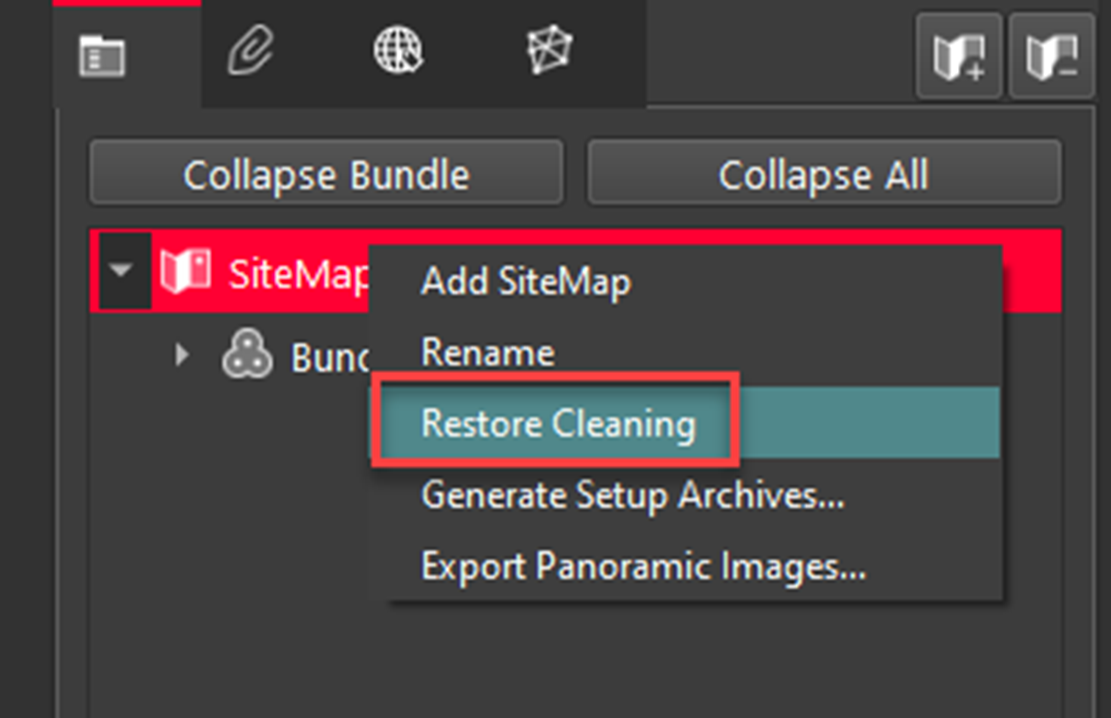
g. In the Review & Optimize area, right-click the SiteMap with the Bundle(s), and choose "Restore Cleaning". Cleaning will be applied to all Bundles in the SiteMap.
h. Proceed to the Finalize step, then to the Report step, and generate a new Finalized Registration.
i. Export using the desired structured format.
Project thumbnails (the image shown in the project explorer) are not preserved in the RAF export file.
After creating a Finalized Registration with a fenced area and exporting it to RCP with applied decimation through subsampling, certain Setups are missing from the exported RCP files. Splitting Setups into different SiteMaps increases the number of exported Setups but does not completely resolve the issue.
BLK360 Issues
When downloading scans from BLK360, progress is being made even though the dialog says 1% for much of the download.
When the BLK360 battery is low, download is not supported. The download button will not be clickable though no warning message is given.
When the BLK360 battery level is low, the charge percentage number is not shown.
When a download from the BLK Data Manager is cancelled, there is an intermittent error that causes the program to hang. The workaround is to restart both the scanner and BLK Data Manager and reconnect.
If a download is unsuccessful, a user might receive a message stating Downloaded 0 setup(s). If you receive this message, please re-download those scans.
BLK360 scans will appear chronologically in the Download Manager while BLK2GO walks will appear in alphanumeric order.
The temp folder may not contain non-ASCII characters.
If there is a synchronization issue between the tablet and the scanner (which may be caused by a poor or interfering Wi-Fi connection) items created on the tablet using FIELD 360 such as links, images, and geotags may not be synced back to the scanner. The workaround here is to download the data from the tablet using FIELD 360 rather than directly from the scanner.
In rare cases, downloading scans from BLK360 may fail. The workaround is to restart the BLK360 scanner.
Only BLK360 projects will appear when the user connects to Cyclone FIELD 360. Cyclone FIELD 360 does not store full project data for the RTC360 / P-Series and should be imported directly from the scanner's USB memory stick.
The Re-import image command does not function correctly when trying to import the image(s) from a BLK360 scanner with a cable connection, i.e. via LAN.
BLK2GO Issues
When a download from a BLK2GO scanner is cancelled, the user will not be informed.
The Save B2G file(s) function during import from the BLK2GO scanner is broken. The workaround is to use the Data Manager.
After the recommended firmware update for BLK2GO, in some cases, Setups are unable to be imported over Wi-Fi. The workaround is to import via USB-C cable.
Due to the unstructured nature of BLK2GO data, E57 files created from the scanner will not be supported for import into Cyclone REGISTER 360 2021.1 or earlier. Users should save original B2G files for future use.
BLK ARC Issues
As of version 2024.0.1, importing BLK ARC data, which includes static scans and FIELD 360 links, directly into Cyclone REGISTER 360 PLUS is not fully supported. This is because the image assets and static scans may not be fully imported. The recommended method for full data import is using BLK Data Manager 2024.0.1.
When importing BLK ARC scans containing georeferenced data, the global coordinates may not be read upon the first import of the raw data into Cyclone REGISTER 360 PLUS. The recommended workaround is to import scans twice using specific import settings mentioned in the workflow below:
1. Download the job from BLK ARC using the Data Manager.
2. Navigate to Settings | General and define Import settings in Cyclone REGISTER 360 PLUS. Ensure SLAM recalculation upon the import is enabled by choosing one of the settings below:
a. BLK: Re-Run SLAM
b. BLK: Use Re-Observation

3. Drag and drop the job folder into Cyclone REGISTER 360 PLUS and import the data.
4. Remove the imported scan from the project or delete the project altogether.
5. Import the same B2G file again:
a. Drag and drop the B2G file into Cyclone REGISTER 360 PLUS.
6. (Optional) Use the map to visualize the scans on a satellite map.
a. Click Show Geo Image Bar to visualize the satellite view.
b. Locate precisely the environment and click Get Image.
c. Click Place by Geo Coordinates to automatically place the scan according to the global coordinates.
d. Double-click the SiteMap to centre the view.
7. Select the Coordinate System in the Import options and define other Import and Registration settings.
Note: SLAM recalculation is not mandatory this time to retrieve the GNSS data.
a. Select Auto Cloud in Import settings to automatically align multiple scans.
8. Import the data.
Publishing Issues
There can be an issue when publishing to JetStream Enterprise with a large number of assets in the project. The workaround is to publish the project to LGS and then import the LGS to JetStream Enterprise.
Note: As of Cyclone REGISTER 360 PLUS 2023.0.0, Jetstream Enterprise is no longer supported.
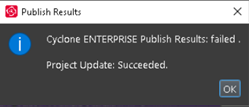
There is an issue where publishing to Cyclone ENTERPRISE may not direct users to the correct landing page. The workaround is to enter the Host Name and Port for the target server. The Host Name should only contain the top-level domain part of the URL. In some cases, a hostname may be valid for the connection test but will not work for publishing. In this case, the connection dialog will display the Project Selector. To solve this problem, edit the Host Name to remove all text after the Top Level Domain. For example, "https://mycycloneenterprise.com/abc...-////" should be trimmed to "https://mycycloneenterprise.com"
When publishing to Cyclone ENTERPRISE fails, the following error message could mean that:
The server has low disk space.
The network drive is disconnected.
Invalid file path.
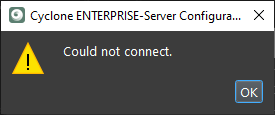
RCP publish will fail if the Setup published has zero points. The workaround is to restore the points for the Setup and publish again.
There is an issue with publishing data to TruView Cloud with Applied Control for projects created in Cyclone REGISTER 360 prior to 2020.0. The Setup icons do not match the SiteMap. The solution is to create another Finalized Registration, and then re-publish to TruView Cloud.
In some cases, when publishing to TruView Cloud, Setups do not appear in the SiteMap view. The workaround here is to publish to LGS and import the file into TruView Cloud.
When publishing an RCP file, the progress bar will appear and stall at a certain interval. Though the progress bar does not update, the export is progressing. Users may check the task manager to ensure that the service is still functioning.
When publishing an LGS file, the Hue and Greyscale pano layers will show the uncleaned cloud. A workaround is to publish to E57, re-import the data, and then publish to LGS.
The 2-billion-point limitation has been removed when publishing to RCP.
Classification Issues
In some cases, the Classified Point Clouds seem to disappear when switching between SiteMap and Bundle Cloud View or Setup View. Selecting Show/Hide Setups twice can refresh the screen and they will be visible.
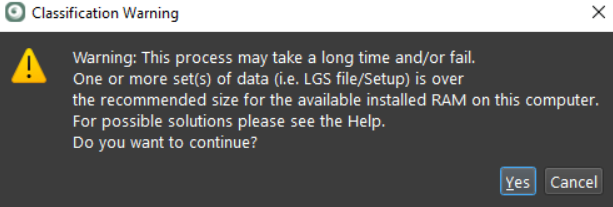
Auto-Classification runs one Setup at a time. In case a very large point cloud is detected, the following warning will appear.
Asset Issues
When Panoramic images are turned off in a Setup View, the camera position may occasionally change and appear inverted. Going back to the SiteMap view and then into the Setup View again will fix the issue.
Automatic image matching of imported panoramic images may not always be correct.
On rare occasions, HDR images may appear grey with very little variation. The workaround is to open the image with the Tone Map Editor and re-save the image.
In some cases, E57 files published from Cyclone REGISTER 360 PLUS, when imported into ReCap, may display blurred imagery when entering the Setup location sphere. This is a known issue with ReCap's handling of E57 files. RCP files published from Cyclone REGISTER 360 PLUS do not show any display issues. The E57 export using the Compatibility mode option may help with this issue.
The zoom scale bar will be captured in the image in the Import area when using the satellite or street map.
Applied Control Issues
If a Control file has a leading space (a space as the first character), then that line is ignored. The workaround is to manually delete the first line.
A published RCP that has Applied Control with very large coordinates shows a black map rather than a color image. The workaround is to create another map in ReCap.
In some cases, if the scanner was inverted and automatically acquired targets, applying control fails. The workaround is to manually acquire the targets.
Virtual target snaps below were clicked and the exported data has different coordinates to those in Cyclone REGISTER 360 PLUS. The workaround is to lock the Bundle before applying control.
Target Usage Issues
Paper Targets should not be placed on significantly curved surfaces. The workaround is to create a virtual Target rather than using the algorithm to best fit these cases.
Inserting virtual Targets with BLK2GO data can have issues if the Pano image is on. The workaround is to turn off the Pano image and then create a virtual Target.
UCS-Related Issues
When a Setup has a UCS created from it, the UCS must first be deleted before the Setup can be deleted from the project.
Cloud-to-Cloud Registration Issues
The cloud used for Cloud-to-Cloud registration cannot be cleaned by the Smooth Surface feature. Therefore, the options for which cloud to clean are not available.
Point Cloud Issues
Scans that have more than one point cloud in a Setup are not properly displayed. This can be the case when a C10 has a full 360 scan and a highly detailed window scan. The scans still exist and can be exported.
After editing an HDR tone map, other versions created will still show the original tone map in the thumbnail but the Pano and point cloud will be correct.
Bundle Optimization Issues
In rare cases, the Bundle will show an optimized state, but there is still an unoptimized Link in the Bundle (not shown with a dotted line). Optimize the Bundle to resolve the issue or split the Bundle into smaller Bundles and look for the suspect dotted line Link, delete this Link, and re-optimize.
Finalize Step Issues
Hyperlinks in the master SiteMap in the Finalize area, once created, will hide behind the inserted image, but will still export to TruView, Cyclone ENTERPRISE, and LGSx properly.
SDK and Library Compatibility
To ensure exceptional performance, reliability, and security, Cyclone REGISTER 360 PLUS is regularly upgraded to incorporate new external libraries and SDKs.
Cyclone REGISTER 360 PLUS 2024.0.1
The BLK Mobile API and BLK Mobile SLAM library are updated to 4.1.0 and 2.3.1, respectively.
The .NET framework has been upgraded to version 4.8.1.
Cyclone REGISTER 360 PLUS 2025.0.0
CLMnext 3.3 has been upgraded to version 7.1.0.
pcStruct SDK has been updated to version 9.0.
Deprecated Features
Leica Geosystems strives to provide support for the widest array of operating systems and file formats possible as is reasonable given current technologies and support from third-party partners.
With each release, we review our list of currently supported formats and operating systems in line with industry trends and announce product terminations.
Leica Geosystems may add or terminate support for a file format during any release. Obsolete operating systems will be supported for six months after their announced termination or the next major software release, whichever comes first. Server products will be supported in alignment with Leica’s Client License Manager (CLM) supported servers to guard users against incompatibility.
Cyclone REGISTER 360 2020:
TVG files are no longer published. Users should use the LGS format. If a TVG is required, users can Publish to TruView Local and run the dataset through the free utility Leica Pack&Go.
Cyclone REGISTER 360 2021:
Windows 7, 8, and 8.1 are no longer supported.
Cyclone REGISTER 360 PLUS 2023.0.1
FARO raw scan files from the newest FARO scanners are not supported due to a lack of availability in the FARO SDK.
Cyclone REGISTER 360 PLUS 2023.0.0:
Publishing to TruView Local and JetStream Enterprise is no longer supported.
Cyclone REGISTER 360 PLUS 2023.0.3:
ZFC scanner data files are no longer supported due to a lack of updated supporting MS redistributables.
iStar Camera images are no longer supported due to the lack of updated supporting MS redistributables.
Cyclone REGISTER 360 PLUS 2023.0.3:
This release of Cyclone REGISTER 360 PLUS will only support MS redistributables supported by Microsoft.
Licenses
All users with valid CCP for either Cyclone REGISTER 360 or Cyclone REGISTER 360 PLUS or Cyclone REGISTER, or with CCP valid as late as 1 Feburary 2025, can run this new version of Cyclone REGISTER 360 PLUS with no new license required.
All users with valid CCP for Cyclone REGISTER 360 (BLK Edition) or Cyclone REGISTER 360 PLUS (BLK Edition) or with CCP valid as late as 1 Feburary 2025 can run this new version of Cyclone REGISTER 360 PLUS (BLK Edition) with no new license required.
Users do not need to migrate to a Cyclone REGISTER 360 PLUS or Cyclone REGISTER 360 PLUS (BLK Edition) license in order to run Cyclone REGISTER 360 PLUS if their CCP or subscription is valid.
