What is Livelink
Livelink is a cloud-enabled collaboration workflow that connects field and office teams throughout the reality capture process. Integrated with the Leica RTC scanner series, Cyclone FIELD 360, and Hexagon GeoCloud, Livelink enables scan data to be shared between the field and the office as a project progresses.
Using a shared cloud scene, field operators can upload scan data directly from Cyclone FIELD 360 while continuing acquisition activities on site. At the same time, office-based users can access the incoming data, review project progress, and verify data completeness without waiting for the survey to be finished.
Livelink helps your team:
Connect field and office workflows through a shared cloud workspace.
Synchronize scan data between Cyclone FIELD 360 and Hexagon GeoCloud.
Monitor project progress as new scans become available.
Collaborate with multiple users on the same project.
Check data completeness and coverage while work is still underway.
Reduce the risk of missing data and costly return visits to the site.
By creating a continuous connection between devices, data, and users, Livelink streamlines reality capture workflows and enables faster project delivery with greater confidence in the collected data.
Before you start
Before using Livelink, ensure the following requirements are met:
Requirements
A supported Leica RTC scanner is available and configured: Livelink is available only for RTC 300/500/700
Cyclone FIELD 360 v. 7.2 is installed on your mobile device
You have a valid and active Hexagon GeoCloud account
Your account has Editor role: only Editors have permission to create and access Livelink Scenes.
Only Company Accounts can join the Livelink project and scenes from Field360. Invitations to External Accounts can be sent only via Hexagon GeoCloud on the desktop
An internet connection is available for authentication and data synchronization: the scanner is using the wifi connection with the tablet, therefore to synchronize the data while the scanner is connected, cellular data is required
Recommendations
For the best Livelink experience:
Verify internet connectivity before arriving on site.
Ensure all devices are running supported software versions.
Confirm that office collaborators have access to the same Livelink Scene.
See the best practices in detail here.
Key Concepts
Description | |
Livelink Scene | The shared cloud project where synchronized scan data is stored and accessed by collaborators. |
Local Job | The Cyclone FIELD 360 Job, running on the tablet in the field, created and synched with a connected scanner |
Shared scans | Scan data that has been synchronized to the Livelink Scene and is available to collaborators. |
Scanner Data | Data currently stored on a connected scanner and available for import into the project. |
Workflow
Workflow Overview
This workflow describes how to:
Log in in to Hexagon GeoCloud.
Create a Livelink Scene.
Connect a local FIELD 360 job to the Livelink Scene.
Capture and synchronize scan data.
Visualize and check shared and scanner-resident data in the Data Browser and in the map view.
Step 1: Sign In to Hexagon GeoCloud
To use Livelink, you must first sign in to Hexagon GeoCloud. For the full procedure, see Login to Hexagon GeoCloud.
Step 2: Create a Livelink Scene
A Livelink Scene is the shared cloud workspace used for collaboration between field and office users.
Tap on the main project creation button in the Field360 Job Browser
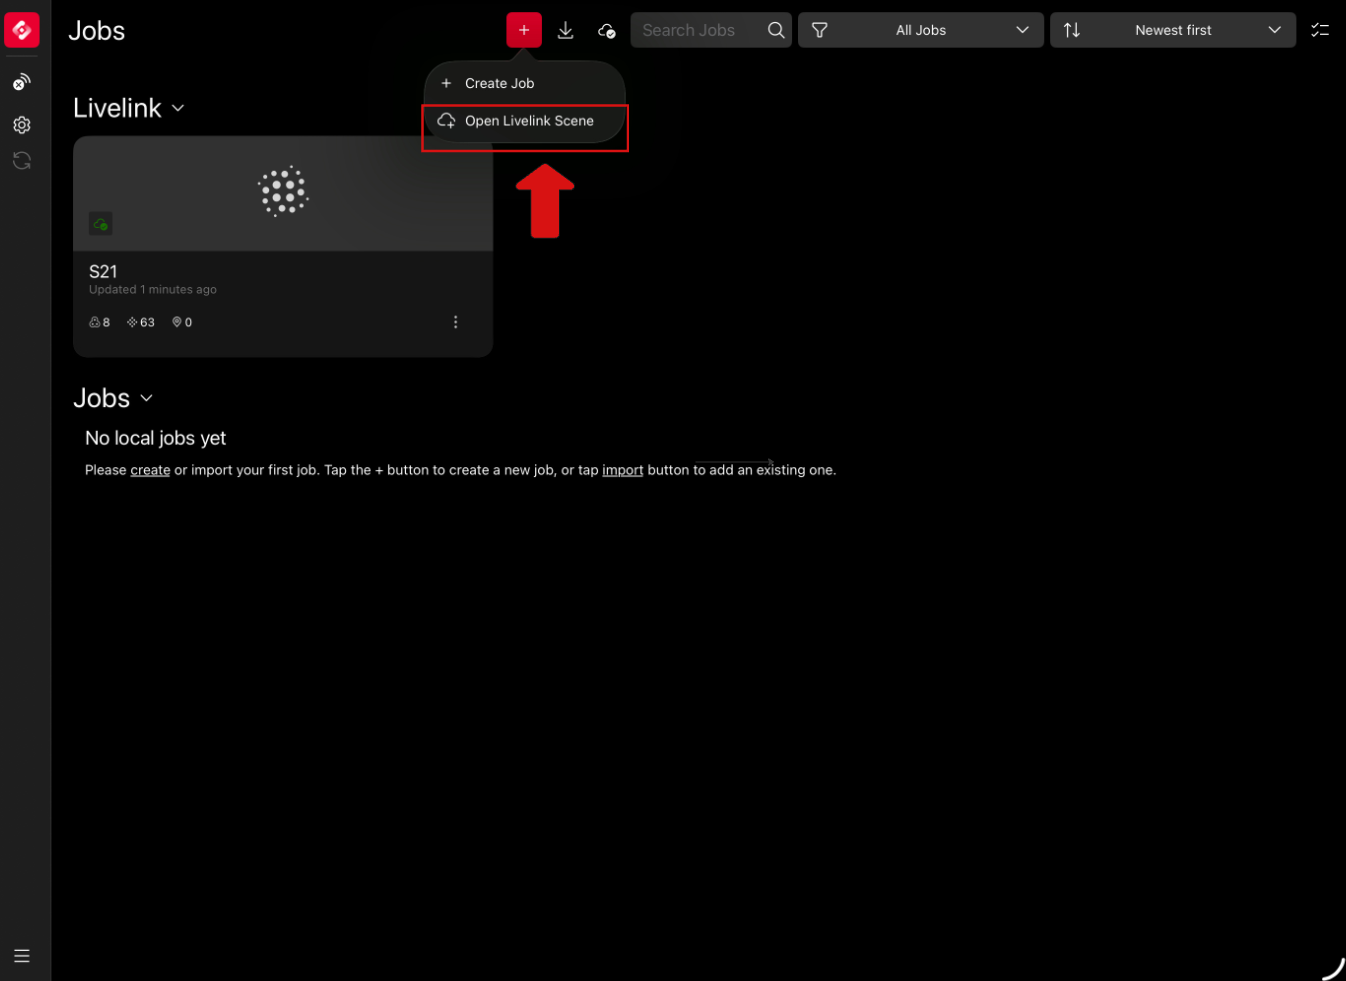
Select Open Livelink Scene
Select a Project from the list where you want to store your Livelink scene
or
Create a new project
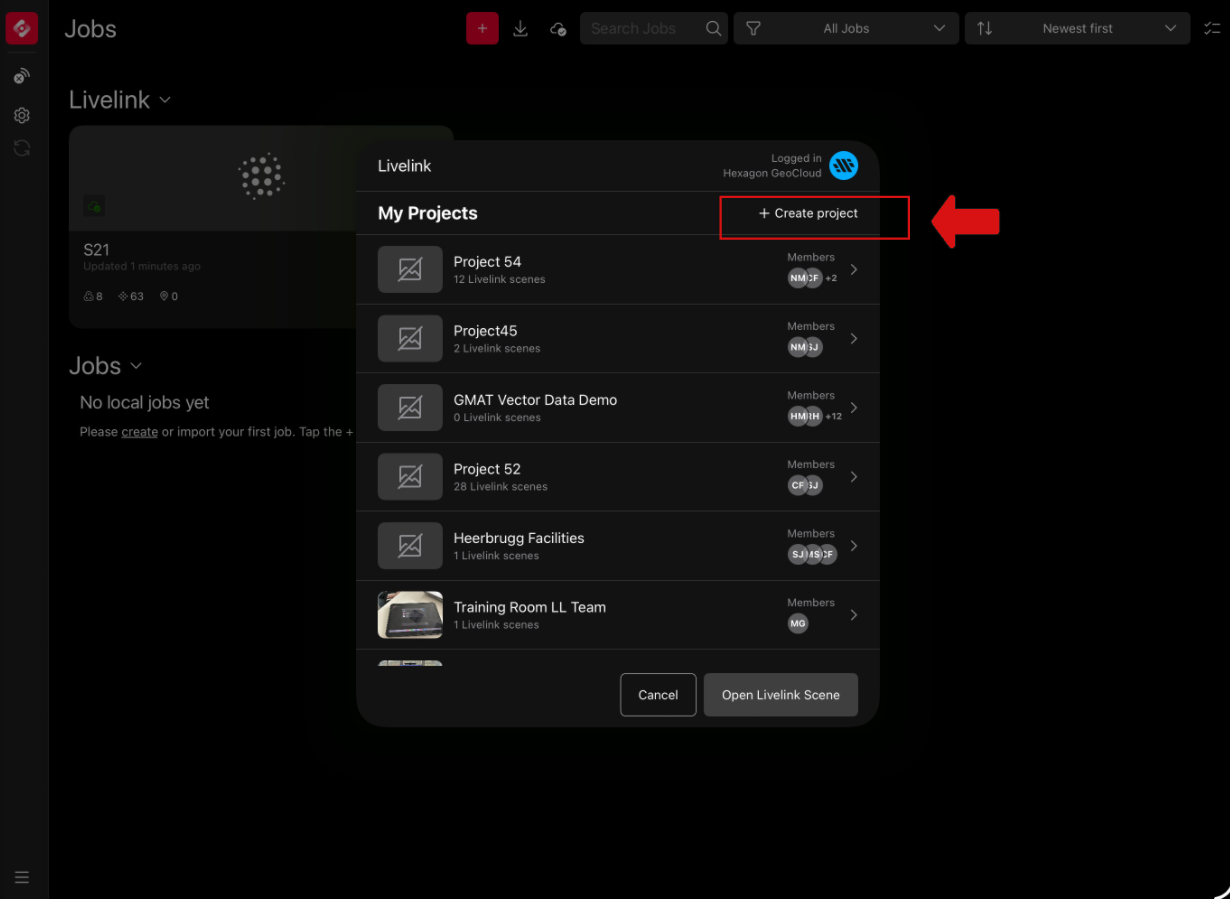
Add a Title
Add the project information such as the storage region
Please ensure to invite members to the project: only if you are a member you will be able to see the livelink scene on your own Field360 and work with it and collaborate with the other members
Optionally add a description.
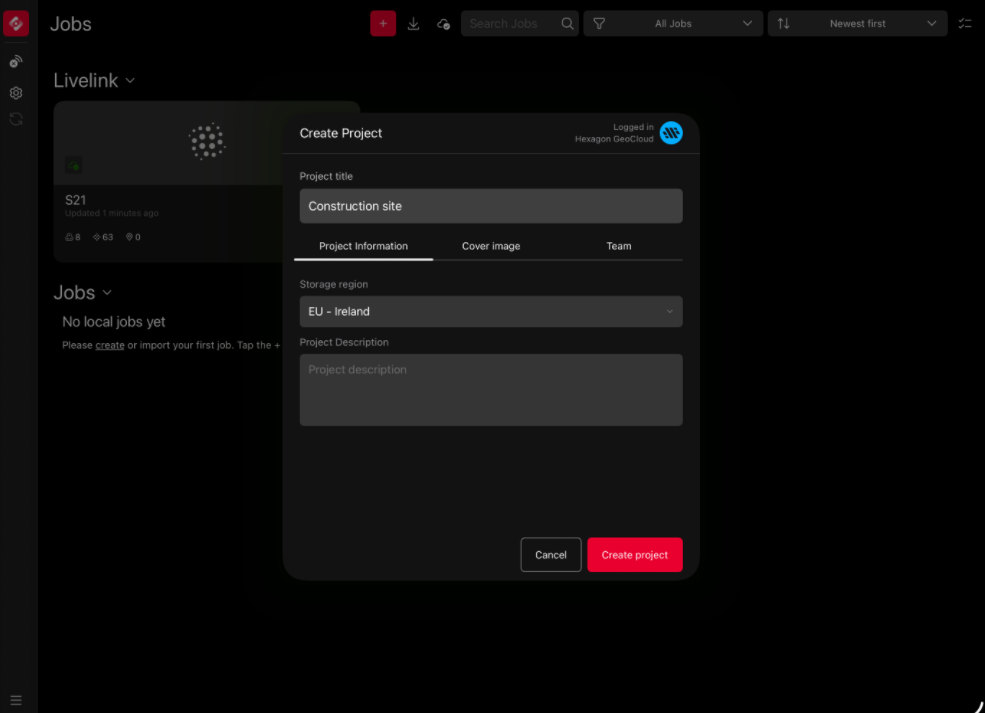
Create a Livelink Scene
Enter a title and press Create
This operation creates a scene in the cloud, so it might take few seconds to show in the window. After the scene is shown, select it tapping on it
Click Open Livelink Scene
In this moment the scene will be synched with Field360. Wait few instants until the success screens show. Now you can close and see the Livelink scene in the browser.
The new empty Livelink Scene is created and becomes available in Cyclone FIELD 360 and Hexagon GeoCloud for scan data synchronization and collaboration.
How all the Team Members can collaborate in the same Livelink Scene?
Every Team Member with a Field360 installed can now Open the same Livelink scene.
repeat steps 1 and 2.
Select the project where the previously created Livelink scene has been created
Select the scene and Open it
You will see it in your browser, ready to be use
Step 3: Merge a Local Job to a Livelink Scene
To begin scanning into a newly created livelink scene, merge a Cyclone FIELD 360 local job to an existing Livelink Scene.
Connect the scanner to Cyclone FIELD 360
Create a local job
Select Merge with LiveLink Scene in the 3 dots menu
Choose the target Livelink Scene.
Review the job and scene information.
Confirm the merge operation.
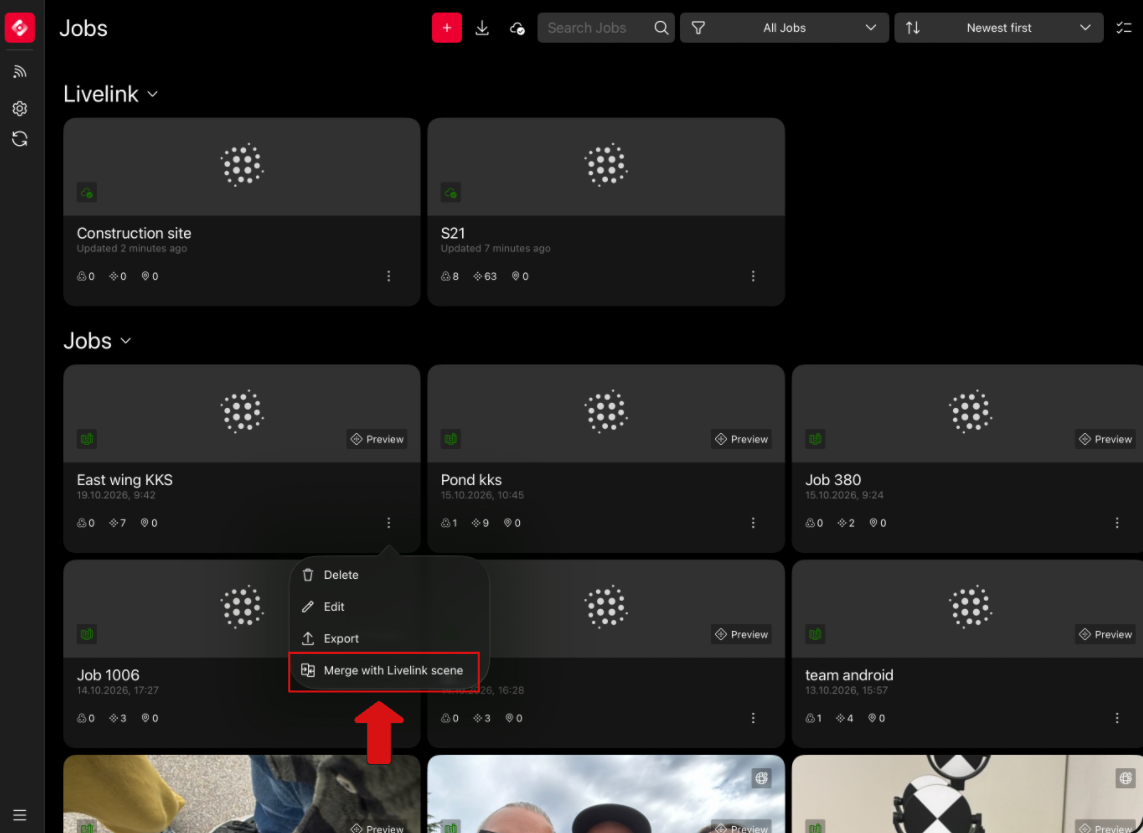
Result
The local job will not be visible anymore in the Job browser, since it is now part of a Livelink scene.
Important!
The local Job still exists on the scanner. Deleting the Livelink scene will restore it in the Job Browser
What if I deleted the Livelink Scene from Cyclone FIELD360?
Deleting a Livelink scene in Field360 will not delete any data from the cloud.
Every scan data that has been synchronized with Hexagon GeoCloud using Livelink is stored in the cloud and can always be re-synched to Field 360 by re- opening the Livelink scene.
Can I merge a local Job that stores already scan data?
Yes. The local Job Merge option can be also used to import already existing scan data into a Livelink scene to become part of a collaborative project.
Step 4: Capture and Synchronize Data
Now the Livelink scene is ready to be used to capture and share your data.
The capture procedure does not change with respect to the traditional approach: use the scan button to open the miniplayer, adjust the scan settings, and start scanning.
The linking and alignment steps are also not changing: you can use Quick Link to quick regiser the scans based on the VIS position or start a manual alignment to better check the overlaps. You can run Optimization to refine the registration and finally visualize the links in the map.
Thanks to Livelink, as scans are added to the scene, they become available to every team member. This means that, if two (or more) team members are working simultaneously into the same livelink scene, each of them will be able to visualize each other data and edit them (Rename, Delete, Move, Link)
Livelink synchronizes preview data
The data that Livelink synchronizes to the Livelink Scene is preview data, not the full raw data stored on the scanner. The full raw data remains on the scanner.
Step 5: Visualize and Check Your Data
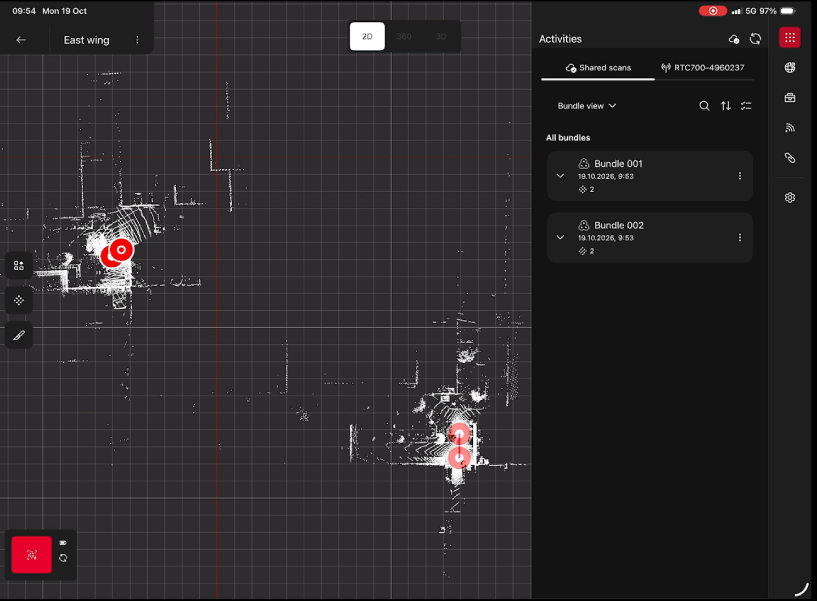
When a job is connected to a Livelink Scene, the Data Browser provides separate views for cloud-shared data and scanner-resident data.
Shared Scans Tab
The Shared Scans tab displays data that belongs to the Livelink Scene.
Use this tab to:
Review synchronized scans.
Verify which scans have been shared with collaborators.
Monitor project progress.
Scanner Tab
The Scanner tab displays data currently stored on the connected scanner.
Use this tab to:
View scan setups available on the scanner.
Review and manage newly acquired data.
Map View
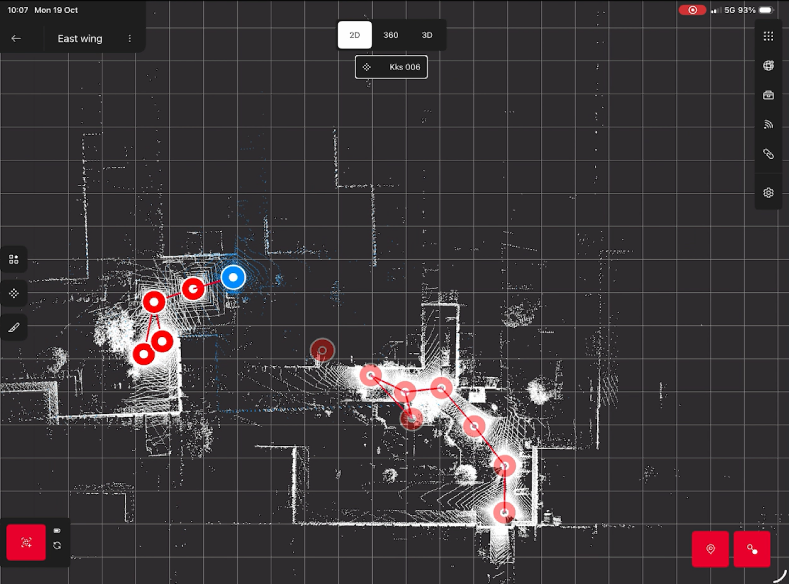
In the map view, setup positions are displayed in red. How a position is displayed tells you which scanner produced the setup:
Solid red: setups scanned with the scanner that is currently connected.
Transparent red: setups scanned by a different scanner, which is not the one connected at the moment.
In this way, you can see at a glance which setups come from the connected scanner and which were scanned by another scanner.
What’s possible in Livelink?
Scanning
Linking and registering
Georeferencing (all the surveying workflow for RTC series included)
Using Tools (Measurements and Limit Boxes)
Warning!
In Cyclone FIELD 360 v. 7.2 GeoTags, Measurements and Limit Boxes are not synchronized with the cloud
Synchronization status and performances may depend on network availability and project size.
Best practices for a flawless Livelink scanning campaign
For an optimal experience, we suggest following these simple rules:
Check connectivity. Check 4G or 5G network availability before starting, as Livelink performance depends on the network. Losing connectivity does not stop your work in the field: you can keep scanning into a Livelink scene while offline, and data synchronization with Hexagon GeoCloud resumes automatically as soon as the connection is restored.
Prepare the scene. In Cyclone FIELD 360, create a Hexagon GeoCloud project and add your team members. Then create a scene: all team members can contribute to it from both Cyclone FIELD 360 and Hexagon GeoCloud.
Limit conflicting edits. Coordinate edits with your team to minimize concurrent operations on the same Setup, as these can cause conflicts and unexpected results.
Coordinate the registration. If two (or more) team members are scanning simultaneously in a scene, we recommend that each of them creates an independent Bundle of Setups. At the end of the scanning campaign, one team member links all the previously created Bundles and optimizes the field registration.
Identify who scanned what. To distinguish more easily which team member each setup comes from, we recommend using the setup name template.