
Release Notes | 2023.1

TruView 2023.1
What’s New
This is a major release which includes support for a new data architecture structure and new measuring tools/enhancements amongst other new features and improvements.
LGSx support
For this release a new data architecture has been implemented at the very core of our Reality Capture software products and our popular file format, the LGS file. The update provides a next-generation solution for our Leica Reality Capture data and includes faster writing (publishing), higher compression, and new core architecture that will allow us to build out new capabilities and features to meet your growing needs, like file versioning (i.e., track changes to GeoTags, markups, etc.), in the future.
As part of the new data architecture there is a change to the LGS format. The new format, called LGSx, will contain the new data architecture and will not be compatible with versions of Reality Capture software older than 2023.1.0 (this release).
The next part of the description varies widely depending on the product, but the core decision is to refer to HSPC as the “new data architecture”.
A full list of LGS\LGSx compatibility is shown below:
Software | Import/Open | Export/Save As |
TV desktop 2022.1 and older | LGS | LGSx |
TV desktop 2023.1 and newer | LGS/LGSx | LGSx |
Cyclone ENTERPRISE 2022.1 and older | LGS | LGS |
Cyclone ENTERPRISE 2023.1 and newer | LGS/LGSx (LGS gets converted to LGSx on import) | LGSx |
TVE/TVC 2022.1.0 and older | LGS | LGS |
TVE/TVC 2023.1.1 and newer | LGS/LGSx (LGS gets converted to LGSx on import) | LGSx |
CyCore 2023.1 | LGS | LGS |
CyCore 2023.0.2 | LGS | LGS |
Reg360 2023.1 | LGS/LGSx | LGSx |
Reg360 2023.0.2 | LGS | LGS |
Reality Cloud Studio | LGS (LGSx date TBD) | LGSx (date TBD) |
CloudWorx 2023.1 and newer | LGS/LGSx | N/A |
CloudWorx 2023.0 and older | LGS | N/A |
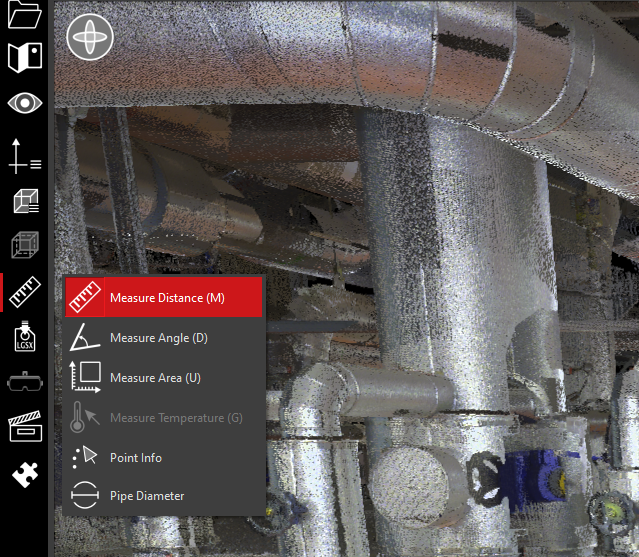
Point Snapping
When using the distance measuring tool, users can now easily measure from objects of interest. Measurements can now be snapped to pipe centerlines, pipe edges and GeoTags. Pipe snapping options can be toggled on or off at any time while measuring using the buttons in the floating toolbar. These tools will automatically snap to the pipe centerline or edge while measuring.
If the tool is unable to detect a pipe it will display an error message. Pipe snapping is only available when using the Measure Distance measuring tool.
Snapping to objects of interest will improve the accuracy of user’s measurements and allow them to take advantage of the work already done to place GeoTags on objects during data collection in the field.
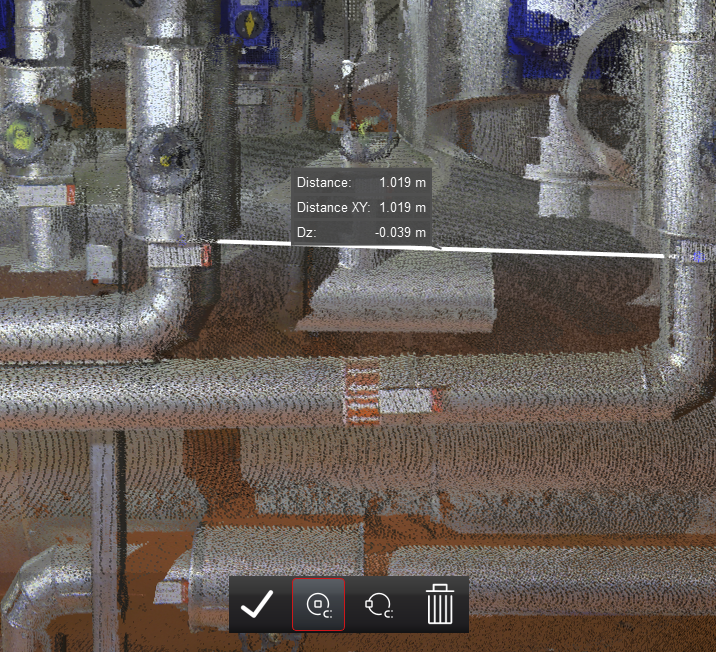
Pipe Centerline
This tool will automatically detect the centerline of the pipe and snap to it once the measurement is complete. The first click will place a point on the edge of the pipe wherever the user clicks. Upon the second click, the tool will adjust the pick to the centerline of the clicked pipe(s).
Users can snap between a pipe centerline and any other point include another pipe edge, a centerline, a GeoTag or any other point in the project.
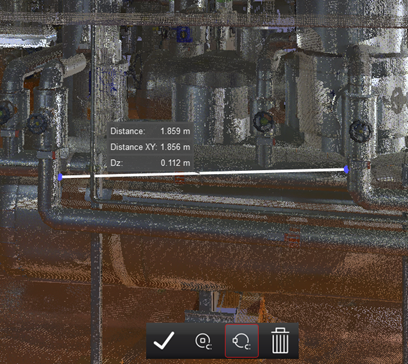
Pipe Edge
This tool will automatically detect the edge of the pipe and snap to it. Users can snap between a pipe edge and any other point include another pipe edge, a centerline, a GeoTag or any other point in the project. The first click will place a point on the edge of the pipe wherever the user clicks. Upon the second click, the tool will adjust the pick to the edge of the pipe closest to the second click to determine the distance between the edge of the pipe and the other object.
Snap to GeoTags
While using the measuring tools, hovering over a GeoTag will snap to its exact location. GeoTags will display with a halo effect when they can be selected. Clicking on the GoeTag while hovering over it will snap the pick point to the location of the GeoTag. This feature is automatically turned on while using measuring tools. To pick a point behind a GeoTag, turn off GeoTags in the visibility panel.

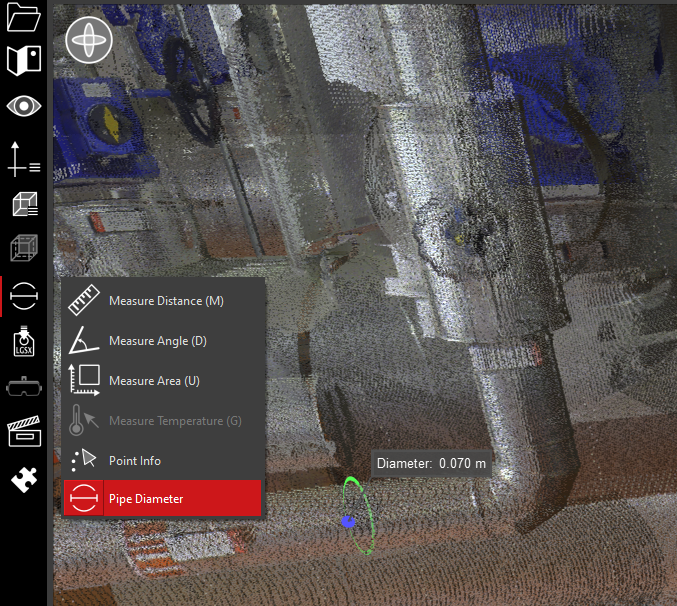
Measure Pipe Diameter
Users can now measure the diameter of a pipe via a one-click measurement tool. The tool is located in the measurement menu. Once the tool is selected, click on a pipe in the point cloud. The tool will output a diameter in the unit of measurement defined in the TruView settings. If the tool is unable to detect a pipe it will output an error message.
Color GeoTags by Category
GeoTags can be rendered by category by selecting the Color GeoTag by Category button.

The Color Geotag by Color dialog contains two options for rendering GeoTags. By default the Color by Category option is turned off. This disables the Category table control. The GeoTag Color control at the bottom of the dialog will be active. This control can be used to render all GeoTags as the same color. Click on the color control to open the color picker and choose a color.

Truning on the Color by Category option will activate the category table control. This will display each GeoTag category in a list with a color picker for each category. GeoTag categories can be added to individual GeoTags by opening the GeoTag properties for each GeoTag in the GeoTag panel and adding a value to the Category field.
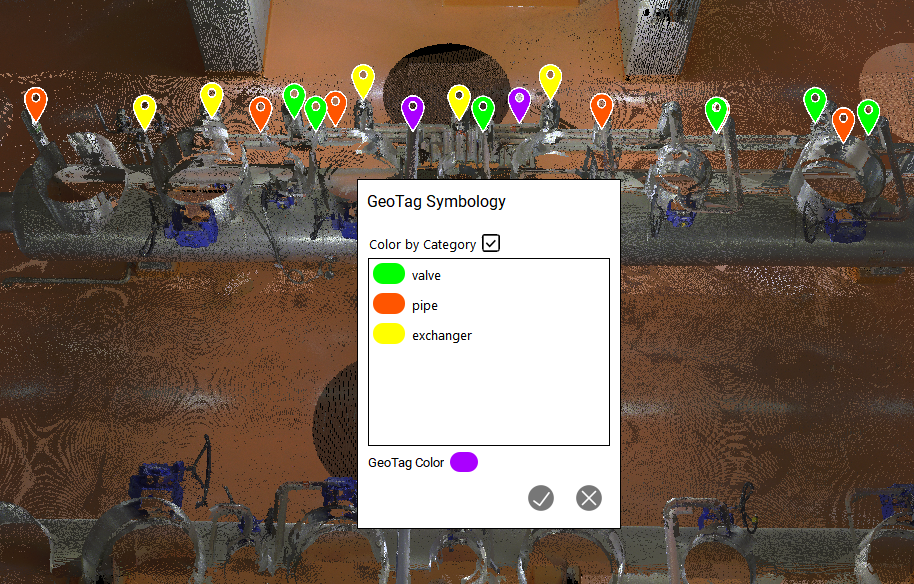
GeoTags that do not have a category associated with them will be labelled as <No Category> in the GeoTag symbology dialog and adopt the overall GeoTag color for the program.
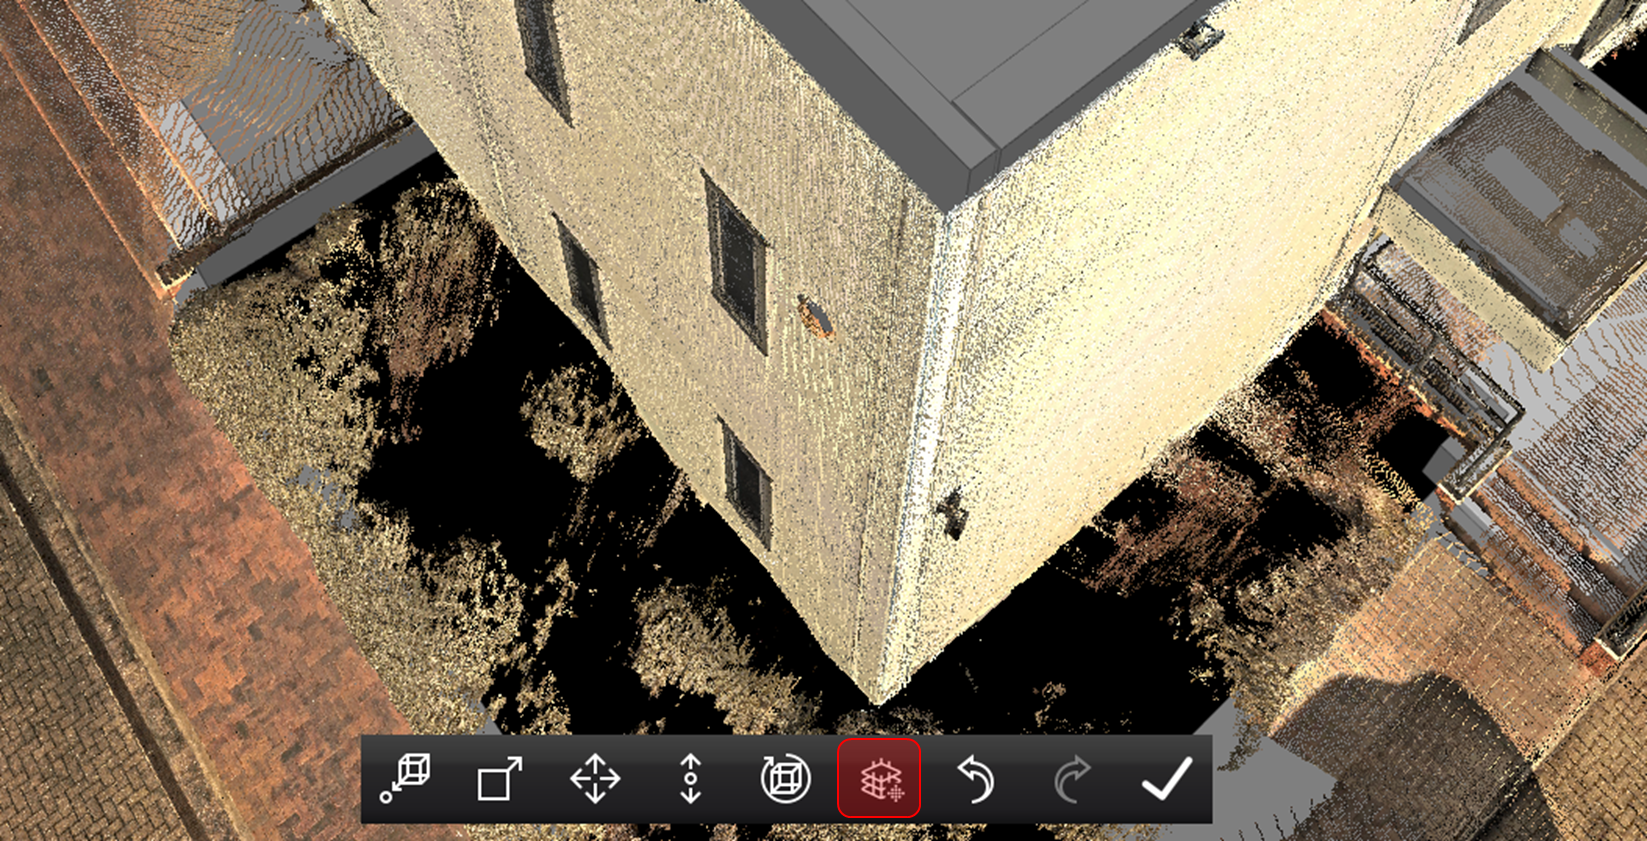
Touch Friendly Clip Box Creation Tools
The Clip Box creation tools have been improved to support users of touch screen devices. They can be invoked from the tools menu, as in previous versions. In addition to the new touch-friendly controls, users may also click and drag the box faces as in previous version of the product.
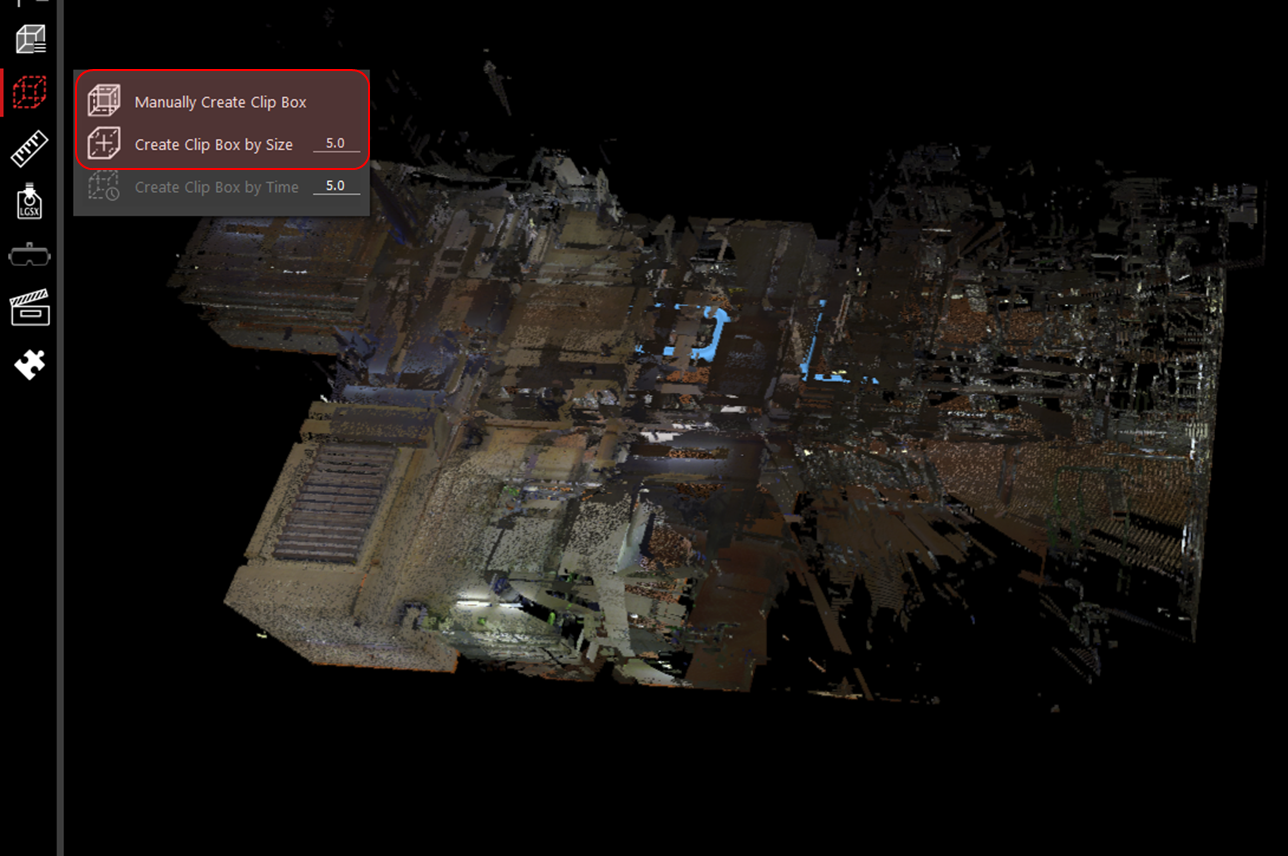
Once a Clip Box is created, several controls will open around the perimeter of the screen that can be used to manipulate the clip box with a mouse or on a touch screen.
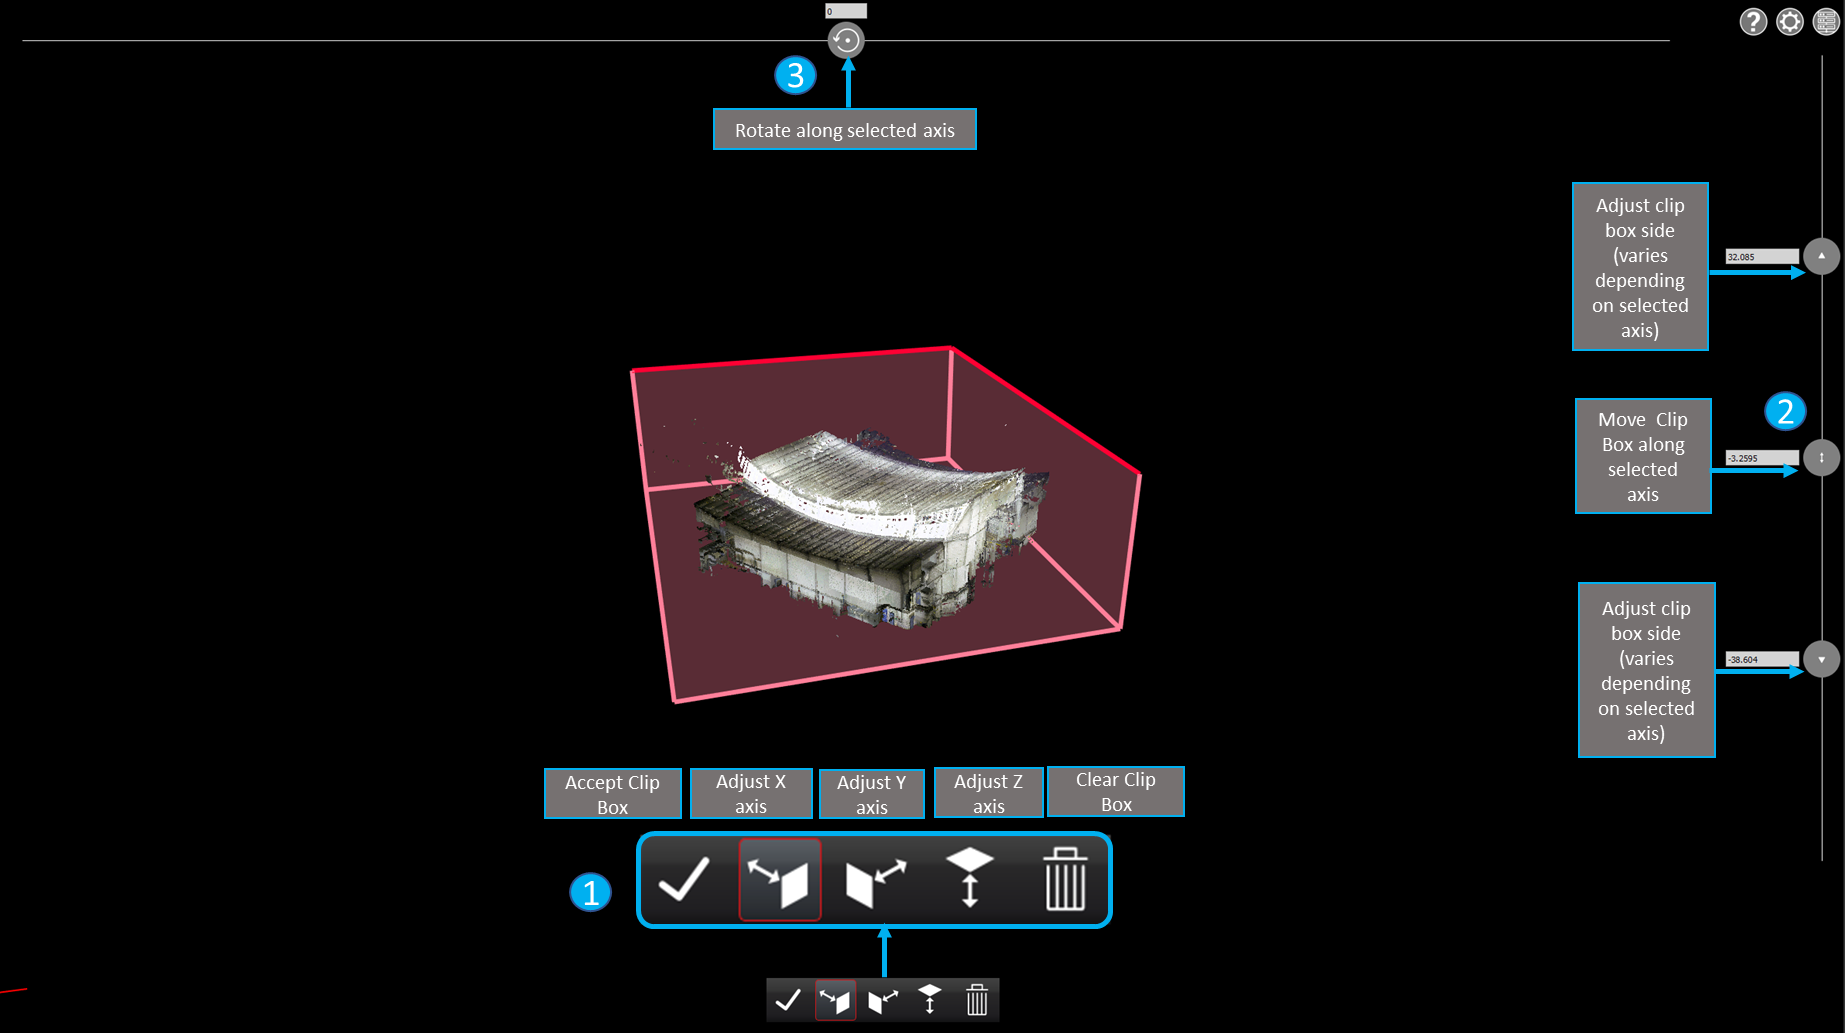
1. Primary toolbar
Accept Clip Box - When you are finished editing the Clip Box, click on the Accept Clip Box button in the floating toolbar to add it to the list of saved Clips
Adjust X Axis - Set the active editing axis to the X axis
Adjust Y Axis - Set the active editing axis to the Y axis
Adjust Z Axis - Set the active editing axis to the Z axis
Clear Clip Box - Delete the Clip Box that is being edited and close the editing session
2. Clip Box adjustment
The Clip Box adjustment control on the right-hand side of the viewing window can be used to adjust the extents and location of Clip Box along the selected axis. The buttons on the top and bottom of the slider control can be used to adjust the edges of the Clip Box. The button in the middle of the slider control can be used to adjust the location of the Clip Box. Optionally, you can manually type values into the text boxes next to each of these controls. The values should be in the same unit as the coordinate system being used.
Clip Boxes can also be adjusted by clicking and dragging any face on the Clip Box itself. Hold the SHIFT key to access the back faces of the Clip Box.
3. Clip Box Rotation
The Clip Box rotation control at the top of the viewing window can be used to rotate the Clip Box along the selected axis. Moving the control to the left will rotate the Clip Box counterclockwise. Moving the control to the right will rotate the Clip Box clockwise. Optionally, you can manually type a degree of rotation value into the text box next to the rotation controls. The value should be between 0 and 360 degrees.
Clip Boxes can also be rotated by holding the ALT key then clicking and dragging the corner of the Clip Box.
Model Smart Align
The Smart Align tool automatically adjusts the alignment of models to a point cloud. In order for this to work you will need to manually bring the model and point cloud in proximity of one another. You can then select the Smart Align tool and it will automatically align the model to the point cloud. This will allow users to rapidly align un-georeferenced models to the point cloud without having to take the objects into a licenses project resulting in a time savings to the user and improved accuracy over pure manual alignment.
Smart Align Tool usage:
Open the project that contains the point cloud that you would like to align to the model.
Select the appropriate UCS, if applicable.
Add a model to the project.
bring the model into the proximity of the point cloud using the manual alignment tools. They should have good overlap without being perfectly aligned.

Select the Smart Align tool.
Once the tool completes a dialog will open displaying the transformation information.
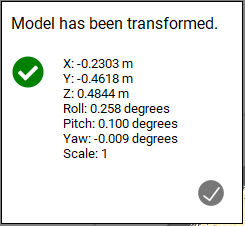
The complexity of the model can impact the tool’s ability to automatically align it to the point cloud.
Shaded Surface Lighting
In this release, a new Shaded Surface Lighting rendering mode is introduced that improves point cloud visualization. This feature allows transformation of point clouds into shaded surfaces that dynamically respond to the lighting and the camera perspective, providing an immersive experience. As the camera's perspective changes within the scene, the point cloud dynamically responds to the lighting conditions, resulting in a realistic and engaging visualization.
The Shaded Surface Lighting rendering mode simulates the behavior of light reflecting on the shaded surfaces. When viewing a surface directly, it appears at its brightest, closely resembling real-world behavior. As the perspective shifts and the surface is viewed at an angle, it gradually darkens, enhancing the realism of visualizations.
The Shaded Surface Lighting mode can be accessed and toggled On/Off using the “Shaded” icon in the Toolbar is available for all point clouds coloring modes, including Color from Scanner, Hue/Intensity, Grayscale Intensity, Color by Classification and Color by Setup.
 unshaded points |  shaded points demonstrate clearer distinction between surfaces. |
|---|

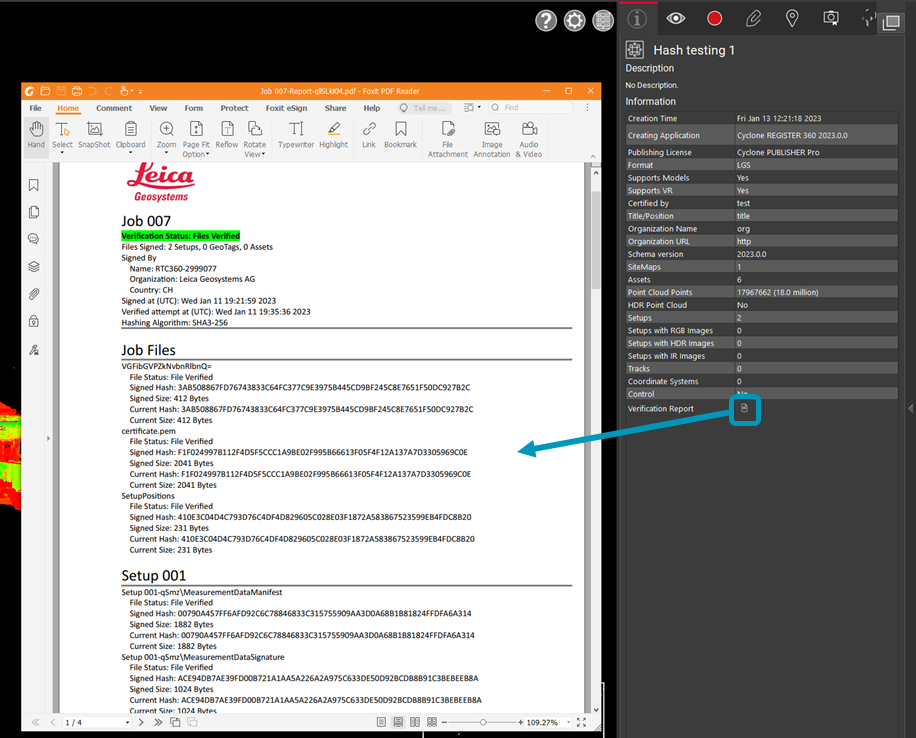
Verification Reports
Users can now access Verification Reports created in Cyclone REGISTER 360 PLUS as a PDF. This report corresponds to the digital signature process for the RTC360 and Cyclone REGISTER 360 PLUS and contains a history of edits that were made to the project.
The report can be accessed from the project info panel by clicking on the PDF icon next to Verification Report. If it was not included when the project was published, the button will be disabled.
Please refer to the section on Data Security in the Cyclone REGISTER 360 Help for more information.
4k Display Support
All dialogs and panels have been adjusted to support 4k displays. In previous versions of the product, there were several dialogs and toolbars that did not display properly or were not legible when setting monitors to 4k resolution.
Pano Navigation Mode
This setting can be used to switch between navigation modes while exploring pano images.
Swipe: A mouse friendly navigation experience. Moving the mouse right or left will pan in the same direction respectively.
Drag: A touch screen friendly navigation experience. Move your finger to the right will pan left. Moving your finger to the left will pan right.

This has been added to both TruView and TruView LIVE.
Unrestricted Use of Models and TruView VR with LGSx
When using LGSx files, users can add models and view projects in TruView VR without a Cyclone WORKFLOW license. This only applies to LGSx files. The license check will continue to occur for LGS files.
Bugs
Fixed a bug that caused and error when recording video. After recording a video using the native TruView video recording tool. Some users were getting the following error: "Error recording video. Image buffer has been filled". This has been fixed.
Fixed a bug with measurement picking wherein the measurement did not snap to the closest point making the measurement slightly off.
Fixed a bug that caused large LGS files to take longer than expect to open.
Fixed a bug that caused a delay in navigating to panos with some Mobile Mapping datasets.
Leica TruView Compatibility and Upgrades
Compatibility with TruView 2023.1 and JetStream Enterprise server
TruView 2023.0.1 requires JetStream Enterprise 1.6 and newer for connected mode to access all JetStream-compatible features. TruView 2023.1 is compatible JetStream Enterprise 1.3 and newer, however non-synchronous versions will result in a limited toolset.
Model Compatibility
TruView 2023.1 supports models in LGS and LGSx files and Cyclone ENTERPRISE projects. LGS, LGSx files and Cyclone ENTERPRISE projects must be published from Cyclone 2020.1 or later, Cyclone REGISTER 360 PLUS (including BLK Edition) 2020.1 or later or JetStream Enterprise 2020.1 or later (for LGS files only).
To add models to an LGS file, it must be published with a Cyclone WORKFLOW license.
Models can be added to LGSx files regardless of whether they were published with a Cyclone WORKFLOW license.
VR Compatibility
TruView 2023.1 supports TruView VR for LGS, LGSx files and Cyclone ENTERPRISE projects. LGS, LGSx files and Cyclone ENTERPRISE projects must be published from Cyclone 2020.1 or later, Cyclone REGISTER 360 PLUS (including BLK Edition) 2020.1 or later or JetStream Enterprise 2020.1 or later (for LGS files only).
To view an LGS file in VR, it must be published with a Cyclone WORKFLOW license.
LGSx files can be viewed in VR regardless of whether they were published with a Cyclone WORKFLOW license.
Disconnected Mode
TruView 2023.1 can be installed and used without connecting to a JetStream Enterprise or Cyclone ENTERPRISE server. The free, stand-alone Viewer can open/read JetStream Viewer (JSV) files as well as LGS and LGSx files. LGS and LGSx files are exported from the JetStream Enterprise admin utility, Cyclone ENTERPRISE or from the Cyclone REGISTER family. Only LGSx files are published from version 2023.1 and later of all products.
The disconnected mode, when viewing JSV files, does not support access to saved User Coordinate Systems (UCS) nor saved limit boxes, slices, and clips. This project information is stored in and managed by JetStream Enterprise, Cyclone ENTERPRISE or available in an LGS or LGSx file.
Portable Mode
TruView 2023.1 Portable is a free, no-install version of the Viewer that can be packaged on a thumb drive and run from any PC, no network or Wi-Fi access required. Leverage most of TruView’s capabilities (all the same capabilities as the Disconnected Mode) in a go-anywhere package that can be navigated by even the most inexperienced point cloud user. Perfect for sharing data with organizations with IT hurdles for new software or as a marketing tool for prospective customers. The free viewer can read LGS and LGSx files written from Cyclone, the Cyclone REGISTER 360 family, JetStream Enterprise or Cyclone ENTERPRISE projects.
TruView Portable does not support TruView VR.
Deprecated Features
Leica Geosystems strives to provide support for the widest array of operating systems and file formats possible as is reasonable given current technologies and support from third-party partners.
With each release, we review our list of currently supported formats and operating systems in line with industry trends and announced product terminations.
Leica Geosystems may add or terminate support for a file format during any release. Obsolete operating systems will be supported for six months after their announced termination or the next major software release, whichever comes first. Server products will be supported in alignment with Leica’s Client License Manager (CLM) supported servers to guard users against incompatibility.
TruView 2021:
Windows 7 is no longer supported.
TruView 2022:
TruView can no longer be installed in Windows 7, 8 or 8.1.
TruView 2022.0.1:
CLM versions prior to 2.5 are no longer supported.
TruView 2023.1
LGS files are no longer saved from TruView. LGSx files will be saved in lieu of LGS files and data will be automatically converted during the saving process.
Known Issues
Model rotation rings clipped by clip boxes
When rotating a model, the rotation rings will obey an active clip thus being cut off when a temporary Clip Box or upstream Clip is active.
Model resizing
A previously scaled model may return to its original (as imported) scale upon being moved with the Align to Point function.
GeoTag preview does not close
When hovering over a GeoTag in the main viewing window the image preview does not close sometimes.
Workaround - Close and reopen TruView.
Changing the active server connection will cause a project opened in the current connection to stop working
If a project from one server is open and the active sever is switched to another server, the existing project will not work properly.
Workaround – If another server is set to the active server, close the current project.
Mobile Mapping data with varying frame distances
Mobile Mapping datasets published with varying frame distances will cause issues with the pano visibility settings. If you click on a point along the trajectory where there is no pano the pano visbiltiy setting will remain off while navigating along the trajectory. If you navigate to another point where a pano exists the visbility toggle will remain off even though there is a pano at that location.
Workaround: Open the visibility panel and toggle the pano visibiltiy setting to “On” while in Track Navigation mode.
GeoTag UCS issue
When changing a UCS and placing a GeoTag. The GeoTag placement will occur based on the original UCS.
Workaround: Place GeoTags while in the degault UCS.