Function
Triangulation is mapping technique that uses trigonometry to calculate a coordinate point position from two known reference points. This method is ideal when baseline-offset method is not practical due to an obstruction.
Simply define a point where two existing measurements intersect and Map360 will provide two possible solutions – you choose which is correct for your scene.
Procedure
Once the Triangulation command is selected, the user is prompted to set Reference Point 1 and Reference Point 2 by left clicking or snapping to existing objects in diagram. These define the two points from which measurements were taken from to the specific items being mapped.
-
The reference points may represent two corners in a room, two points on the edge of a sidewalk, road edge, an outside wall of a building, etc.
Once both reference points are specified, a line will be drawn between them and labelled with RP1 and RP2. The Triangulation data entry dialog box will also display.
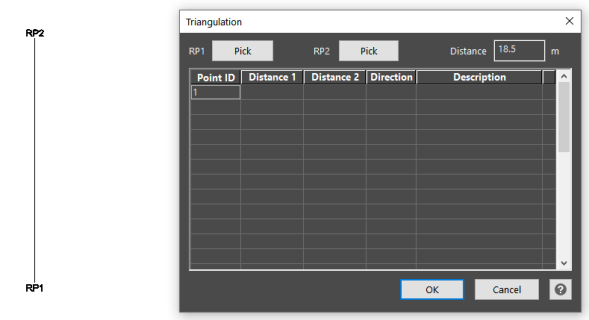
The top row of the Triangulation dialog provides options to reposition RP1 or RP2, by clicking the corresponding Pick box then clicking or snapping to the new desired location in drawing. The Distance box is used to type in a precise known distance between the reference points.
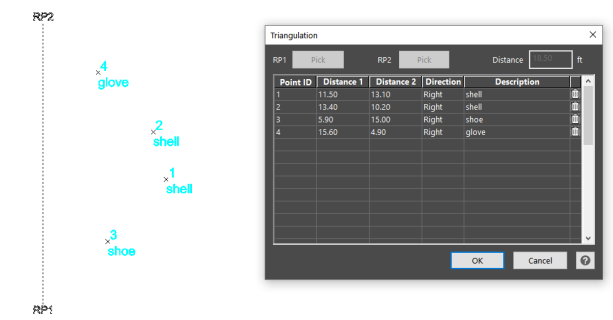
Commence entering measurement data entry in dialog box using Tab key to proceed to next space. Distance 1 is the distance measured from RP1 to the object, and Distance 2 is the is the distance measured from RP2 to the object.
-
Direction field will be Left or Right (Above or Below) depending on the direction of line. The coordinate point, point number and description will appear in diagram as each point is entered.
-
Distances will be the same as selected for drawing units, in feet or meters. However, if the drawing units are feet and entered as 8’ 3” then it will automatically convert this to decimal feet.
Values can be edited in the table and drawing points will update as changes are made. The garbage can icon at the end of the row is used to delete a row, a message will appear, “Are you sure you want to delete the data in this row? Yes or No” If Yes, then the point will be deleted.
Selecting OK will close the Triangulation entry dialog and stores your data. Multiple triangulation lines can exist in a drawing. To reopen an existing Triangulation entry to resume, double click on the RP line. The data entry dialog table will display allowing you to resume data entry or make modifications.
Once data entry is completed, press OK. To create an Evidence Log to accompany a diagram, click on the Evidence Log button found on the upper ribbon menu under Data Tab. This can be printed, saved to PDF or other formats.