GeoTags

GeoTag pin icon
A GeoTag is a defined location in Cartesian coordinate space that has associated data and/or metadata; see the table below for details.
GeoTags help maximise the value of geo project data by providing additional context. GeoTags:
Enhance organisation and accessibility of data by identifying and categorising specific points or objects of interest in complex datasets
Streamline maintenance and operations by providing links and files for relevant data and information, such as user manuals, warranty information, object identifiers (serial numbers, model numbers/type, etc.), maintenance schedules, maintenance status, operational status, and more.
Improve data integration with 3rd party Asset Management and Facility Management software solutions by creating direct links between AM/FM software and contextual, real-world 3D views
Permissions related to GeoTags
Project Owners, Editors, and Collaborators can:
Create GeoTags (including Pasting GeoTags from another asset)
Edit GeoTags
Delete GeoTags
Show/Hide GeoTags
Filter GeoTags
Copy Links to GeoTags
Project Viewers can:
Show/Hide GeoTags
Filter GeoTags
Copy Links to GeoTags
GeoTag Contents
GeoTags contain the following fields:
Field | Mandatory / Optional Field | Content of Field | Quantity / Limit |
|---|---|---|---|
Name | Mandatory | Text string | One name per GeoTag |
Categories | Optional | Customizable with names per category, and each category has a field for a text string or a predefined list. Categories are managed in the Category Manager. See more here. | Unlimited Categories can be assigned per GeoTag |
Attachments | Optional | Files attached to the GeoTag. Attachments support any file format; common formats include images (e.g., JPG, PNG) and documents (e.g., PDF, DOCX). Attachments can be previewed on the web without leaving the application. Note: Adding files as attachments to GeoTags will count as an Upload against the account’s consumption subscription. | Unlimited Attachments can be added per GeoTag (within the consumption limit of the account’s subscription) |
Links | Optional | URL Links | Unlimited Links can be assigned per GeoTag |
Description | Optional | Text string | One description per GeoTag |
Metadata | Mandatory | Generated and maintained automatically by the system and includes:
| n/a |
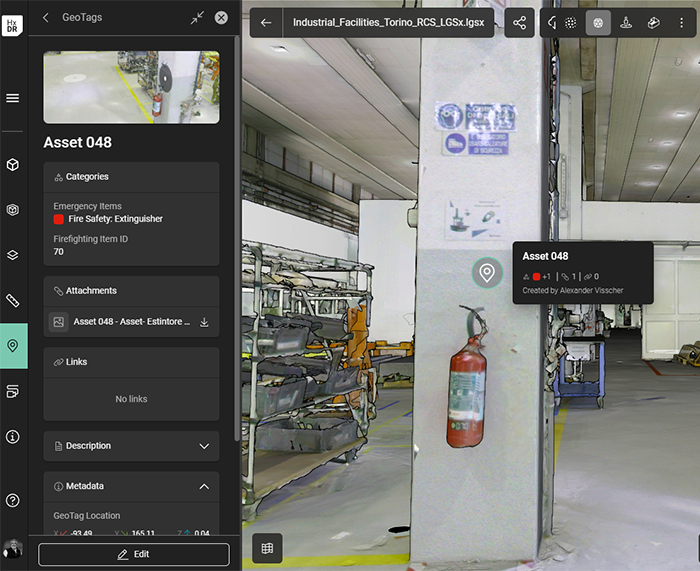
Example: GeoTag marking a fire extinguisher with a name, two categories (Emergency Items and Firefighting Item ID) and their content, and an attached image.
Adding GeoTags
To begin, locate and centre the 3D object or point of interest in the 3D canvas view
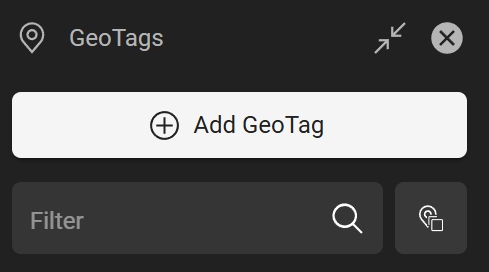
Click the GeoTags menu on the left side of the screen to open the GeoTags tray.

Click Add GeoTag at the top of the GeoTags tray (see permissions info).
Click on the point in the 3D canvas view where the GeoTag icon should be placed (e.g., center of the object, just above the object, etc.; this is a user preference).
One the point is clicked, the GeoTags tray will change to display the fields to be completed for the GeoTag. Enter a name for the GeoTag.
OPTIONAL: Add information for any of the optional fields (categories, attachments, links, description).
For more information about Categories, including creating and managing them, see Categories for GeoTags.
When all the needed information is added to the GeoTag, click Create.
A GeoTag thumbnail will be generated based on the camera position and view when it is saved (“created”). Adjust the view before clicking Create if a different view for the thumbnail is needed.
Edit a GeoTag
Once a GeoTag is created, it can be edited (see permissions info).
Click the GeoTags menu on the left side of the screen to open the GeoTags tray.
Find the GeoTag in the GeoTags tray’s list of GeoTags (use the Filter if needed).
Click the Options button (three vertical dots) on the GeoTag’s tile.
Click Edit.
Modify any fields in the GeoTag’s editing form as needed.
Click Save.
The GeoTag’s “Last modified” metadata will be updated with the current User and Date/Time stamp.
A GeoTag’s position cannot be edited (i.e., the GeoTag cannot be moved). To place a GeoTag in a different location, delete it and re-create it in the new location.
Viewing GeoTags: Show/Hide, Locate, and Filter what is viewable
Once a GeoTag is created, any user can adjust which GeoTags are visible in their 3D canvas view for the current session (i.e., if the user leaves the 3D canvas view, the visibility settings will reset).
Show GeoTag details
The GeoTag details can be viewed in the GeoTags menu tray, and a summary of information appears when hovering over the GeoTag pin on the 3D canvas.
If a user clicks a GeoTag pin in the 3D canvas:
If the GeoTag menu tray is closed, the tray will open (but the GeoTag tile will not be highlighted).
If the GeoTag menu tray is open, the GeoTag’s details view opens in the tray, showing all completed information (i.e., name, categories, attachments, links, description, metadata).
If a user clicks a GeoTag tile in the menu tray, the details view opens in the tray, showing all completed information, and:
If the GeoTag pin is currently visible in the 3D canvas, the pin will be highlighted.
If the GeoTag pin is out of view in the 3D canvas, the pin will be highlighted and the camera will pan/zoom to center it in view.
Show/Hide all GeoTags
Click the GeoTags menu on the left side of the screen to open the GeoTags tray.
At the bottom of the GeoTags tray, the user can select:
Show all
Hide all
The default setting when a 3D Asset is opened for viewing is to have all GeoTags hidden.
Show/Hide individual GeoTags in the view
Click the GeoTags menu on the left side of the screen to open the GeoTags tray.
Find the GeoTag in the tray's list (use the Filter if needed).
To show an individual GeoTag:
Click on the GeoTag’s tile in the list. The GeoTag tile will highlight and the camera position in the 3D canvas will pan/zoom to the GeoTag (i.e., to the camera view saved during the GeoTag creation step).
Click on the GeoTag’s thumbnail within the tile. The GeoTag will become visible in the 3D canvas; however, the tile will not remain highlighted, and the camera will not pan/zoom to the GeoTag. The GeoTag may be out of view from the current camera position.
Multiple GeoTags may be activated and viewed at the same time.
Locate a GeoTag in view
Click the GeoTags menu on the left side of the screen to open the GeoTags tray.
Find the GeoTag in the tray's list (use the Filter if needed).
Click Locate in View. The camera position will pan/zoom to center the GeoTag in the view. If the GeoTag was invisible - locating in view will toggle on GeoTag’s visibility.
Hovering over the GeoTag in the tray’s list will highlight both the GeoTag’s tile in the tray and the GeoTag’s pin on the 3D canvas (if in view).
Similarly, hovering over the GeoTag’s pin will highlight the GeoTag pin and the GeoTag tile in the tray if the tray is open and the tile is in view.
Filter GeoTags in the tray list
Near the top of the GeoTag tray (just below the Add GeoTag button), is the Filter text field.
The Filter text bart for filter GeoTags in the tray’s list.
Click the GeoTags menu on the left side of the screen to open the GeoTags tray.
Enter the name (or partial name) of a GeoTag in the Filter text field. The tray’s list of GeoTags will dynamically update to filter only GeoTags with the entered text within their Name field.
GeoTag search only searches the name of a GeoTag, not the description, Categories, attachments, links, or creator. Filtering by these additional fields will be a future update.
Filter GeoTags in view
A Filter tool for the 3D canvas is available in the top right, along with other view and visualisation tools.
Click the Filter tool
Toggle “Enable filter” to on
Set the distance filters for both horizontal distance and vertical distance from the user’s camera position in 3D space. GeoTags (and Setups) outside these limits will be hidden from view, but will dynamically populate in the view as the user moves around (and if a GeoTag comes within the distance filter).
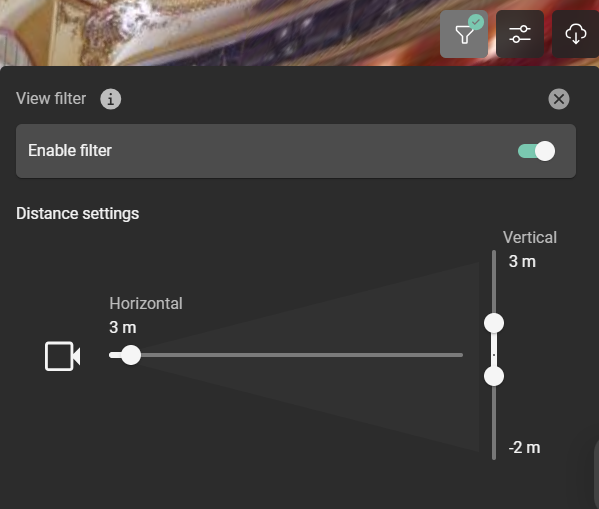
Enable the filter and set the distance limits to show only GeoTags within the defined distances.
Share a GeoTag: Copy Link
Once a GeoTag is created, it can be shared with other Project Members.
Click the GeoTags menu on the left side of the screen to open the GeoTags tray.
Find the GeoTag in the GeoTags tray’s list of GeoTags (use the Filter if needed).
Click the Options button (three vertical dots) on the GeoTag’s tile.
Click Copy link.
The link will be copied to the user’s clipboard for sharing via email, chat, or other means.
Direct links to GeoTags are not available for non-Project Members. Only the full Asset can be shared with a general, public link.
Delete a GeoTag
Once a GeoTag is created, it can be edited (see permissions info).
Click the GeoTags menu on the left side of the screen to open the GeoTags tray.
Find the GeoTag in the GeoTags tray’s list of GeoTags (use the Filter if needed).
Click the Options button (three vertical dots) on the GeoTag’s tile.
Click Delete.
The user will be prompted to confirm the deletion of the GeoTag. Click Delete.
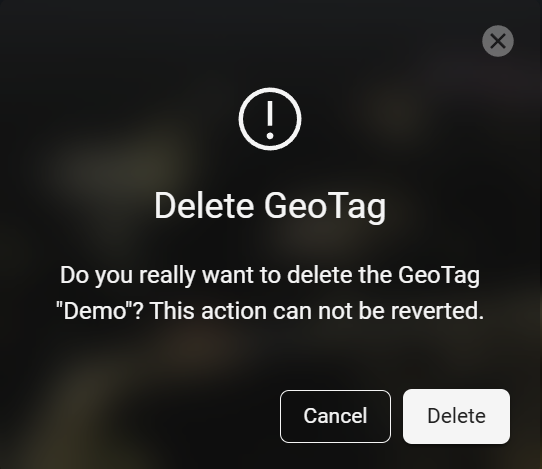
Deleting a GeoTag cannot be undone. If deleted by mistake, a new GeoTag would need to be created.