Storage
Setting Up Project Folders
Upon initial installation, the default project folders are located deep in directories under program data. They are not easily accessible and can quickly fill up with projects, leaving limited hard drive space for the program to function correctly. To manage the imported data properly, it is highly recommended to set up specific storage folders for the projects, archive, and temporary files in a drive with ample free space.
The Storage tab allows the configuration of multiple Project Storage locations to create and toggle between datasets on multiple drives.
Setting Default Storage
All new projects are automatically saved in the Default Storage folder. The user does not have the option to choose a different storage location when a new project is created. Therefore, the Default Storage folder is the only location where new projects can be saved.
To map the Default Storage folder to another location, the following steps are required:
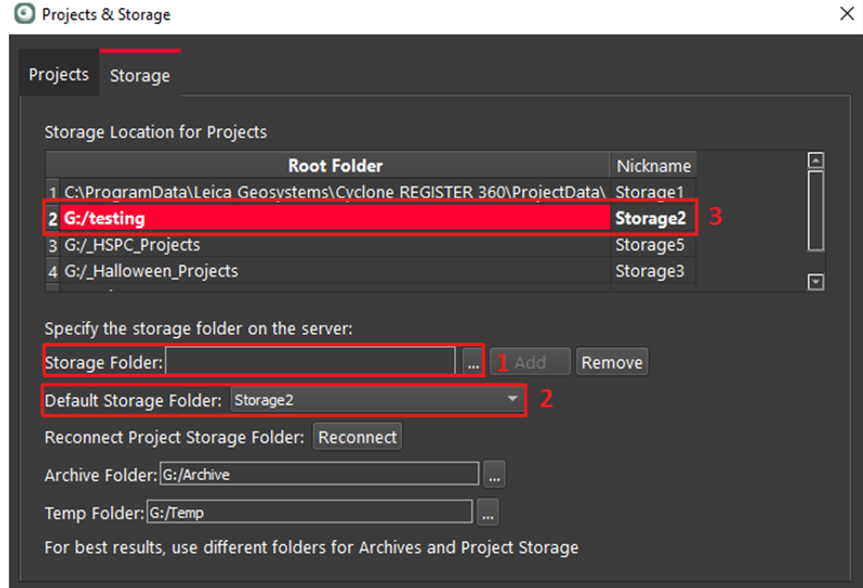
Click the Browse button next to Storage Folder (see Fragment 1 in the figure below).
Navigate to a solid-state drive that has enough space for point cloud processing and select the necessary folder by clicking Select Folder.
Next to Default Storage Folder, select a storage name from the drop-down list (see Fragment 2 in the figure below).
Note: The new path to the storage folder will be listed above in the Storage Location for Projects section, with a storage number assigned to its name (see Fragment 3 in the figure below).

Setting the Archive Folder
To transfer projects to other computers or free up space by archiving them, the user should use the Archive process. The command for archiving (Import or Export) can be accessed from the Projects tab, but the location of the folder for exchanging files should be specified on the Storage tab.
To map the Archive folder, click the Browse button next to Archive Folder and select the desired folder.
Setting the Temp Folder
To map the Temp folder, click the Browse button next to Temp Folder to set the temp directory.
Reconnect Project Storage Folder
Cyclone REGISTER 360 PLUS allows users to reconnect the project storage folder to support users who have experienced critical issues with their processing computer.
Cyclone REGISTER 360 PLUS supports connecting to a single project instead of the entire project storage folder.
Workflow:
Click the Reconnect button.
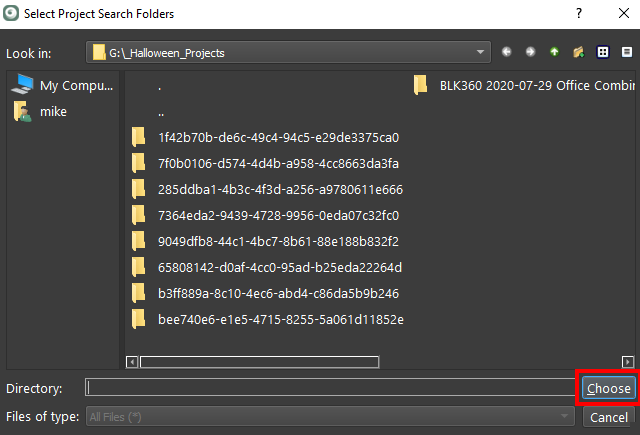
2. Browse to a storage folder containing REGISTER 360 projects and select Choose.

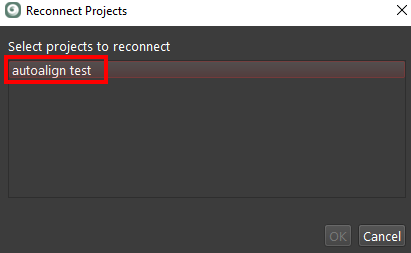
3. Select one or more projects to connect and click the OK button.

4. When completed, a dialog will show the number of connected projects.
Use and Limitations of This Feature
This feature supports the reconnection of Project Storage folders that have been disconnected.
Reconnecting a Project Storage folder from Cyclone REGISTER 360 PLUS Version 1.5.1 or earlier will work, but with limitations:
The name of the project will be lost, and the project will be named Project_1 then, for the next Project, Project_2 and so on.
To avoid the loss of the project name, open the project in Cyclone REGISTER 360 PLUS Version 1.6.0 or later.
The bundle count listed in the Project Explorer, seen upon startup, will show 0 bundles until the project is opened. The Bundle(s) will still be in the project.
Storage of a Project Storage folder on a NAS drive and using this feature to reconnect with different computers running Cyclone REGISTER 360 PLUS (i.e. using NAS as a project server for multiple instances of Cyclone REGISTER 360 PLUS) is not recommended. This feature is designed to restore data in the event of a critical system failure only.
This feature does not support concurrent connections to Project Storage folders. Only one computer can be connected and use a Project Storage folder.
Once the 1st computer running Cyclone REGISTER 360 PLUS connects to the Project Storage folder on a NAS drive, the 2nd computer running Cyclone REGISTER 360 PLUS will not be able to connect to the same Project Storage folder until the 2nd computer reconnects to the same Project Storage folder. However, the 1st computer will still list the project, but will not be able to connect until the 1st computer reconnects.
If there is a connection error, please check that the project is not already listed. If it is already listed, remove the drive containing the project that you are trying to connect from the computer and then delete the entry for the project listed as connected. Then try and reconnect the drive and then reconnect the project.
