2023 Release Notes | Cyclone REGISTER 360

Archive
Cyclone REGISTER 360 PLUS 2023.0.0 Release Notes
Cyclone REGISTER 360 2022.1.1 Release Notes
Cyclone REGISTER 360 2022.1 Release Notes
Cyclone REGISTER 360 PLUS 2023.0.0
What’s New
This major release includes support for the Classification of point clouds and the ability to use the Data Security feature to secure the chain of custody of Data collected with the RTC360. Other notable features include more support for Cyclone FIELD 360 4.1, the Software Improvement Program, new image settings for the BLK360, additional options for Limit Boxes and the CLI converter tool, license and name changes, and bug fixes.
Help documentation is now available online from the Help button within the product and here: https://rcdocs.leica-geosystems.com/
Please reference the licensing section at the end for information about Customer Care Package compatibility.
License and Name Changes
As of January 1, 2023, many valuable additions were made to users' Cyclone REGISTER 360, Cyclone REGISTER 360 (BLK Edition), and Cyclone REGISTER licenses which correspond with the introduction of Cyclone REGISTER 360 PLUS and Cyclone REGISTER 360 PLUS (BLK Edition). These changes include the addition of all Cyclone PUBLISHER features now standard within both licenses and the addition of Cyclone FIELD 360 Export capabilities which allow users to publish E57 files directly from their tablet or smartphone.
These changes represent an immediate, free upgrade for all users--including those without active CCP. This change is indicative of Leica Geosystems' commitment to proving customer value and delivering a holistic field-to-office experience for our users.
With this change, all users can now:
Publish LGS files
Publish RCP files
Publish to Cyclone ENTERPRISE
Connect to CloudWorx without publishing
Publish E57 files from Cyclone FIELD 360
Run Cyclone REGISTER
Additionally, with the release of Cyclone REGISTER 360 PLUS 2023, users can export pano images as JPG images.
Owing to the new capabilities within Cyclone REGISTER 360 and Cyclone REGISTER 360 (BLK Edition) licenses from the addition of Cyclone PUBLISHER functionality and exporting from Cyclone FIELD 360, the products have been renamed Cyclone REGISTER 360 PLUS and Cyclone REGISTER 360 PLUS (BLK Edition). Likewise, Cyclone PUBLISHER Pro has been renamed Cyclone WORKFLOW to better reflect its feature set’s applications across the entire reality capture workflow rather than simply publishing.
Classification
Cyclone REGISTER 360 PLUS has the ability to automatically classify point clouds and includes both an indoor and outdoor model for classification. This process will look at each Setup and determine which class each point will be placed in. Classes consist of features like walls, floors, and ceilings. Manual classification can also be done by fencing the point cloud and assigning the class. The point visibility and color can be controlled by class.
It is recommended that classification be performed after import rather than during for all but small Projects. Users will benefit from placing indoor and outdoor Setups into separate Bundles and classifying those Bundles using the appropriate model after import to take full advantage of the feature.
Classification information can only be published to LGS as of the release of the feature. Additional formats will follow in future releases. Using TruView version 2022.1.0 and newer can read and display the class and control visibility by class.
This is a resource-heavy operation with unique hardware requirements. Since this process requires graphics cards that not all users will have access to, the classification package is a separate download. Upon Installing Cyclone REGISTER 360 PLUS, the user will be given a message stating whether or not the graphics card is compatible. If the GPU is acceptable, the user will be prompted to download and install the classification package.
Recommended Specifications for Classification:
Ampere NVIDIA, Volta, or Turing
o Any RTX
o GeForce GTX 1650 or better
Only NVIDIA GPUs are supported
4GB of Video RAM or better
A GPU computer capability of 7.0 or better is recommended.
https://en.wikipedia.org/wiki/CUDA
Note: These cards will not work: GeForce, GeForce GT, GTX older than GTX 750
Classification is a standard feature of Cyclone REGISTER 360 PLUS and Cyclone REGISTER 360 PLUS (BLK Edition). No additional license is necessary to run this feature.
Download Classification Package
Classification Package for Cyclone REGISTER 360 PLUS
Classification Package for Cyclone REGISTER 360 PLUS (BLK Edition)
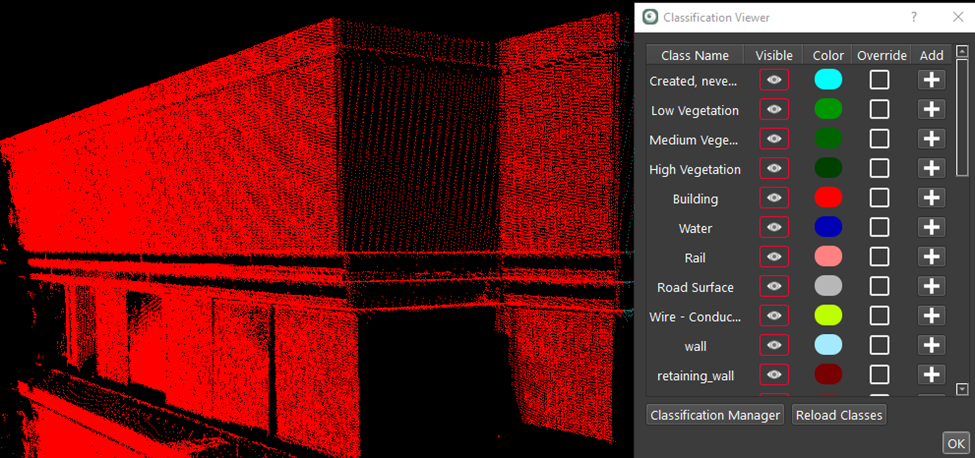
Classification Viewer
The Classification Viewer is the main panel used while working with classified point clouds.

To open the Classification Viewer go to the Review and Optimize section and select the icon above.
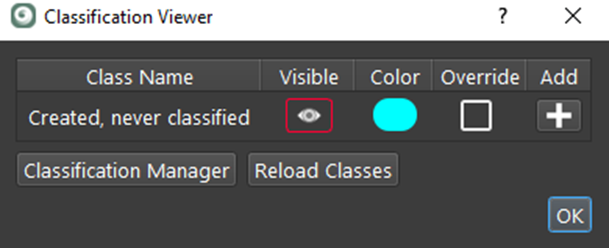
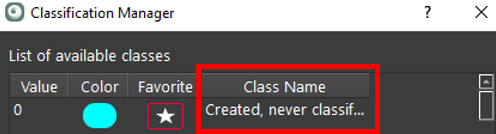
Before running classification, all points will be on the “Created, never Classified” class. Once points have been classified, all classes that have points will be visible.
If the Setups are classified and not hidden, the Classification Viewer will show the classes that have points on them.
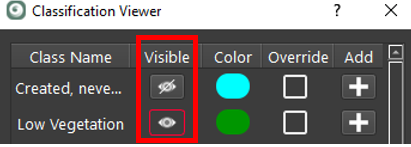
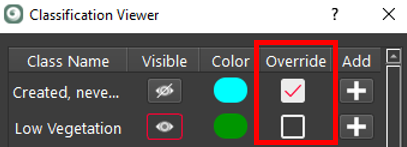
By default, all present classes will be visible, selecting the eye icon will turn that class off. Selecting the visible header will turn all visibility for all classes on or off.
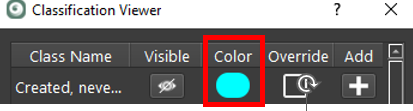
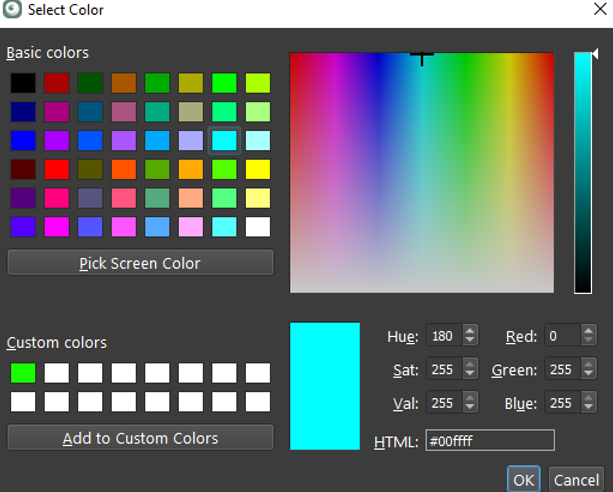
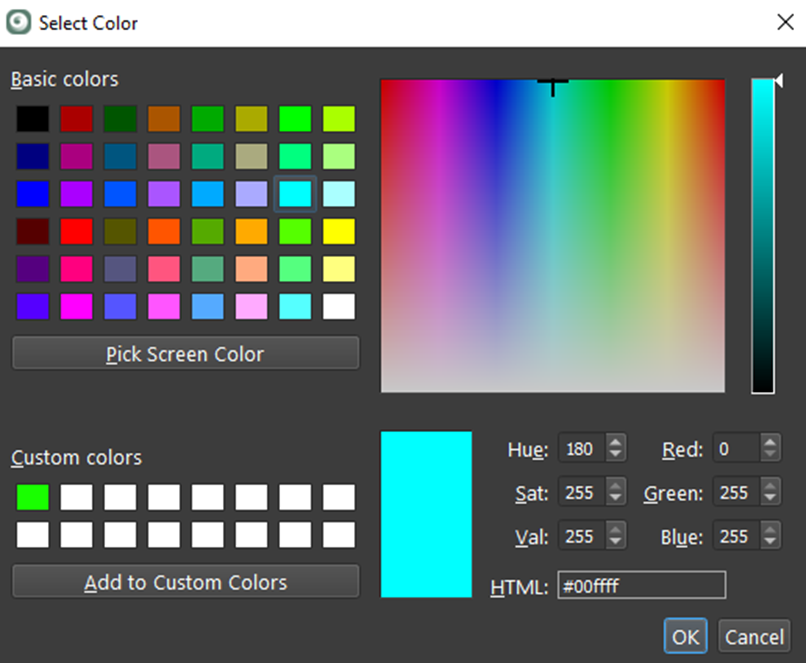
The user may modify the color of any given class. Selecting a color will bring up a menu to change the color of that class.
In some cases, the user may wish to display a single class selecting the check box Override will make that class retain its class even if coloration modes such as Grayscale or Color From Scanner are chosen. Selecting the Override header will check or uncheck all boxes.
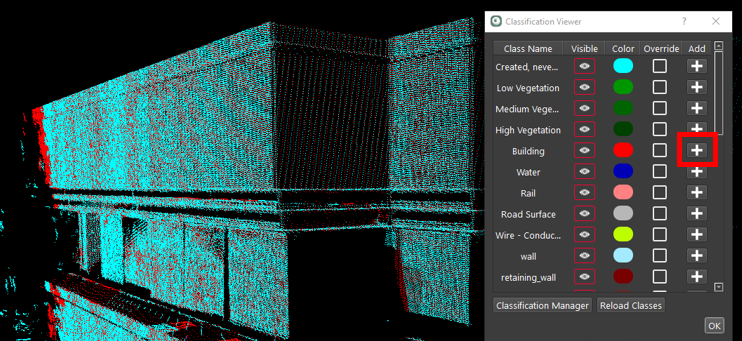
To manually change the class of points, fence the portion of the point cloud desired and select the + icon on the class.
WARNING: Undo is NOT available when classifying point clouds.
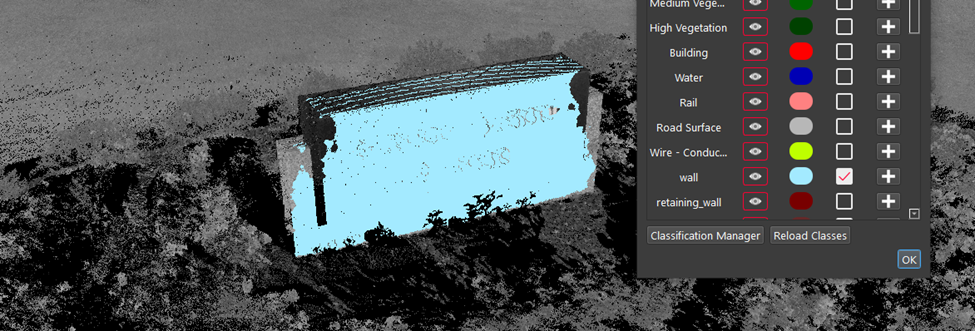
The image below shows two Setups that have points in the same area, one has classified the points on the wall as Building while the other Setup shows them as Created, never Classified.
Fencing this area and selecting the Add icon will move those points to the Building class.
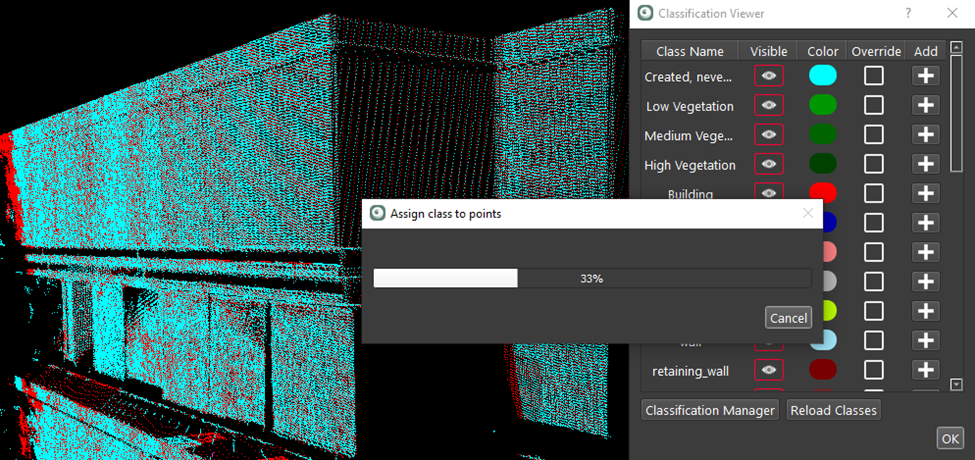
The image below now shows all the points in this area to be on the Building class.
To run automatic classification on visible point clouds, use the Classification Manager.

Reload Classes will reset the classes listed in the Classification Viewer to show only the classes that are included in Setups that are not hidden. This is used to limit the number of classes that are visible in the Viewer. In the Classification Manager, all classes are always available.

Selecting OK will close the Classification Viewer.
View by Class
A new rendering mode is available to view point clouds by their class. If the check box for Override is selected, that class will be shown in its class color rather than the other view modes such as Color From Scanner or Grayscale Intensity Map. This can be useful to highlight certain features.
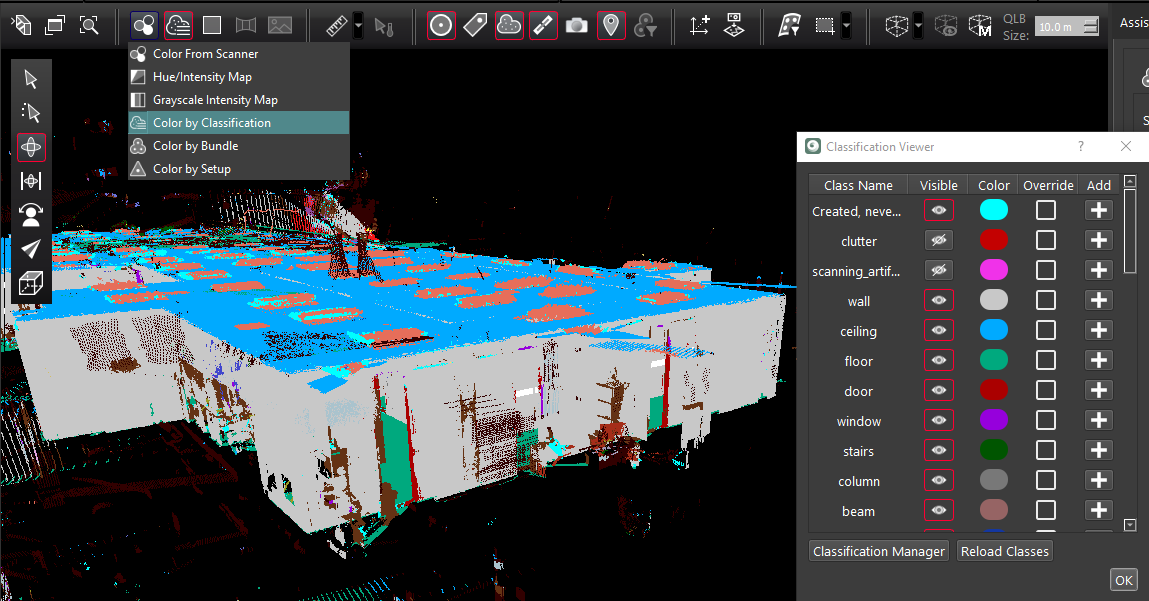
Note: In some cases, the classified point clouds seem to disappear when switching between SiteMap and Bundle Cloud View or Setup View. Selecting Show/Hide Setups twice can refresh the screen and they will be visible.
Classification Manager
The Classification Manager is accessible through the Classification Viewer. This is where the user can perform an initial classification in pre-imported data, adjust the classes shown in the Classification Viewer, import and export the XML file containing the class data such as color and class name, and is the main location for classifying the point cloud.
To automatically classify a pre-imported data set, select Classify Visible Points to use the Classification Model listed in the drop-down menu.
It is recommended that classification be performed after import rather than during for all but small Projects. Users will benefit from placing indoor and outdoor Setups into separate Bundles and classifying those Bundles using the appropriate model after import to take full advantage of the feature.
As this can be a very time-consuming process depending on the number of point cloud points in the Setup(s) and the power of the computer/GPU. It is recommended to test the time to classify a single Setup before classifying a large project with many Setups. To do this toggle the show/hide Setups on all Setups except the one(s) you would like to classify or move the Setup to another SiteMap and then select the command Classify Visible Points from the Classification Manager.
Once a data set is classified, the user may begin modifying it.

As in the Classification Viewer, selecting a color will bring up a menu to change the color of that class.
The Favorite column indicates which classes are visible in the Classification Viewer. Once the classification has been completed, the classes that contain classified points will automatically have the star in the Favorite column and be visible in the Classification Viewer.
Another option is to select a Favorite star manually. For example, if no points were classified as ground points, the user would like to add that class, selecting the Star by ground will add the ground class to the Classification Viewer and points can be fenced and added to the ground class.
To reset the Favorite category to include only the classes in non-hidden Setups that contain points, select Reload Classes in the Classification Viewer. This can be useful to keep the number of classes in the Classification Viewer to the minimum needed.

The Class Name can be edited in the Classification Manager. There are a total of 256 classes including class 0-Created, never Classified. All points will start in class 0. The classification model, discussed below will attempt to map the point cloud onto the appropriate class. As a best practice users should classify visible points before changing the names of the classes.
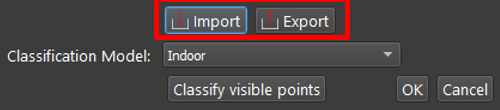
Rather than using the automatic classification function in Cyclone REGISTER 360 PLUS, users may also import a classification by selecting Import. This will allow the user to import an XML file that contains information for the Value, Color, and Class Name. Selecting Export will allow the user to Export the current class colors and names to an XML file. These XML files are interchangeable with Cyclone 3DR.
WARNING: Undo is NOT available when Classifying Point Clouds.
Classify While Importing
Auto-Classification is a very GPU-heavy process and it is recommended that Auto-Classification be run from the Classification Manager. However, it is also available on scan import. In this case, the import will be done in Safe Mode (single thread). If you usually use Balanced or Fast Mode, this will increase the time for the basic import of the scans as well as add time further time for the classification. It is possible that classification will fail upon import. This will not stop the import from occurring and Automatic Classification can be run again using the Classification Manager.
Note: Existing Projects can be Auto-Classified from the Classification Manager.
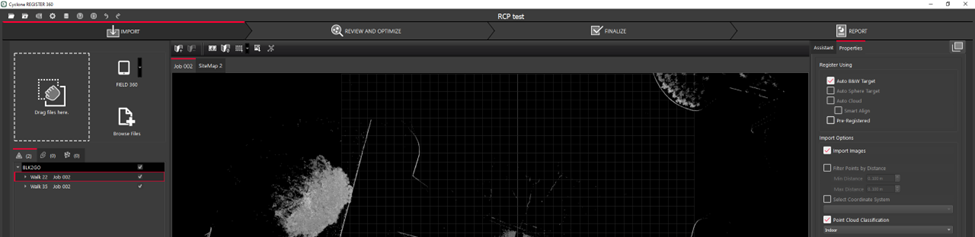
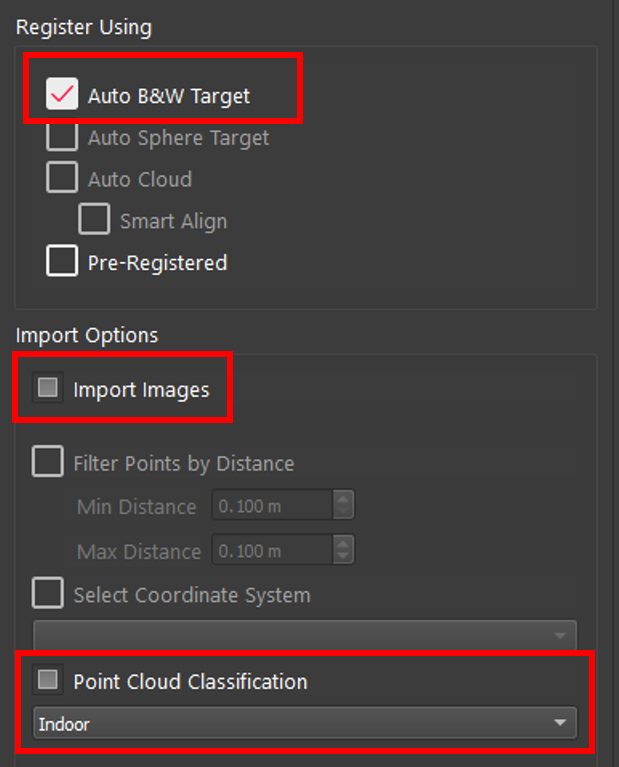
To classify while importing place some data in the Import area and select the check box on the right for Point Cloud Classification. Indoor and Outdoor models are available.
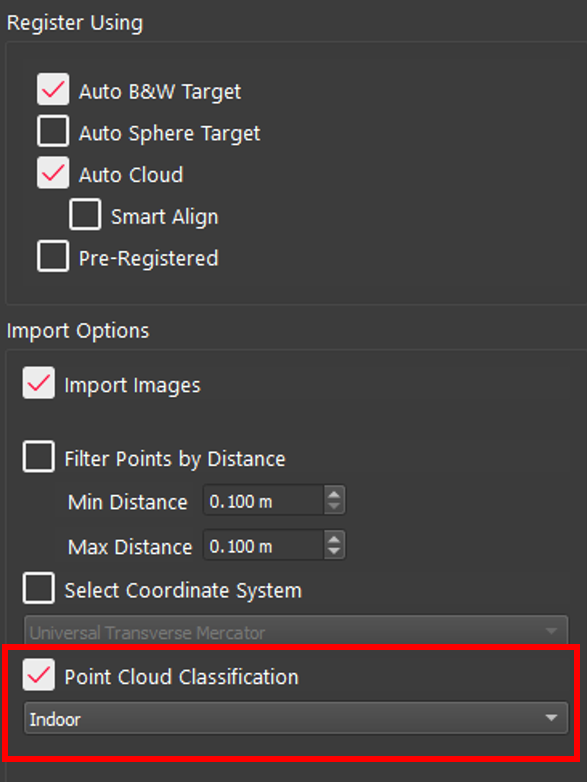
Multiple Settings During Import
It is now possible to have different settings for each Setup, Bundle, or Project in a single import session. By selecting an object in the Import area, the settings for that object will be displayed on the properties panel. This allows Projects that have some Setups inside and some outside to be classified with the correct model, Indoor or Outdoor, and be imported in the same session.
For example, if the object selected is a Project that has Setups with different settings under it, the check box will turn into a grey square. As shown below all Setups have Auto B&W Target selected, thus the box is checked, but some have import images and point cloud classification, thus those boxes are grey, and none of the Setups have Pre-Registered thus the box is empty.

Data Security
The integrity of data is key across industries but of particular importance within public safety where data integrity is key to the maintenance of public trust. A new Data Security feature has been introduced in Firmware version 6.0 for RTC360 and RTC360 LT laser scanners which enables Cyclone REGISTER 360 PLUS to verify data signatures from the scanners.
The Data Security feature follows the latest guidelines and standards of Data Security that are used by professionals in the Public Safety, Security, and Forensics industries.
The feature enables users to prove the integrity of secure job data when the job is imported into Leica Cyclone REGISTER 360 PLUS.
Users can selectively enable the Data Security feature for the job where Data integrity is important. Once the Data is collected on the RTC360 scanner, it is signed by the device. When such a job is imported into desktop software, the verification step is completed within Cyclone REGISTER 360 PLUS and the user is informed whether the imported Data is the same as it was when it was signed in the field. If the data does not match, this does not prevent the data from being imported but provides the user a notification that it does not match allowing them to make an informed decision about how to proceed.
Beyond its applications in public safety, the Data Security feature will allow users across disciplines to determine if data has been corrupted during the import process and where errors lie.
The Data Security Workflow
RTC360 Digital Signature Setup
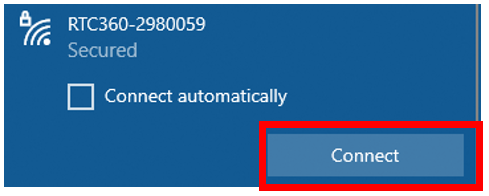
Connect to a scanner’s WLAN network from the Windows Network settings interface by clicking on the Connect button and entering the scanner’s WLAN password.
In Cyclone REGISTER 360 PLUS, go to Settings and Open the Signatures tab.
Select
Discover Scanners. If the discovery finds an RTC360, then it will be listed in the drop-down list.
If a scanner is selected, it will be connected and the Install Signature button will light up.
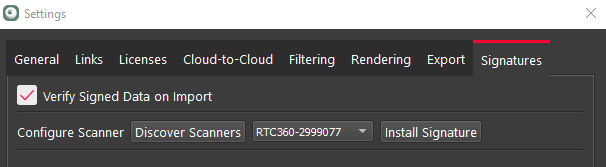
If the user presses Install Signature, a Digital Signature is created and installed on the scanner. Only one signature may be installed at a time.
Sign the Job on the Scanner
Once the user is done scanning for a job and would like to sign the Data, go to Settings on the RTC360 and scroll down to Sign Active Job.
Notice the un-locked icon in the top right. This indicates that the job is unsigned.
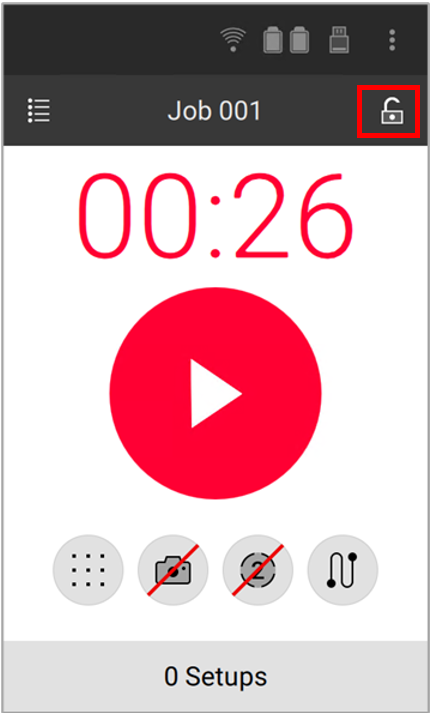

The icon now is now locked, showing that this job has been signed.

If another scan is done after the signature, the lock symbol will change color and provide a warning sign.

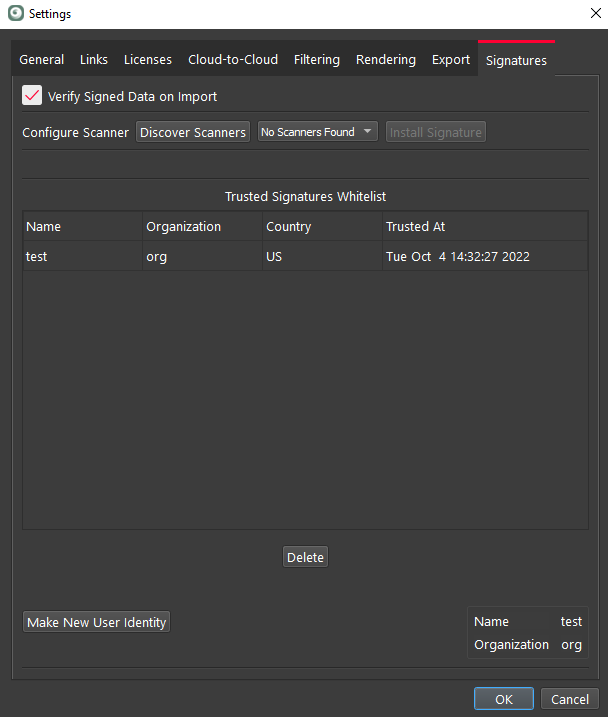
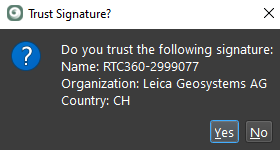
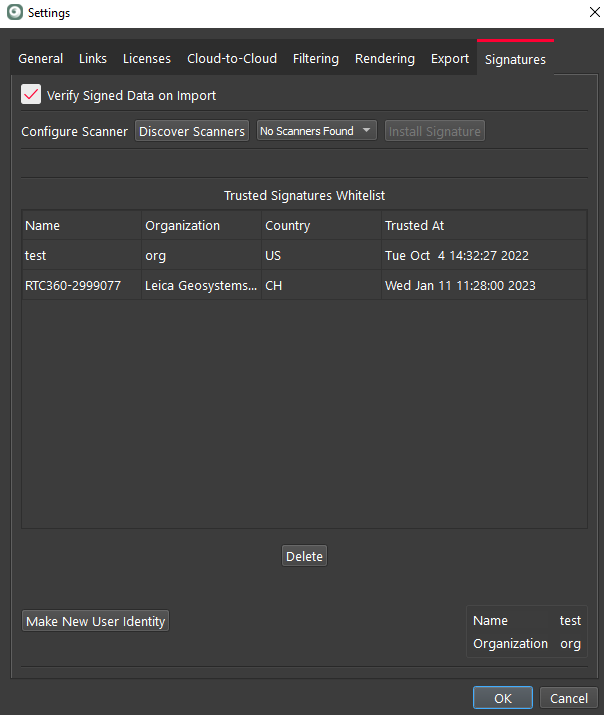
Trusting a Signature
Under Settings in the Signature tab, there is a Trusted Signatures Whitelist. When importing data with a signature that has not been put on the White List, the user will be prompted to trust the signature. The signature is unique to the device and unchanging. A device signature will be trusted once and preserved for future use.
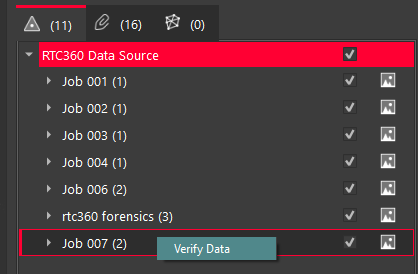
Verify Signed Data Upon Import
Data with a Trusted Signature can be verified upon import. When data is added to the import panel and it has a signature, the user will be able to right-click and verify the data.
When the signature is verified, the user will be notified.
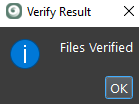
If there have been any changes to the data since it was signed on the scanner, the signature will not be verified and the user will receive a message with details about why verification failed.
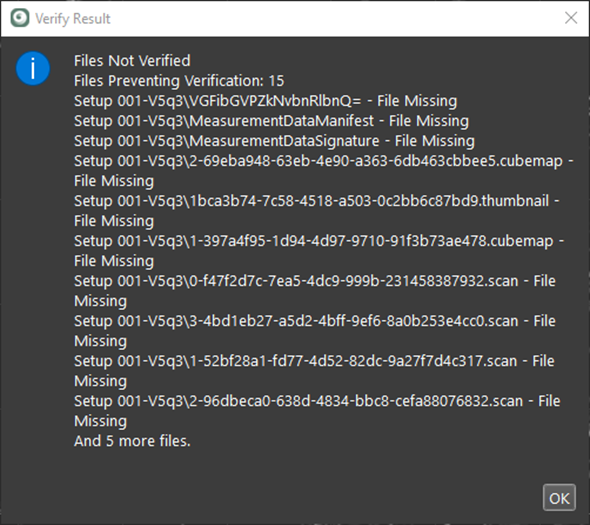
Whether the signature is verified or not, a user may import the data. Importing the data will result in a Verification Report which is included as an asset in the Project.
The Verification Report
The Verification Report can be viewed as a PDF or CSV document.
To view the Verification Report as a PDF document open the
Assets tab, right-click on Job xxx‑Report.pdf, and press on Open.
To save the verification Report in a CSV format open
Assets tab, right-click on Job xxx-Report.pdf, and select Export to CSV.

This report will be attached as an asset in the LGS file when published.
Successful Verification:
Failed Verification:
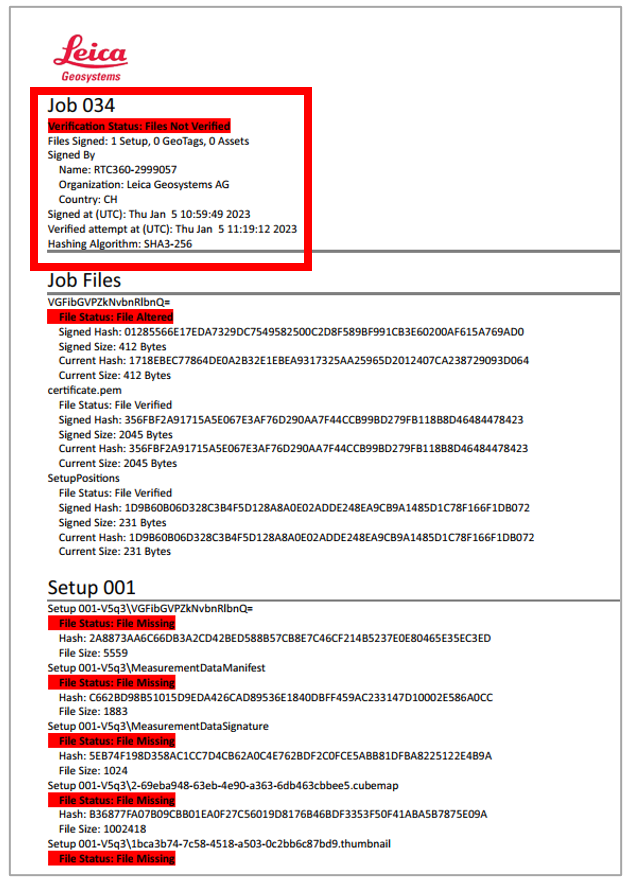
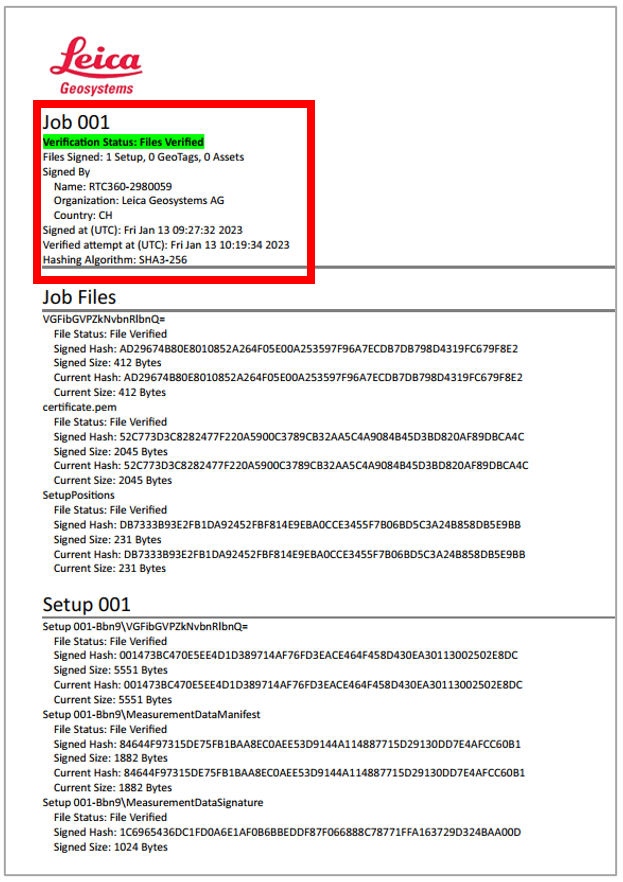
PDF Verification Report
PDF Verification Report consists of a header, a sub-section for files on a job level, and sub-sections for each Setup in a job.
Report Content | Description |
Job name | Name of the verified secure job.
|
Verification Status Files Verified Files Not Verified | Data integrity of a secure job is confirmed. Verification of Data integrity of a secure job failed due to:
|
Files Signed | Number of Setups, GeoTags and Assets in the verified secure job. |
Signed by Name Organization Country | Name of a scanner that signed the job. Organization that issued a scanner signature. Country of the signature issuer organization. |
Signed at (UTC) | Timestamp (UTC) when secure job was signed by scanner. |
Verified attempt at (UTC) | Timestamp (UTC) when secure job was verified in Cyclone REGISTER 360 PLUS. |
Hashing algorithm: SHA3-256 | Hashing algorithm which is used to hash the content of a secure job. |
File Status File Verified File Altered Extra File | Verification result of a single file in a secure job. Current Hash matches Signed Hash. Current Hash does not match Signed Hash. File was removed from a job after a secure job was signed. File was added to a job after a secure job was signed. |
Signed Hash | On a scanner calculated hash of a file during field work. |
Signed Size | Size of a file at the signing of a secure job. |
Current Hash | In Cyclone REGISTER 360 PLUS calculated hash of a file during verification process. |
Current Size | Size of a file at the verification of a secure job. |
Make New User Identity
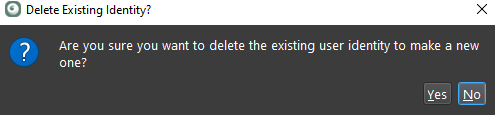
The User Identity is separate from the Scanner Identity in the Verification Report. This allows different User Logins to have different Trusted Signatures Whitelists. Under Settings go to the Signature tab. Select Make a New User Identity on the bottom left. Note that on the bottom right it shows the current User Identity.
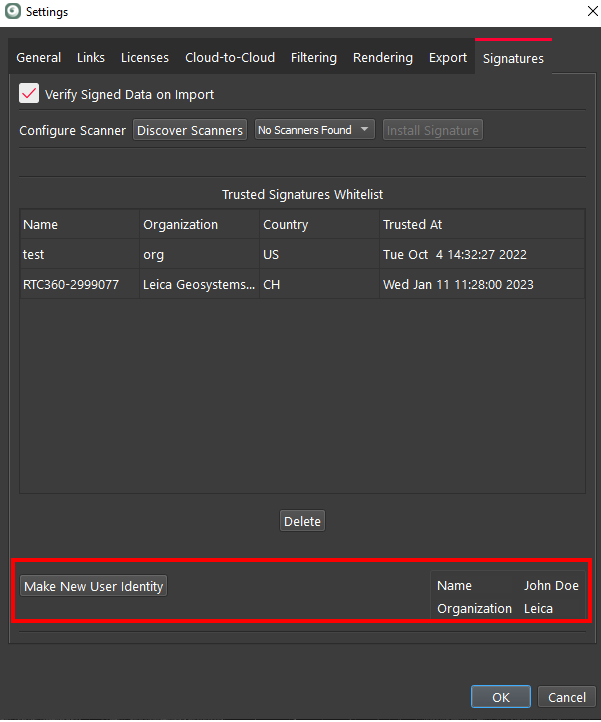
Only one User Identity is allowed at a time, if there is already one present, the user will be asked to delete it.
You will have the option to select the following information: Name, Organization, Country (2 letters only) Company URL, Title, and Password.
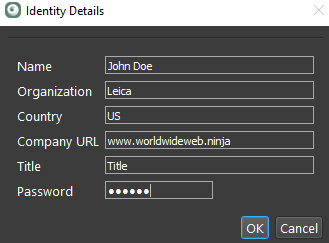
Your new User Identity will be in the bottom right.

This information will be propagated to the Report section in Cyclone REGISTER 360 PLUS.
NOTE: This is separate from the signature of the scanner in the Verification Report.
New Backup/Archive File Format from Cyclone FIELD 360
As of the release of Cyclone FIELD 360 v 4.1, Cyclone FIELD 360 will be able to export a backup/archive file for Jobs. The new file format is *.faf.
The format can be imported into Cyclone REGISTER 360 PLUS like any other scanner format. Each *.faf file can contain a Job. The *.faf format has the same support as a direct connection to the Tablet, supporting links, and all assets.
The new format can be used as a backup and/or to clear Jobs off the tablet without having to import into Cyclone REGISTER 360 PLUS first.
The recommended workflow is to export Jobs to the new *.faf format and then import the *.faf directly into Cyclone FIELD 360.
North Direction Tag from Cyclone FIELD 360
As of the release of Cyclone FIELD 360 v 4.1, a new tag can be created inside of a Setup that indicates the north direction of the Setup.
Please see the Cyclone FIELD 360 documentation for details about inserting this new tag.
Once imported, a UCS will be created that indicates the north direction of the Setup. If multiple Setups in a Cyclone FIELD 360 Bundle have north direction tags, the north direction created will be an average of all north direction tags.
New High-Quality Image Setting for BLK360 Images
In the import area of Cyclone REGISTER 360 PLUS, there is a new option for BLK360 Setups.

The command is called High-Quality Image Import.
Select one or more Setups in the Import area and right-click to see the new import option.
Using this command will import the highest level of pixels available to form the panoramic Images.
NOTE: The option is only available when connected directly to the BLK360 scanner.
Software Improvement Program
The purpose of the Software Improvement Program is to improve the user experience and to allow users to participate in the design of future commands, workflows, and features of the product. The goal is to make future Cyclone REGISTER 360 PLUS versions best meet your needs.
No personally identifying information is collected and all gathered data will remain strictly anonymous. Then the collected information cannot be used to get personal information or allow us directly contact you.
What information is collected?
Software Improvement Program focuses on the following anonymous user data:
Localization: Country only
Language
Hardware configuration: OS, CPU, Graphic settings, RAM, etc.
Software: TruView versioning
License: license type and duration
Characteristics of use session
Commands and workflows feedbacks
This dialog will appear when Cyclone REGISTER 360 PLUS opened for the first time after installation. You will be opted in by default. If you would like to opt out of participation you can turn it off from Settings.
New Options for the CLI Converter Tool

See the Help file for full details on the CLI tool:
https://rcdocs.leica-geosystems.com/cyclone-register-360/2022.1.00000/cyclone-command-line-interface
The CLI tool -b2g2trajectory has a new option to export rectified images to the E57 file.
These images can be used to help align images to the point cloud for certain applications.
The new command flag is: recimage and is added to the end of the command line inside of the CMD windows program.
New option to set WayPoint interval
The new command: interval=(n), n being the distance in meters.
Example: interval=10, this would create a WayPoint every 10 meters.
Supported for the CLI tools- B2g2lgs, b2g2trajectory and b2g2raf
New option to create WayPoints from GeoTags
The command is: geotag-waypoints
Using this command will add GeoTags for every detailed image captured in the field for the following CLI tools: b2g2lgs, b2g2trajectory
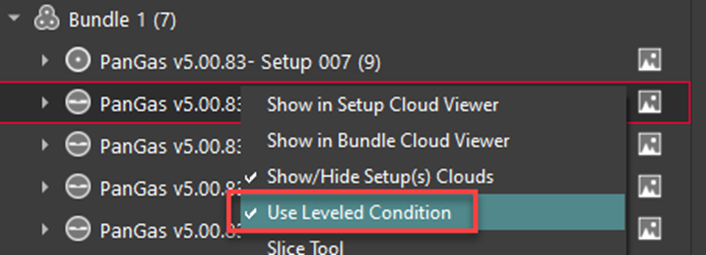
Turn Off Level Condition for DAC-Leveled Scanners
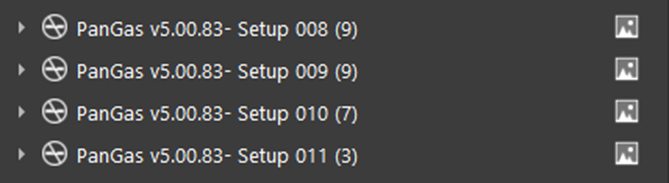
P-series, C-Series, and the RTC360 using high accuracy tilt, come into Cyclone REGISTER 360 PLUS as leveled Setups. This is indicated by the level icon in the left panel explorer. Users can now disable the level condition of selected Setups as shown below:
Single Setup menu option:
Multiple Setup Option:

Level Condition removed showing a different Setup icon:
When removing or adding the Level Condition, Cyclone REGISTER 360 PLUS will re-optimize the Bundle.
This could be useful if scanning in a moving environment such as a boat where it is not possible to level the scanner.
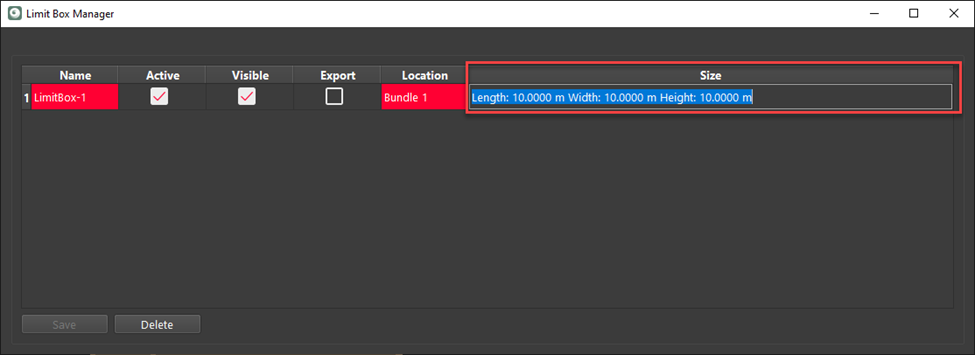
Minimized Limit Box with Dimensions
There is a new command for creating a Limit Box called Create Minimized Limit Box. This creates a limit box that fits very closely to the extent of the point cloud. Creating a UCS is suggested to square the point cloud to the x,y, and z axes before using the new tool to create a limit box that closely encapsulates the point cloud. This will fit tighter than the Create Limit Box command as that uses the extent of the Project rather than the visible point cloud.

The dimensions of all saved Limit Boxes will now be shown in the Limit Box Manager:
Improved Creation of E57 files for ReCap
This new publishing option will create E57 files with images that are supported in ReCap. Since ReCap has a unique way of creating panoramic Images, users should only use this option if the intended destination of the E57 files is ReCap.
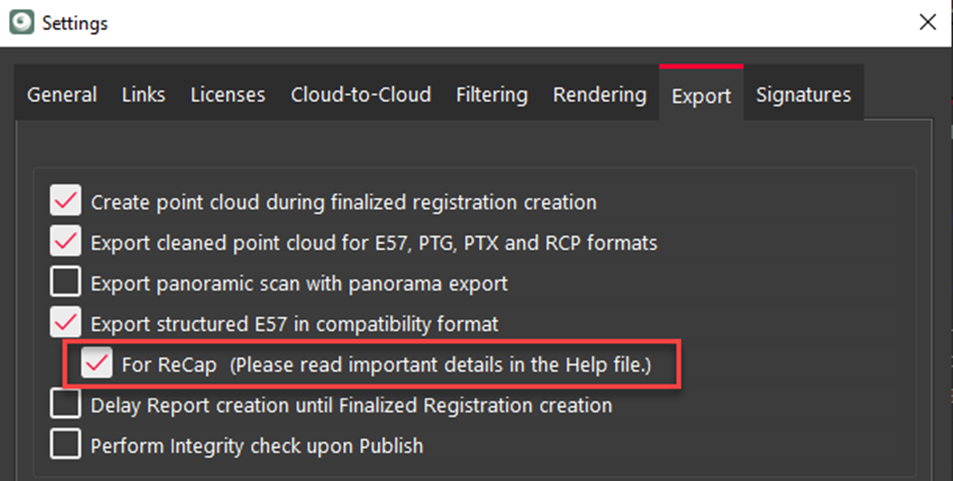
ReCap uses both point clouds and image pixels to create a panorama. Because of this, E57 files can be significantly larger than a normal E57 file that supports images resulting in longer publishing times.
If the point cloud density is low and the image resolution is high, the file size can be significantly increased when using this option. Typically E57 files created from the RTC360 show a smaller file size increase, but E57 files created from the BLK360 (which have lower-resolution scans and higher-resolution images) can show a significant file size increase.
Note: This option should only be used to create E57 files for ReCap. Leaving this option on for other destinations can cause issues.
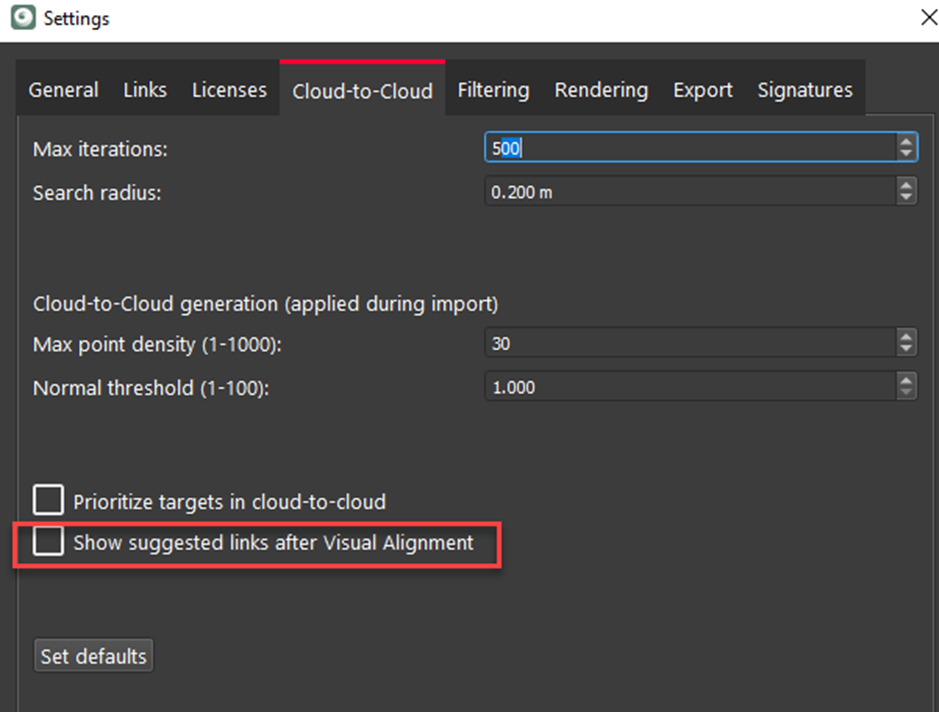
Auto-link Searching for Visual Alignment
By default Cyclone REGISTER 360 PLUS will search for other links when finishing a Visual Alignment. Some users may not want this search to happen to save time, users now have the option of disabling this process.
There is a new option in the Cloud-to-Cloud Settings tab called – Show Suggested links after Visual Alignment. If unchecked, Cyclone REGISTER 360 PLUS will no longer search for additional links after Visual Alignment.
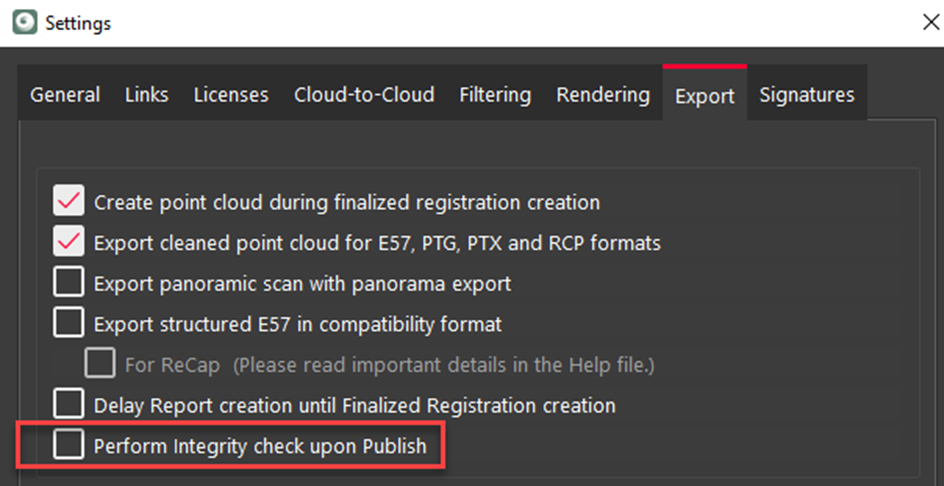
Disable Integrity Check when Publishing
There is a new option in the Export tab in settings that will turn off the integrity check when publishing in the report area. This can save time but at the cost of verifying the Project before publishing.
The option BLK: Use on Device Slam and been renamed BLK: Re-Run Slam
The name was changed to be more representative of the features used. When this option is checked Cyclone REGISTER 360 PLUS will re-run SLAM upon the import of BLK Mobile Data.
Bug Fixes
Fixed an issue that caused Cyclone REGISTER 360 PLUS to crash when deleting a Setup that contained non-ASCII characters.
Fixed an issue that caused a large error when applying control.
Fixed an issue that prevented E57 files published from Pegasus Office to be imported into Cyclone REGISTER 360 PLUS.
Fixed an issue that caused the picked control vertex to have different coordinates than the control label.
Fixed an issue concerning panoramic Images created from 6 cube images.
Fixed an issue that caused adding a job from a BLK360 scanner into the Import area in Cyclone REGISTER 360 PLUS to add GeoTags from other jobs.
Fixed an issue that caused the distance of scan targets to control targets to be different from the control list distances.
Fixed an issue that caused the SiteMap on an LGS file to be skewed.
Fixed an issue that caused the SiteMap on an LGS file to rotate when using high resolution.
Fixed an issue concerning Z values using Create Quick Limit Box.
Fixed an issue that prevented clipping on standalone LiDAR scans.
Fixed an issue where turning off Auto-Cloud incorrectly turns on the Pre-Registered option.
Fixed an issue that when LiDAR and RTC360 Data are in the import area, Pre-Registered had to be toggled to enable Auto-Cloud.
Fixed an issue that prevented Auto B&W Targets option being used if the scan data had LiDAR data as a 3D tag.
Fixed an issue that when batch importing panoramic images, only the last image is displayed and as a result, can only be matched to one Setup.
Fixed an issue where GeoTags were misplaced in Cyclone REGISTER 360 PLUS when importing directly from a BLK360 scanner.
Fixed an issue when importing an E57 file from a NavVis scanner that had an odd vertical striping effect.
Fixed an issue where the Advanced UCS tool not placing the UCS origin at 0,0,0.
Fixed an issue where it was not possible to get the license product description for borrowed licenses.
Fixed an issue where attempting to resize the limit box resulted in the point cloud being rotated.
Fixed an issue that the user-specified image resolution was not being used when publishing to TruView Cloud.
Fixed an issue with the CLI tool, it will now create a text file when failing to process b2g files. Before it was only creating the text file when successful.
Fixed an issue with the CLI tool concerning the placement of pano images when importing an E57 file that had been created using b2g2trajectory.
Fixed an issue that prevented a non-administrator to write to the log file if that folder was set up by an administrator.
Fixed an issue where BLK2FLY b2g files were not being aligned correctly.
Fixed an issue that restricted creating NAS drives from Projects and Storage to administrators only.
Fixed an issue so that cloud registration units now match the Project settings.
Fixed an issue where created WayPoint panoramas were not aligned.
Fixed an issue dealing with the Z axis upon import of multiple E57 files when Pre-Registered was chosen.
Fixed an issue where the Z value in the measure tool did not take into account when the Set Level tool was used.
Fixed an issue that did not allow Japanese characters in the file name or file name on Japanese operating systems.
Fixed an issue that foot type did not include US Survey Feet.
Fixed an issue where import with Pre-Registered was ignoring the link creation criteria during the Cloud-to-Cloud creation.
Fixed an issue when importing BLK360 Data that was creating extra links when using the Pre-Registered option.
Fixed an issue that link creation criteria ‘max error’ was not being followed during visual alignment or import.
Fixed an issue that prevented LGS files created by 3DR to be imported.
Fixed an issue that did not allow structured, or cleaned, E57 files to be imported.
Fixed an issue with BLK2FLY with GNSS with the UTM option, importing with the wrong coordinates.
Fixed an issue that certain GNSS Data did not show the UTM option.
Fixed an issue of links disappearing from the SiteMap when the Bundle was moved between SiteMaps.
Fixed an issue that when a Project has some Setups with images and some without that the Finalized Registration only included points from the Setups with images.
Fixed an issue with WayPoints where only the first WayPoint was created correctly.
Fixed an issue of Setups appearing to move when using 4k resolution.
Fixed an issue that LGS files created with Cyclone REGISTER 360 2022.1.0 were not compatible with CloudWorx.
Fixed an issue where a Limit Box created in a Setup view was applied to all Setups rather than just the one it was created in.
Fixed an issue with images from an RTC360 that were misaligned when using the distance filter.
Fixed an issue that settings were not being saved when OK was selected.
Fixed an issue that the panoramic image was misaligned for BLK2GO data.
Fixed an issue when importing RTC360 Data, if the first Setup had an error that would prevent the Project from being imported with images.
Fixed an issue that caused importing RTC360 data with UTM to result in a crash.
Fixed an issue that caused data that was registered to control and published to LGS, to result in incorrect coordinates.
Fixed an issue when importing BLK2GO Scans without images, the Trajectory Duration was being shown as not available.
Fixed an issue that Export Panoramic Images used the local coordinates of the Setups, rather than the coordinates of the Setup related to the registration.
Fixed an issue that prevented .txt assets from being added to the Assets Panel.
Fixed an issue that prevented applied control from being seen in some Bundles when the control was split across multiple SiteMaps.
Fixed an issue in visual alignment that resulted in points disappearing when the user zoomed in.
Fixed an issue where LGS files published from BLK2GO Data resulted in incorrect measurements in all WayPoints except the first one.
Fixed an issue where turning the UCS on or off, rotated the Background Image.
Fixed bugs related to Cyclone FIELD 360
Fixed an issue of rotated images when Cyclone FIELD 360 was used with an RTC360 and then imported (to Cyclone REGISTER 360).
Fixed an issue where Cyclone FIELD 360 clip boxes were not being applied when imported.
Fixed an issue where data scanned from Cyclone FIELD 360 does not show data scanned from an iPad.
Fixed an issue concerning clipping not being supported from Cyclone FIELD 360.
Fixed an issue that unchecking a Cyclone FIELD 360 job in the import area resulted in the Auto-Cloud and Auto-Target import options being grayed out.
Fixed an issue that assets were missing from the import area when importing a FILED 360 job.
Fixed an issue where an extra link was created when importing RTC360 Data when importing from Cyclone FIELD 360.
Fixed an issue where GeoTags from Cyclone FIELD 360 that had empty 'notes' were not imported.
Fixed an issue where GeoTags from Cyclone FIELD 360 were rotated by 90 degrees.
Known Issues
LGS files from Pegasus Office are not supported.
Pegasus office was updated along with TV desktop and CloudWorx products to support the special LGS file that is produced by Pegasus office. The LGS file includes a trajectory, new image WayPoints positions, and image set rendering. These objects are not supported yet in Cyclone REGISTER 360 PLUS or Cyclone Core. Cyclone Core can import just the Point Cloud, but the depth maps, special images, trajectory, and new icons are not included. Support for all these objects in Cyclone REGISTER 360 PLUS will come this year when we update. Adding these objects to Cyclone REGISTER 360 PLUS is a much larger task than updating the other software, so this is why there is a gap in support for these LGS files.
In some cases, the Classified Point Clouds seem to disappear when switching between SiteMap and Bundle Cloud View or Setup View. Selecting Show/Hide Setups twice can refresh the screen and they will be visible.
Faro no longer shares the required SDK to support import of Faro raw scanner files from the newest Faro Scanners.
The workaround is to import into Faro Scene and export a FLS or e57 file.
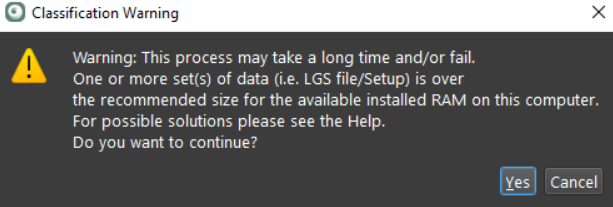
Auto-Classification runs one Setup at a time. In case a very large point cloud is detected, this warning will occur.
Deprecated Features
Leica Geosystems strives to provide support for the widest array of operating systems and file formats possible as is reasonable given current technologies and support from third-party partners.
With each release, we review our list of currently supported formats and operating systems in line with industry trends and announced product terminations.
Leica Geosystems may add or terminate support for a file format during any release. Obsolete operating systems will be supported for six months after their announced termination or the next major software release, whichever comes first. Server products will be supported in alignment with Leica’s Client License Manager (CLM) supported servers to guard users against incompatibility.
Cyclone REGISTER 360 2020:
TVG files are no longer published. Users should use the LGS format. If a TVG is required, users can Publish to TruView Local and run the dataset through the free utility Leica Pack&Go.
Cyclone REGISTER 360 2021:
Windows 7, 8 and 8.1 are no longer supported.
Licenses
All users with valid CCP for either Cyclone REGISTER 360 or Cyclone REGISTER 360 PLUS or Cyclone REGISTER, or with CCP valid as late as 1 January 2023, can run this new version of Cyclone REGISTER 360 PLUS with no new license required.
All users with valid CCP for Cyclone REGISTER 360 (BLK Edition) or Cyclone REGISTER 360 PLUS (BLK Edition) or with CCP valid as late as 1 January 2023 can run this new version of Cyclone REGISTER 360 PLUS (BLK Edition) with no new license required.
Users do not need to migrate to a Cyclone REGISTER 360 PLUS or Cyclone REGISTER 360 PLUS (BLK Edition) license in order to run Cyclone REGISTER 360 PLUS if their CCP or subscription is valid.