Using the HxDR Data Flow app: step by step guide
This step-by-step guide explains how to use HxDR Data Flow. It provides clear instructions on logging in, uploading and managing Reality Cloud Studio projects, creating folders, and more! Following this guide will help users effectively navigate and utilize the HxDR Data Flow app for seamless data management between desktop and cloud environments.
Please download and install the HxDR Dataflow app here before following these instructions
Please note that the HxDR Data Flow app will be automatically updated to the latest version at all times, so once installed, you will not have to manually install the latest version.
Opening HxDR Data Flow
1. Once you have downloaded and installed HxDR Data Flow, open the application by clicking on the shortcut

Login to your Reality Cloud Studio account
2. You will now need to input your user credentials for Reality Cloud Studio in order to access your data

3. Be sure to input the correct password and click "Accept Terms of Service". Then click "Login" to begin working with the application

4. You are now logged into HxDR Data Flow and can start adding data to your Reality Cloud Studio Projects.
Click the Hamburger menu on the left side to access "Projects" and the "Upload Manager".

5. Here you can select "Projects" and see existing projects within your Reality Cloud Studio Account OR "Upload Manager" which will allow you to see all active uploads from your system to the cloud.
We are going to click "Projects" to review existing folders and choose where we would like to upload our data.

6. You can now see all of the projects in your account.
You can choose to create a new project, or upload to an existing project.
If you have lots of projects, you can click "Search Projects" and easily find the location you wish to upload to.

7. I this case, we are going to search for the "Primary Demo Account" because this is where we would like to upload the data.
You can skip this step if you do not yet have any projects in your account.

8. You can simply click on a Project icon to enter the project and view all the data within it

9. In order to create a new folder within your project click "Create Folder" which is located just under the "Search" box

Creating a new folder for data upload
10. The "Create New Folder" dialogue box will appear.
Enter a name for your new folder and click "Save"

11. You can now either double-click the new folder to enter it OR hit "Go to folder" in the lower right hand side of the screen - either option will take you to the newly created, empty folder, ready for you to start uploading your reality capture content to the platform.

Uploading your data to Reality Cloud Studio
12. If there are no existing assets in your folder, then you will be shown the following screen.
Click "Select" in the main window to access your local file system and begin uploading your data to the cloud.
Alternatively you can click "Add Asset".

13. In this use case, we are adding 3 x *.B2G files from a BLK2GO project.
Once you have selected all your scans, hit "Open" to begin the upload process.

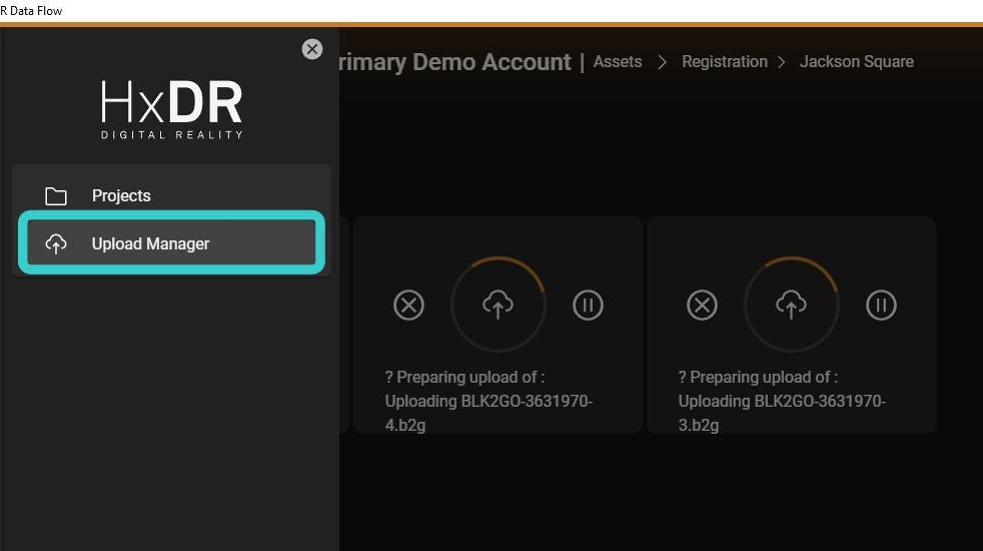
14. You will now see the scans being prepared for upload directly within the app.
You can cancel or pause any single scan using the associated icons on the upload panels.

Using the "Upload Manager" tab to manage your upload queue
15. From the hamburger menu on the left, click "Upload Manager"
16. You will now see all active uploads and can choose to "Pause all", "Resume all", cancel individual uploads, or even re-order the upload according to your priority.
Uploads are not concurrent and will be processed one by one, so by dragging a upload to the top of the queue will make this the active upload.

17. You can now minimise the HxDR Data Flow application and your data will continue to upload in the background. Please do not close the application as this will result in your uploads being stopped.
If you ever have an interruption to your internet connection when using the HxDR Data Flow app, your uploads will continue once the connection is restored. If you are uploading directly to the browser and experience an outage, your uploads will be cancelled - this is the major benefit of using the HxDR Data Flow app over the browser upload method.
We hope you enjoy using this tool to streamline your uploads to Reality Cloud Studio.