Measurements
Measurements in Reality Cloud Studio are persistent, saved objects that can be viewed by collaborators.
Measurements can be added, edited and deleted by any user assigned permission to the asset. They are accessible to all asset collaborators, not unique to a user.
Add Measurement
Click Add Measurement.
Select the desired measurement type.
Distance
Area
Planar
Choose to use available Measurement tools:
Magnifier
Cursor coordinates
Select the appropriate number of points and click Save.
Name the measurement and optionally, add a description.
Click Save.
Measurement tools
Magnifier
Activate the magnifier option to be presented with a zoomed in view during point picking appropriate for precisely selecting on edges, corners and details.
Cursor coordinates
Activate the Cursor coordinates option to show the x, y, z coordinates of the cursor in real time. Upon completing a measurement the coordinates of each point, the coordinates will be displayed in the scene.
Distance Measurement
Distance measurement allows the user to measure between two pick points on the point cloud or mesh.
Click on the first point of interest to begin the measurement.
Click on the second point to end the measurement.
Name the measurement and optionally, add a description.
Click Save.
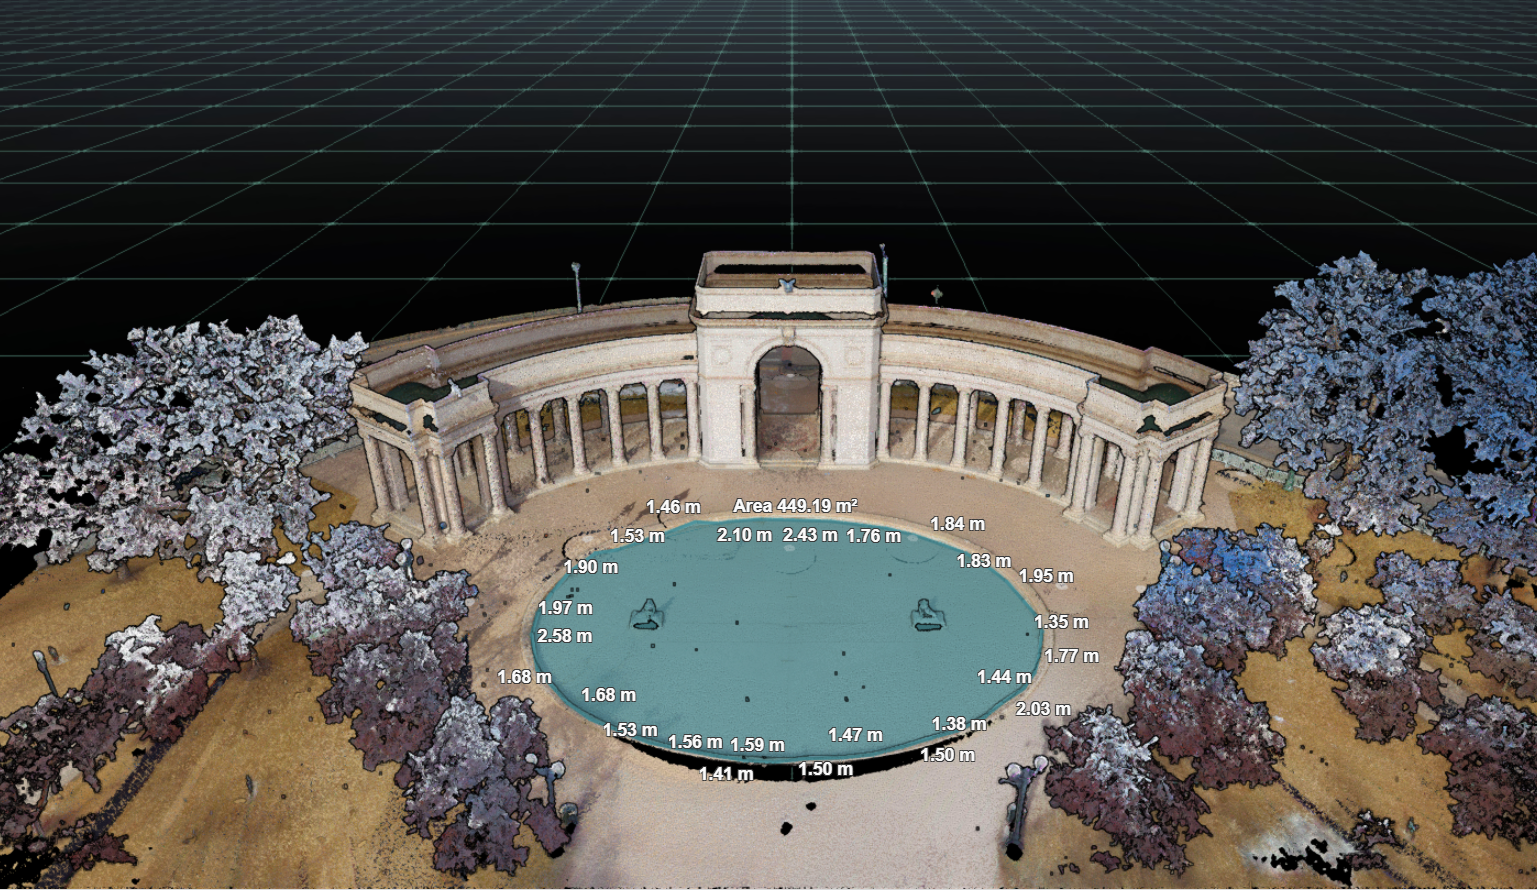
Area Measurement
Area measurement allows the user to measure any two dimensional shape. The plane of the area measurement will be defined by the first two points. The area will always be additive, never substitutive.
Click on the first point to begin the measurement.
Click on at least two additional points to form a triangle.
you can add as many points as needed to your polygon.
The area will always be additive, never substitutive. Plan point clicking to account for this.
Double Click to end the measurement.
Name the measurement and optionally, add a description.
Click Save.
Planar Measurement
Planar measurement allows the user to define plane for the measurement prior to selecting the unique points.
Select the appropriate Plane Mode.
Projection - Sets point perpendicularly to the plane
Ray cast - Places point based on current camera position.
Click on three points to define the plane of measurement.
Click on the first point to begin the measurement.
Click on at least two additional points to form a triangle.
you can add as many points as needed to your polygon.
The area will always be additive, never substitutive. Plan your point clicking to account for this.
Double Click to end the measurement.
Name the measurement and optionally, add a description.
Click Save.
measurement points can be placed outside of the drawn areas of the plane but will adhere to the defined plane.
Activate/Deactivate measurement
Once a measurement is saved it can be activated and deactivated.
Click on the desired measurement in the list of measurements.
The current viewing position will be maintained but the measurement activated.
Depending on the user’s current viewing direction, the data within the scope of the measurement may not be visible. The product will not automatically orientate the user to the data.
Hovering over the measurement in the list allows the user to preview the measurement without activating it.
Multiple measurements may be activated and viewed at the same time.
Edit measurement
Once a measurement is saved, it can be edited.
Click on the ellipsis button.
Click on Edit.
The measurement name and description will appear on the left-hand side of the viewing window to be edited.
Make any modifications needed.
Click Save.
Delete measurement
Once a measurement is saved, it can be deleted.
Click on the ellipsis button.
Click on Delete.
The user will be prompted to accept the deletion to avoid mistaken removal of the measurement . Click Delete.
Center View
Once a measurement is saved, Center view can be used to quickly orient to the object.
Click on the ellipsis button.
Click on Center view.
The camera position will return to the position used when creating the measurement.
Copy Link
Once a measurement is saved, it can be linked to.
Click on the ellipsis button.
Click on Copy link.
The link will be copied to the clipboard to be shared via email, chat or other means. This link will only be accessible to users with permission to view the asset.
Filter
Once an asset contains at least one measurement, the filter bar will be activated. Use the filter bar to enter the name of a measurement to quickly locate it in the list.
Measurement search only searches the name of a measurement, not the description or creator.