Release Notes | Cyclone REGISTER 360

Archive
Cyclone REGISTER 360 PLUS 2023.0.3 Release Notes
Cyclone REGISTER 360 PLUS 2023.0.2 Release Notes
Cyclone REGISTER 360 PLUS 2023.0.1 Release Notes
Cyclone REGISTER 360 PLUS 2023.0.0 Release Notes
Cyclone REGISTER 360 2022.1.1 Release Notes
Cyclone REGISTER 360 2022.1 Release Notes
Cyclone REGISTER 360 PLUS 2023.1
What’s New
Cyclone REGISTER 360 PLUS 2023.1.0 is a major release that marks a significant milestone in the Leica reality capture technology. This release introduces the next-generation Data Architecture, a revolutionary point cloud engine and data model for reality capture data that offers unprecedented speed, scalability, and flexibility. This release also supports the innovative BLK2GO PULSE, a handheld imaging laser scanner that integrates seamlessly with Cyclone REGISTER 360 PLUS and enables faster and easier field scanning with enhanced synchronization capabilities. With numerous new features, optimizations, and bug fixes, Cyclone REGISTER 360 PLUS continues to set the standard for precision, efficiency, and flexibility in reality capture software. Explore this release to experience the future of reality capture technology.
New Data Architecture
Introduction of New Data Architecture & LGSx
With the version 2023.1 release of the below-listed Leica Geosystems reality capture software, Leica Geosystems has begun an investment into a new, next-generation reality capture data architecture that is expected to mature into a new gold standard for reality capture projects.
The Leica Geosystems reality capture data architecture powers applications like Cyclone REGISTER 360 PLUS and Cyclone ENTERPRISE as well as the new LGSx file – the evolution of the popular LGS file. The update provides a next-generation solution that includes significantly faster writing (publishing), higher compression, a new visualization experience, and a new core data architecture. The data architecture change is instrumental in allowing Leica Geosystems to build out exciting new capabilities and features in the future to meet the growing needs of the reality capture industry.
Examples of new features that are now possible to build into future software updates, and are planned as such, include, but are not limited to, enabling time-saving “Save” actions when editing an LGSx file with no need for full file copy via “Save As”, file versioning and histories (e.g., track edits to GeoTags, markups, etc. with options to “restore” from the version history), enhanced model and mesh support, and much more. Moving forward, the LGSx format will be opened by any of Leica Geosystems’ reality capture office and cloud apps, bringing consistency for seamless operations and workflows across multiple industries.
Adoption in Leica Reality Capture Portfolio
Applications included in this update:
Cyclone REGISTER 360 PLUS 2023.1
CloudWorx 2023.1 suite
TruView 2023.1
Cyclone ENTERPRISE 2023.1
TruView Enterprise & TruView Cloud 2023.1
Reality Cloud Studio, powered by HxDR
NEW: LGS File Converter 2023.1 (free LGS-to-LGSx conversion utility with batch conversion ability)
Applications which will soon support the LGSx file:
Cyclone 3DR
Cyclone Pegasus OFFICE
Map360
Infinity
Compatibility
Note: With this release, LGS files will no longer be published by any of the aforementioned products though they will still be consumed. It is recommended that all products be updated in synch to ensure a seamless workflow transition.
The following table provides details about product-feature capabilities:
Product | Open/ | Open/ | Publish LGSx | In-App Project Conversion | Batch Conversion Support | Publish LGS |
|---|---|---|---|---|---|---|
LGS File Converter 2023.1 | Yes | n/a | Yes** | n/a | Yes | No |
Cyclone REGISTER 360 PLUS 2023.1 family | Yes | Yes | Yes | Yes | Yes | No |
Cyclone ENTERPRISE 2023.1 | Yes | Yes | Yes | (future) | (future) | No |
TruView 2023.1 | Yes* | Yes | Yes | n/a | n/a | No |
CloudWorx 2023.1 suite | Yes* | Yes | Q2 2024*** | Yes | n/a | No |
TruView Enterprise & Cloud 2023.1 | Yes | Yes | Yes** | n/a | n/a | No |
Reality Cloud Studio, powered by HxDR | Yes | Yes | future | n/a | n/a | No |
Cyclone 3DR | Yes* | Q1 2024 | Q1 2024 | n/a | n/a | No |
Cyclone FIELD 360 family | No | future | future | n/a | n/a | n/a |
Cyclone Pegasus FIELD | n/a | n/a | Q2 2024 | n/a | n/a | n/a |
Cyclone Pegasus OFFICE | n/a | n/a | Q2 2024 | n/a | n/a | n/a |
Map360 | Yes* | Q1 2024 | future*** | n/a | n/a | No |
Infinity | n/a | n/a | future | n/a | n/a | No |
Cyclone CORE 2023.1.0 | Yes | n/a | No | No | No | Yes |
* Support for opening legacy LGS files will be limited through the end of the calendar year 2024
** With batch publish queue for customers migrating from these legacy products
*** Open e57 and convert to LGSx for native use.
Important Topics | Description |
|---|---|
LGSx for all | Starting from this release, the aforementioned products will not publish LGS files anymore, although they will still be able to read them. It is recommended to update all products at the same time to ensure a smooth workflow transition. |
Limited support for LGS files | The ability to open LGS files will be phased out by the end of 2024. Users should plan and convert their LGS files to LGSx files as soon as possible. |
Backward incompatibility | After converting existing data to the new data architecture, there is no option to revert it back to the old format. It is highly recommended to back up the original data. |
Batch conversion | For customers who are migrating from legacy products, we have provided a batch publish queue feature that allows you to convert multiple Projects or multiple LGS files to LGSx files in one go. |
LGSx files are incompatible with Cyclone CORE | Cyclone CORE does not support LGSx. Therefore, LGS files should be used instead. To convert LGS to LGSx, use the LGS converter tool. Import of Cyclone REGISTER 360 PLUS projects with the new data architecture to Cyclone CORE will be supported. |
WARNING: Once the existing data is converted to the new data architecture, it cannot be restored to the old format. Please make sure to back up the original data before conversion.
Conversions
Overview of Conversions for Leica Reality Capture Portfolio
CYE & R360+ | R360+ Converter | LGS Converter Tool | TVC/E/L | CloudWorx Suite | TV & TV LIVE |
|---|---|---|---|---|---|
  | 
| 
| 
| 
| 
|
|
|
|
|
|
|
Conversion of Cyclone REGISTER 360 PLUS Projects
To work with projects in the new version of Cyclone REGISTER 360 PLUS, they have to be converted to the new data architecture. Projects that require conversion are marked with a red X on the project thumbnail.
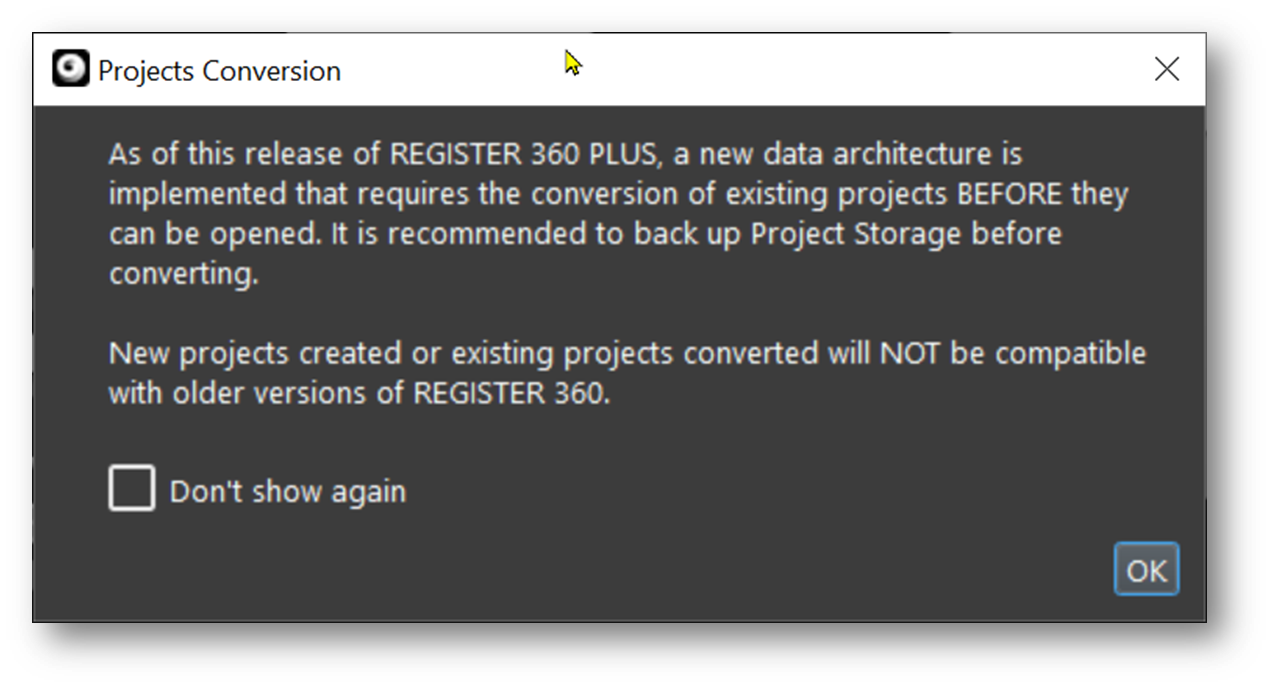
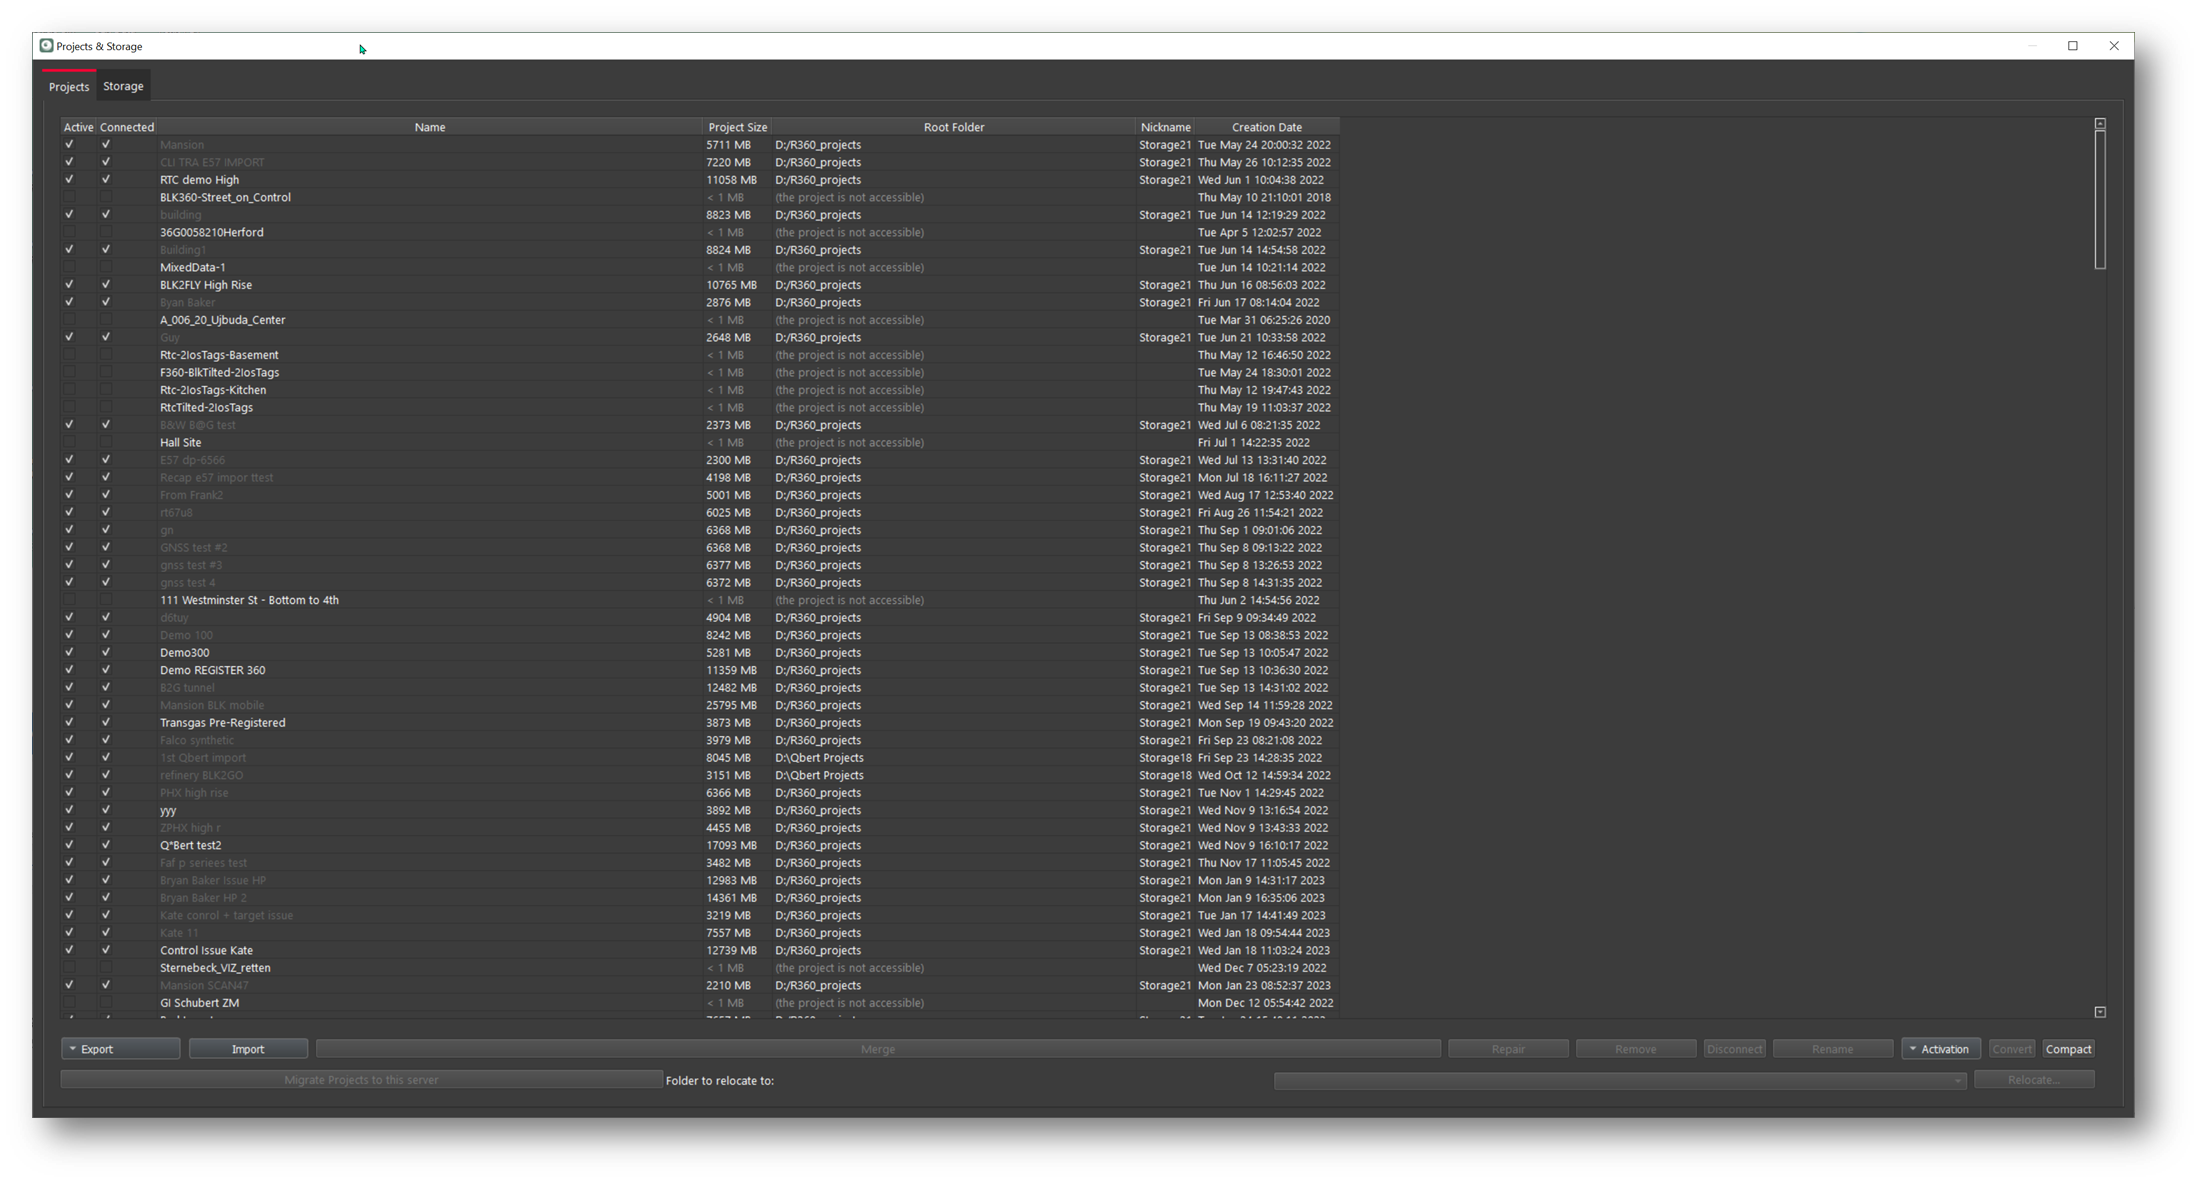
A free project converter tool, named REGISTER 360+ Converter, is also available that can convert projects without using a license. This tool is located in the Project & Storage dialog, where single or batch project conversion can be done using the shortcut below.
Note: This tool is installed simultaneously with the Cyclone REGISTER 360+ installer.
Conversion of LGS to LGSx
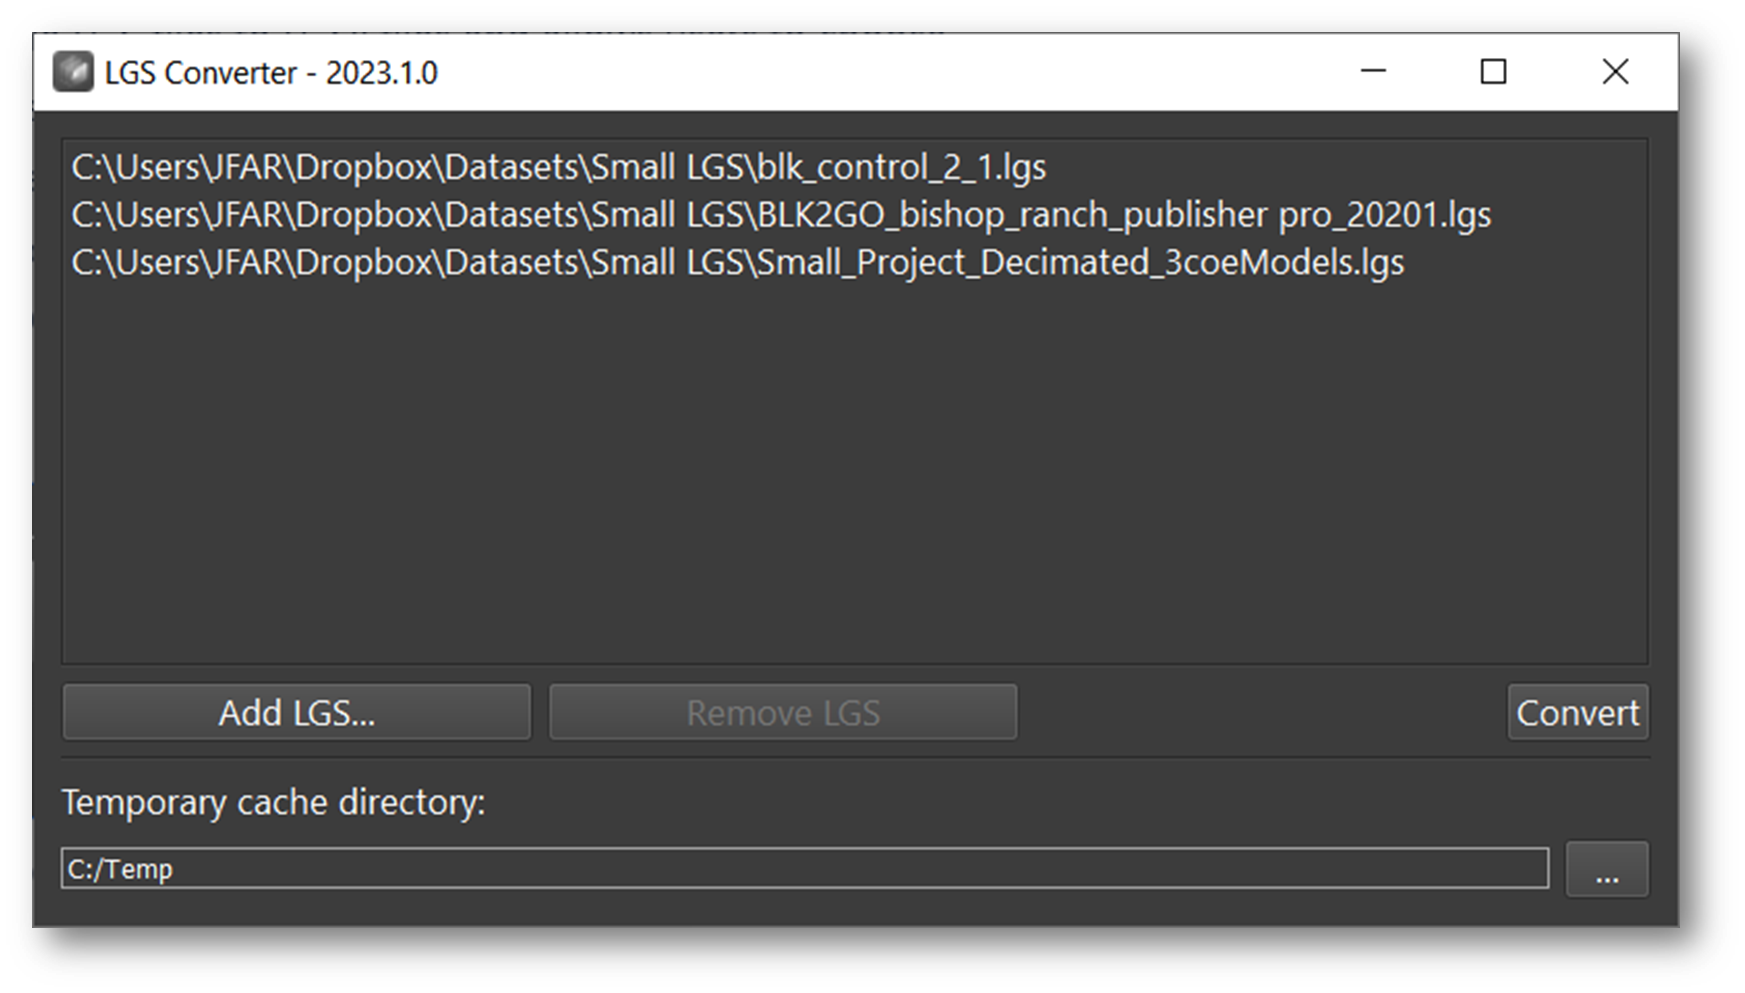
The new tool, named LGS File Converter, enables the conversion of LGS files to LGSx files, the next-generation reality capture data format that offers faster performance, higher compression, and new capabilities. The tool supports batch conversion of multiple LGS files to LGSx files and allows users to choose the destination folder for the converted files.
Note: The LGS Converter installer can be downloaded from this link.
The tool does not require any license to run and has a simple and intuitive user interface. The conversion can reduce the file size by up to 40% depending on the dataset, which can help users save storage space and costs. The tool helps users stay up-to-date with the new data architecture enhancements and leverage the benefits of LGSx files across various Leica Geosystems reality capture products.

Support Leica BLK2GO PULSE
Introduction to BLK2GO PULSE
The Leica BLK2GO PULSE is a first-person scanner that provides a complete, streamlined, end-to-end reality capture solution using the BLK Live app. With instant capture, immediate access to data, and PULSE technology, the BLK2GO PULSE delivers complete, colorized point clouds instantly in the field with no post-processing required. The technology is based on Dual solid-state Time-of-Flight (ToF) sensors designed for indoor reality capture applications.
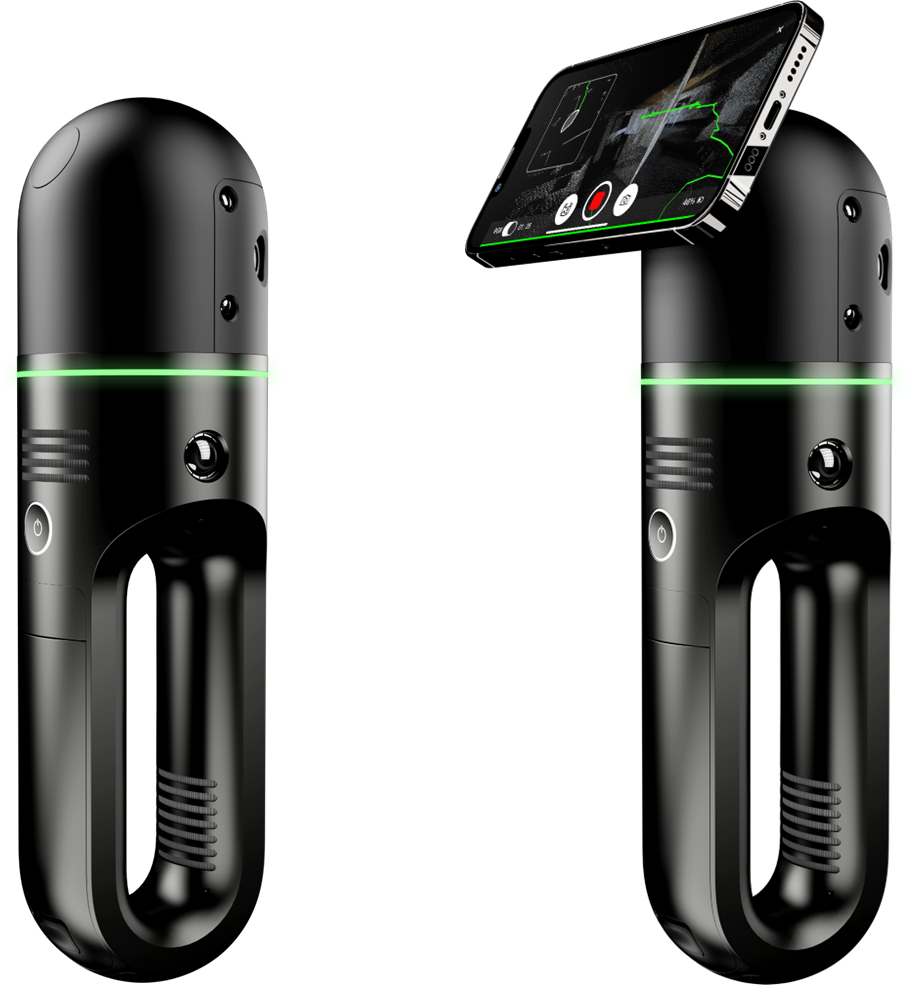
Cyclone REGISTER 360 PLUS (BLK Edition) is optimized for use with the BLK2GO PULSE including support for its image, point, and trajectory data and the ability to combine BLK2GO PULSE with data from other sensors. Users who wish to register their BLK2GO PULSE data to other sensors should consider Cyclone REGISTER 360 PLUS Standard or Cyclone REGISTER.
The BLK2GO PULSE includes a free, dedicated companion app, the BLK Live, which is known from previous BLK sensors. It has been redesigned specifically to maximize the capabilities of the BLK2GO PULSE and provide the best possible first-person scanning experience and workflow.
The BLK2GO PULSE can be connected to Cyclone REGISTER 360 PLUS or Cyclone REGISTER 360 PLUS (BLK Edition) via Wi-Fi or USB cable. Cyclone REGISTER 360 PLUS (BLK Edition) is optimized for use with the BLK2GO PULSE. The software will help users with post-processing and cleaning up captured data (if needed), registering separate scan paths, and exporting and publishing data in different formats for deliverable creation. Once connected, Cyclone REGISTER 360 PLUS (BLK Edition) will show the Jobs (a.k.a. Projects in Cyclone REGISTER 360 PLUS) which contains the Walks (unique capture events) listed in the import area.
The scanner has three panoramic cameras that are used to capture images every second which can be turned into panoramic setup locations along the trajectory (or walking path) of the scan. These images are also used to colorize the point cloud data.
At import, the user will set an interval for how often these panoramic setups are created. The setups are known as WayPoints and are located along the scan path to show panoramic imagery for a more traditional setup location experience.
Upon import, Cyclone REGISTER 360 PLUS will import the point cloud data and pano images per-user setting. The user can set the WayPoint creation every 1-meter or more, along the trajectory. It is not necessary to create WayPoints to import BLK2GO PULSE data, but at least one WayPoint must be created to import the data with at least one handle or WayPoint to move and rotate the data in the SiteMap area.
The BLK2GO PULSE scanner also has one high-resolution camera. When the image capture button is pressed, a 12-megapixel image will be captured from the front of the scanner. Upon import, the image is turned into a GeoTag which is accessible downstream in Cyclone ENTERPRISE, LGS/LGSx, TruView, CloudWorx, etc.
For more information about scanner operation please refer to the manual included with your scanner.
The BLK2GO PULSE scanner can also be connected to the BLK Live App and the Cyclone FIELD 360 App for both Android and iOS devices.
Working with BLK2GO PULSE kinematic scanner
Note: For more details, please refer to the BLK2GO manual and help.
Using the BLK Live or FIELD 360 app
Turn on the BLK2GO PULSE scanner.
Open the BLK Live or FIELD 360 app on the tablet or phone.
Connect the app to the PULSE scanner.
Create a new job in the app.
Press the scan button on the app or the scanner to start scanning.
Press the image button on the app or the scanner to collect detailed images during the scan. This will create a geotag with an attached asset of a detailed image.
Create “Cyclone FIELD 360” links and GeoTags in the FIELD 360 app after scanning is complete.
Download the scans using the BLK Data Manager or connect the scanner directly to Cyclone REGISTER 360 PLUS after the changes from FIELD 360 (such as links and geotags) are synced back to the scanner.
Note: Importing the PULSE or BLK2GO jobs directly from the Cyclone FIELD 360 app is not supported in this release.
Not using the BLK Live or Cyclone FIELD 360 app
Turn on the PULSE scanner.
Press the scanner button to start scanning.
Press the image button on the scanner to collect detailed images during the scan. This will create a GeoTag with an attached Asset of a detailed image.
Download the scans using the BLK Data Manager or connect the scanner directly to Cyclone REGISTER 360 PLUS after scanning is complete.
Import BLK2GO PULSE data to Cyclone REGISTER 360
Wi-Fi import workflow
Connect to the wireless network of the BLK2GO PULSE scanner. SSID and PW are listed in the battery compartment of the scanner.
Once connected, open Cyclone REGISTER 360 PLUS or Cyclone REGISTER 360 PLUS (BLK Edition) and create a Project.
Click on the BLK2GO PULSE button to open the connection dialog:
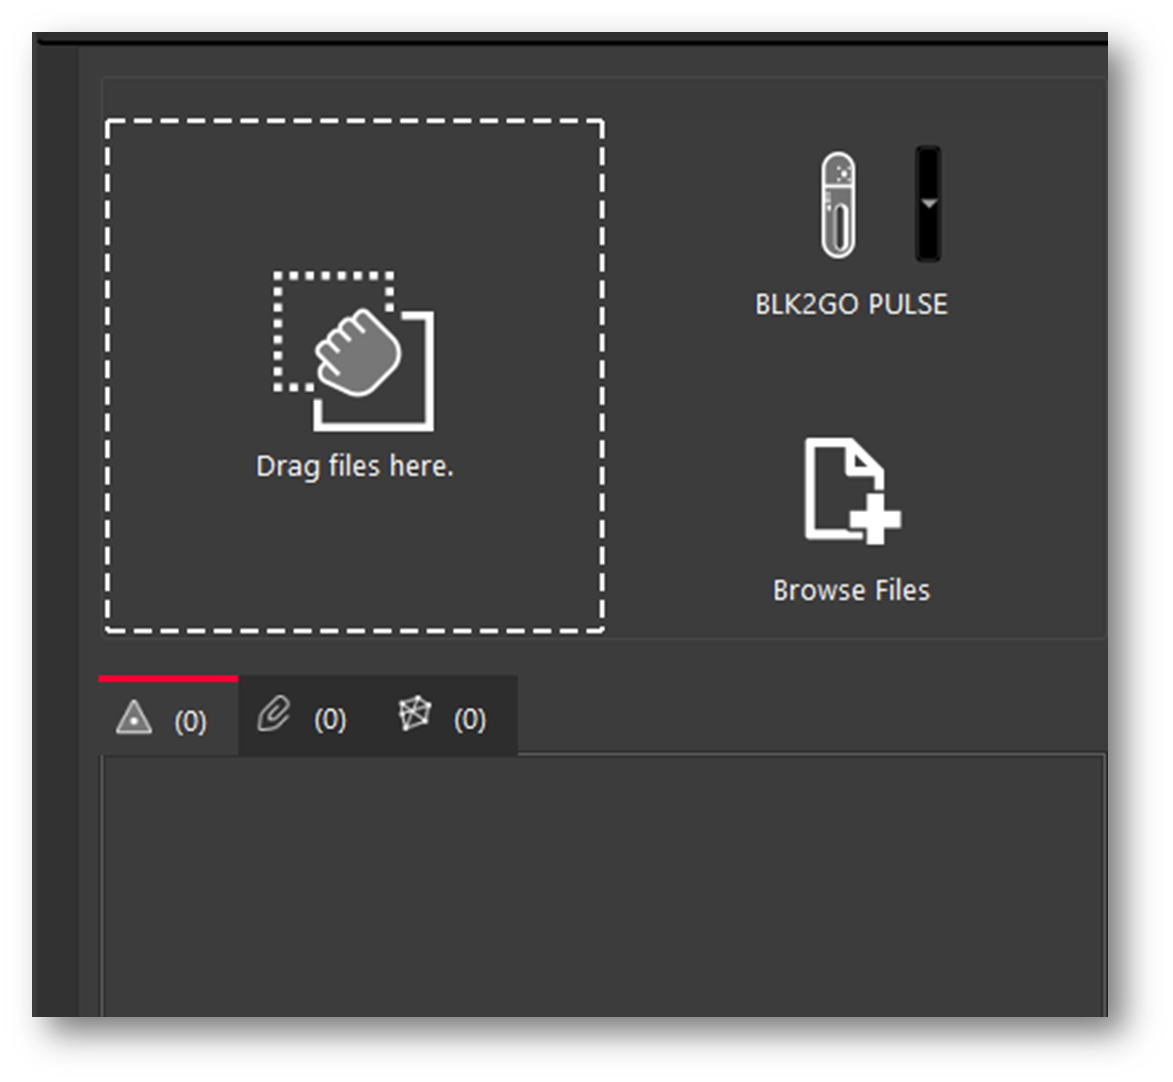
The available scanners will be listed by serial number.
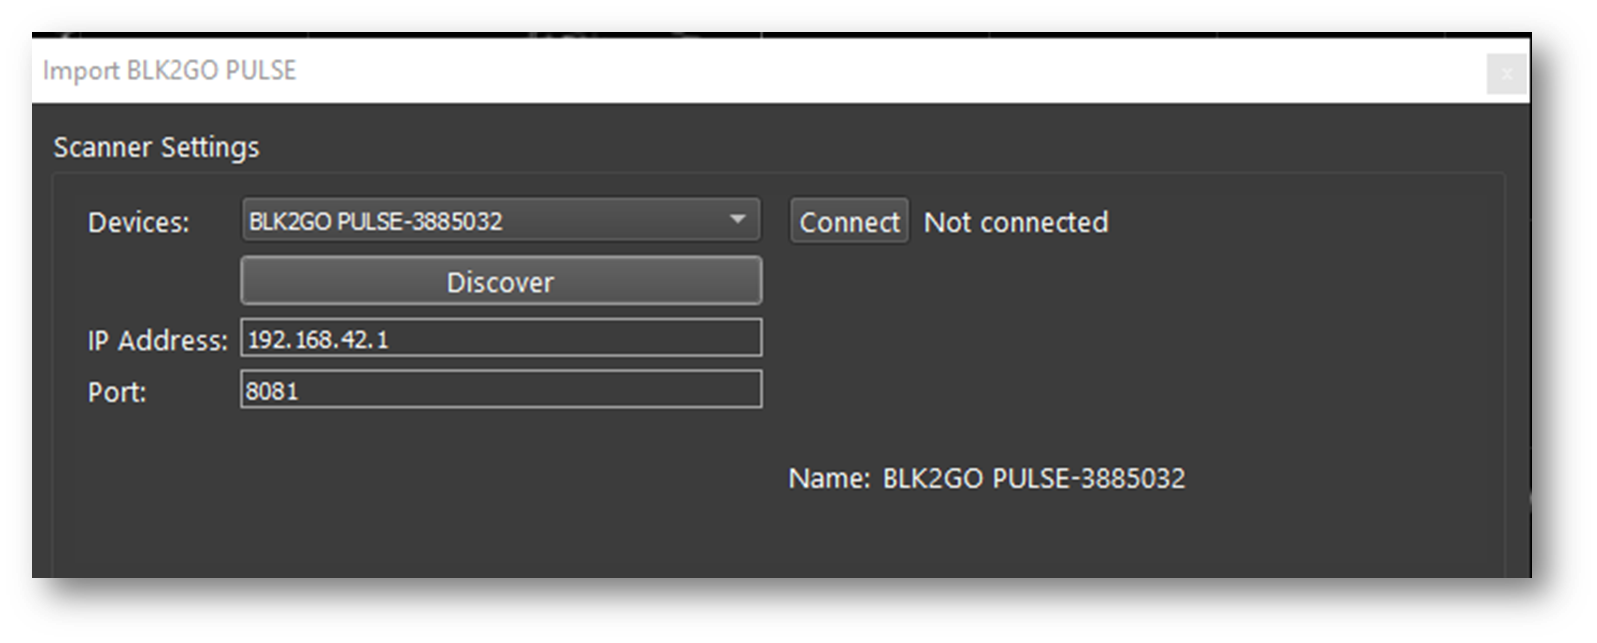
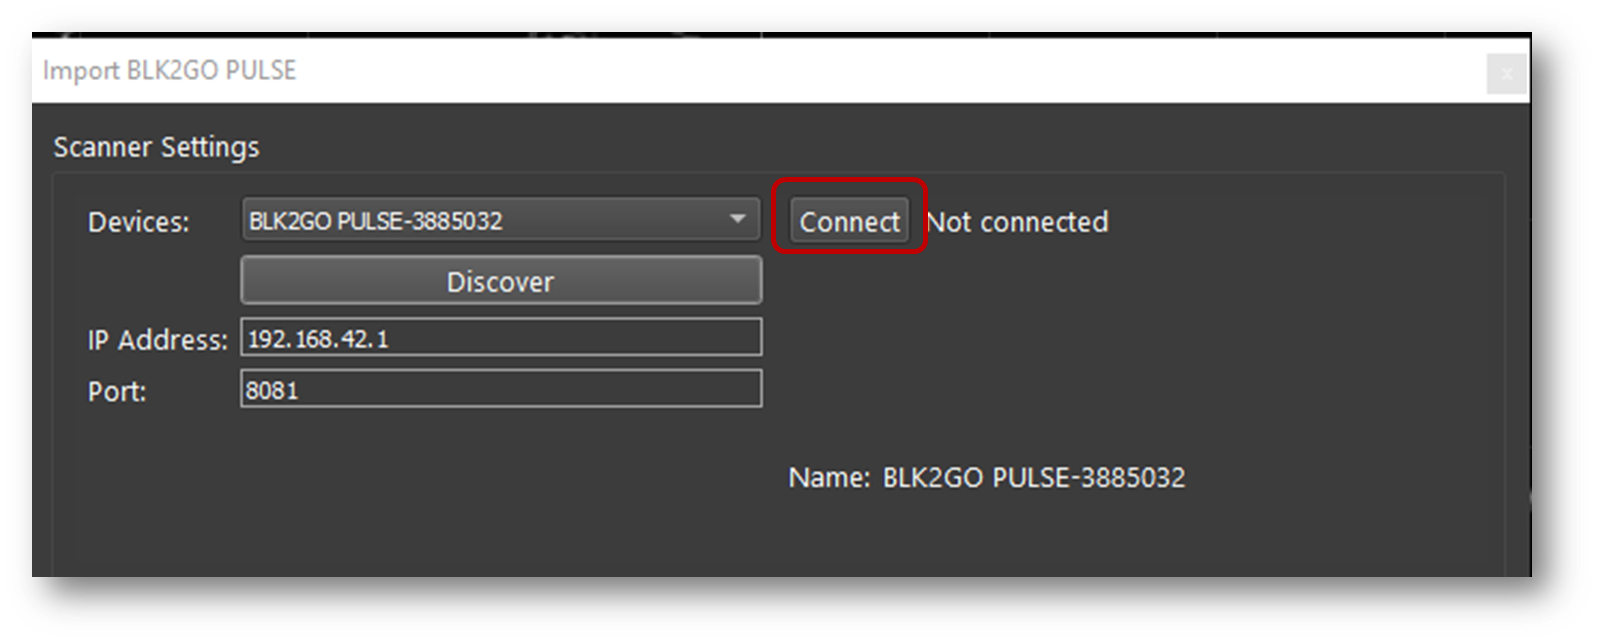
Click the Connect button to establish a connection to the scanner.
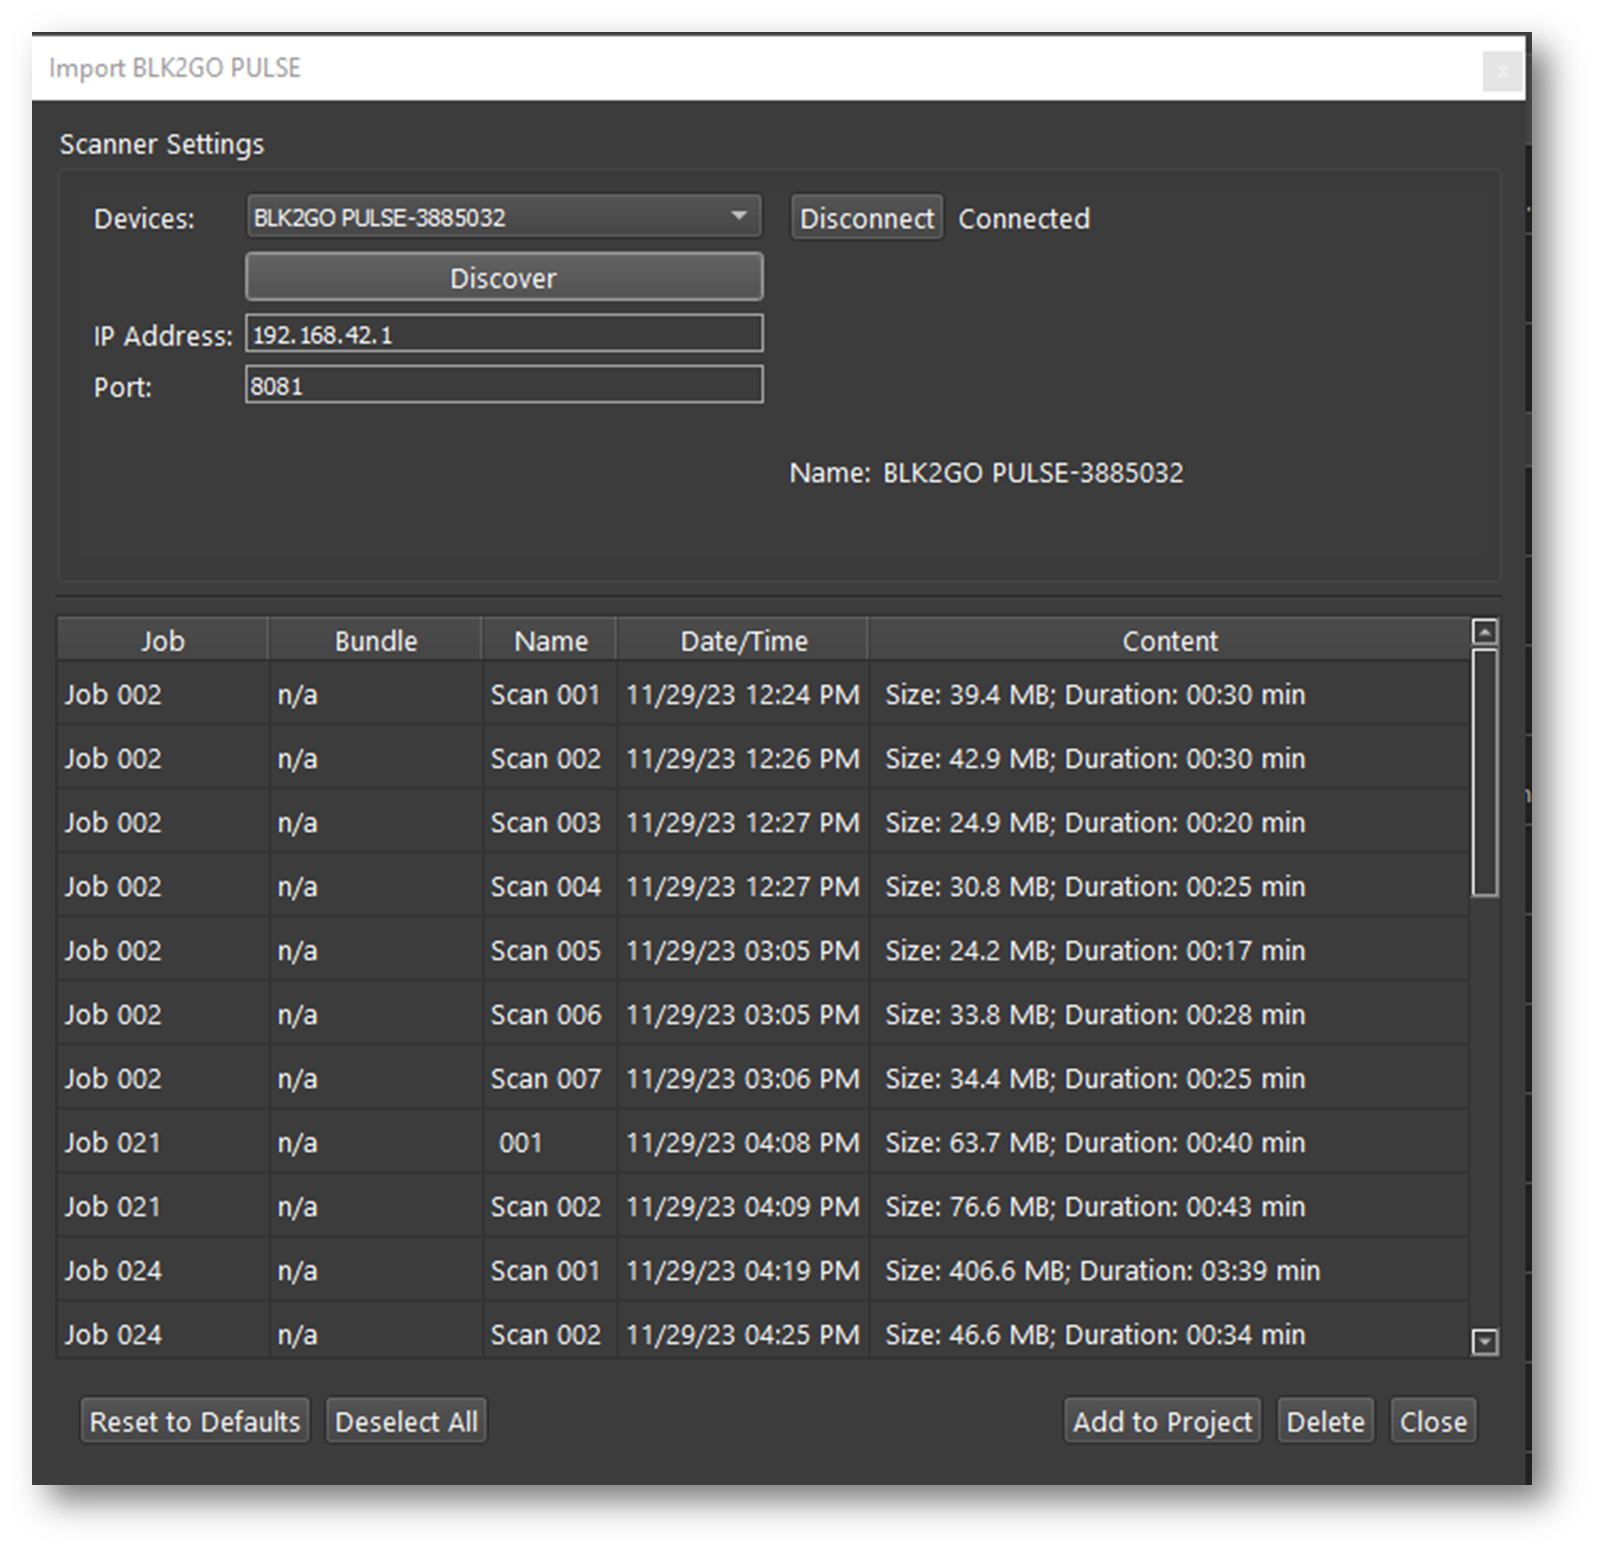
Then click the Add to Project button. This will add all available Jobs to the import panel.
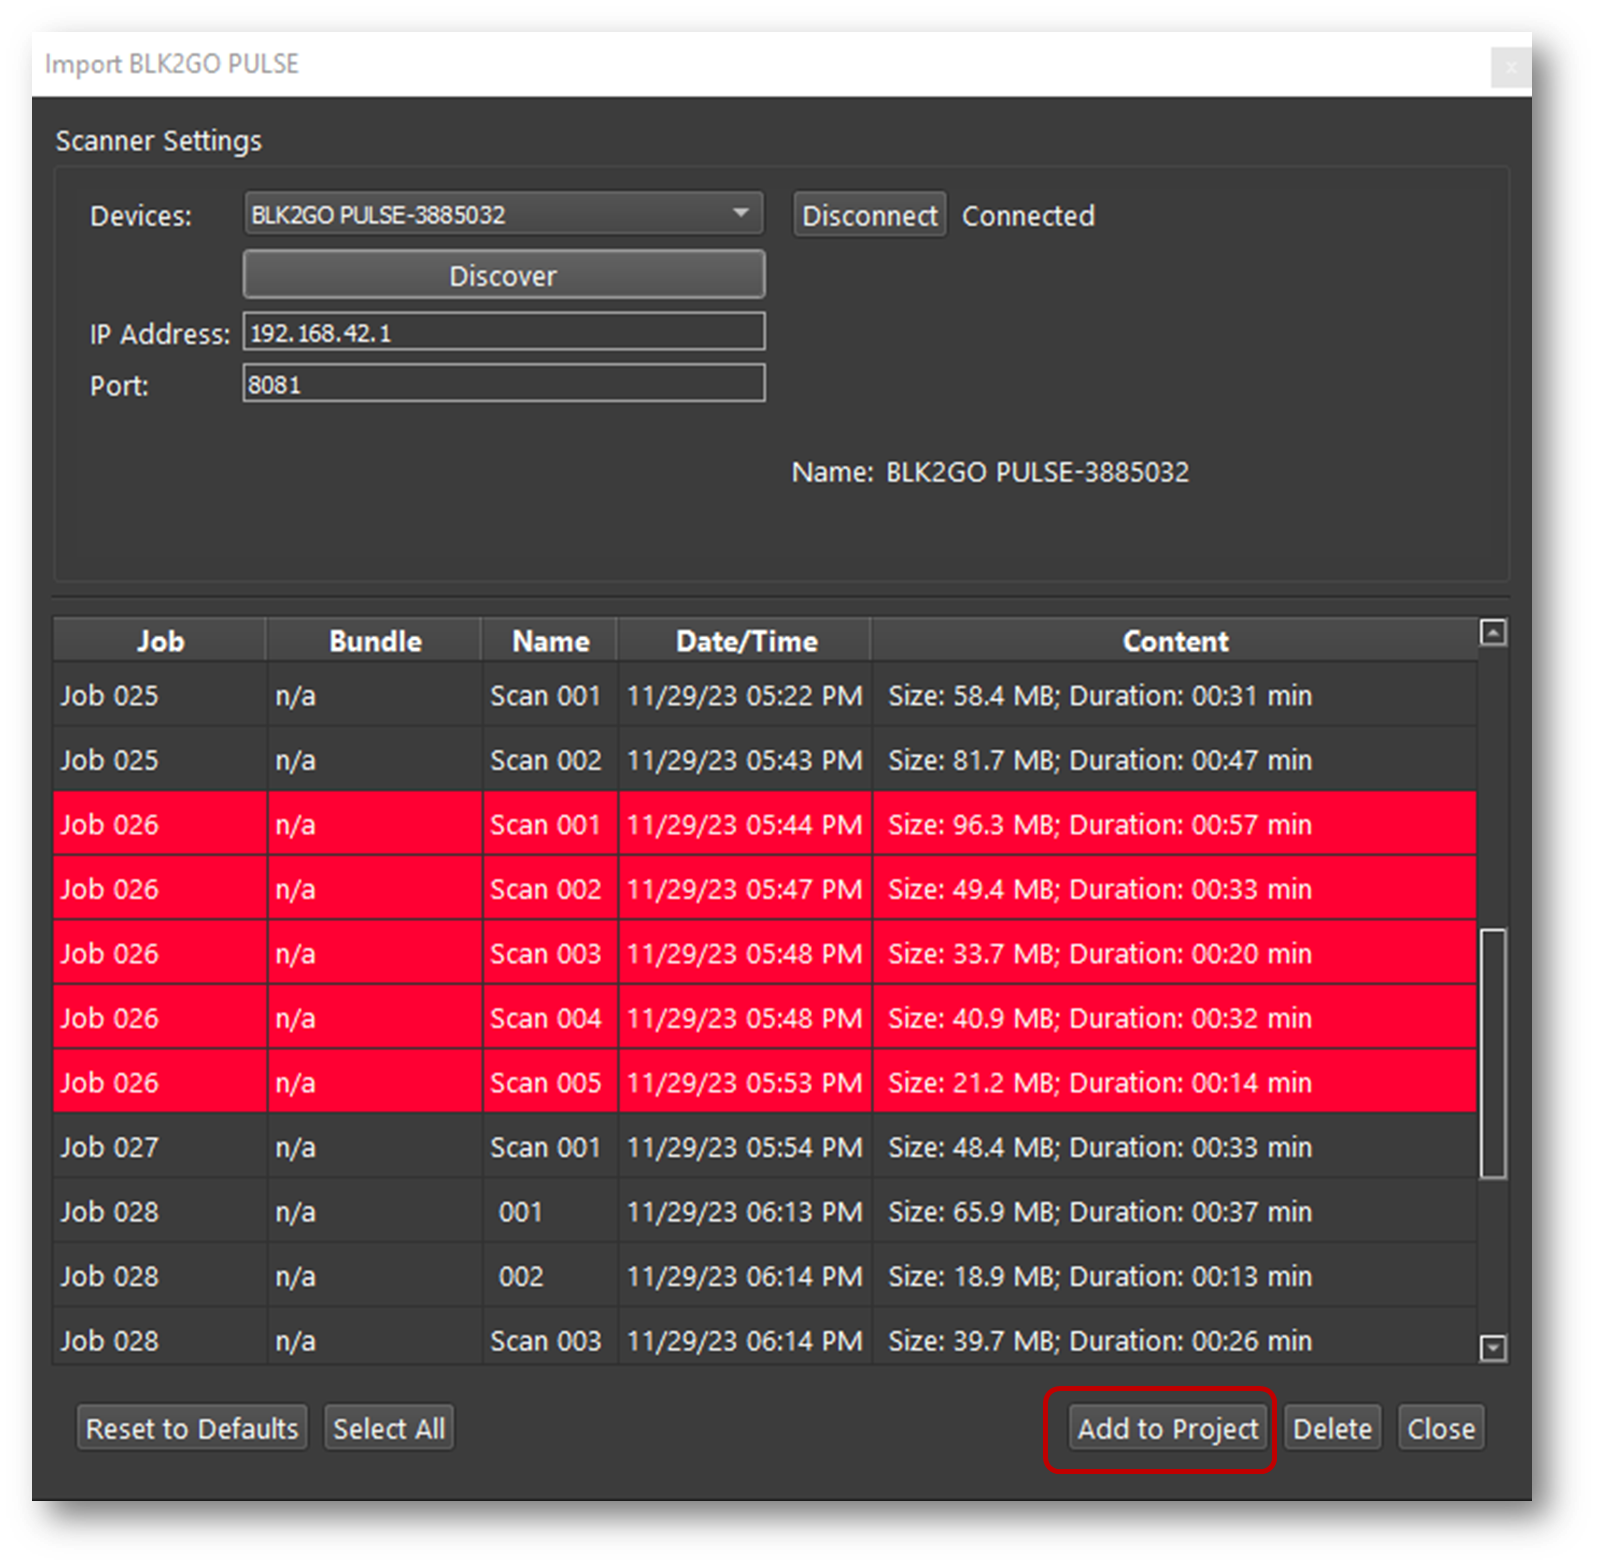
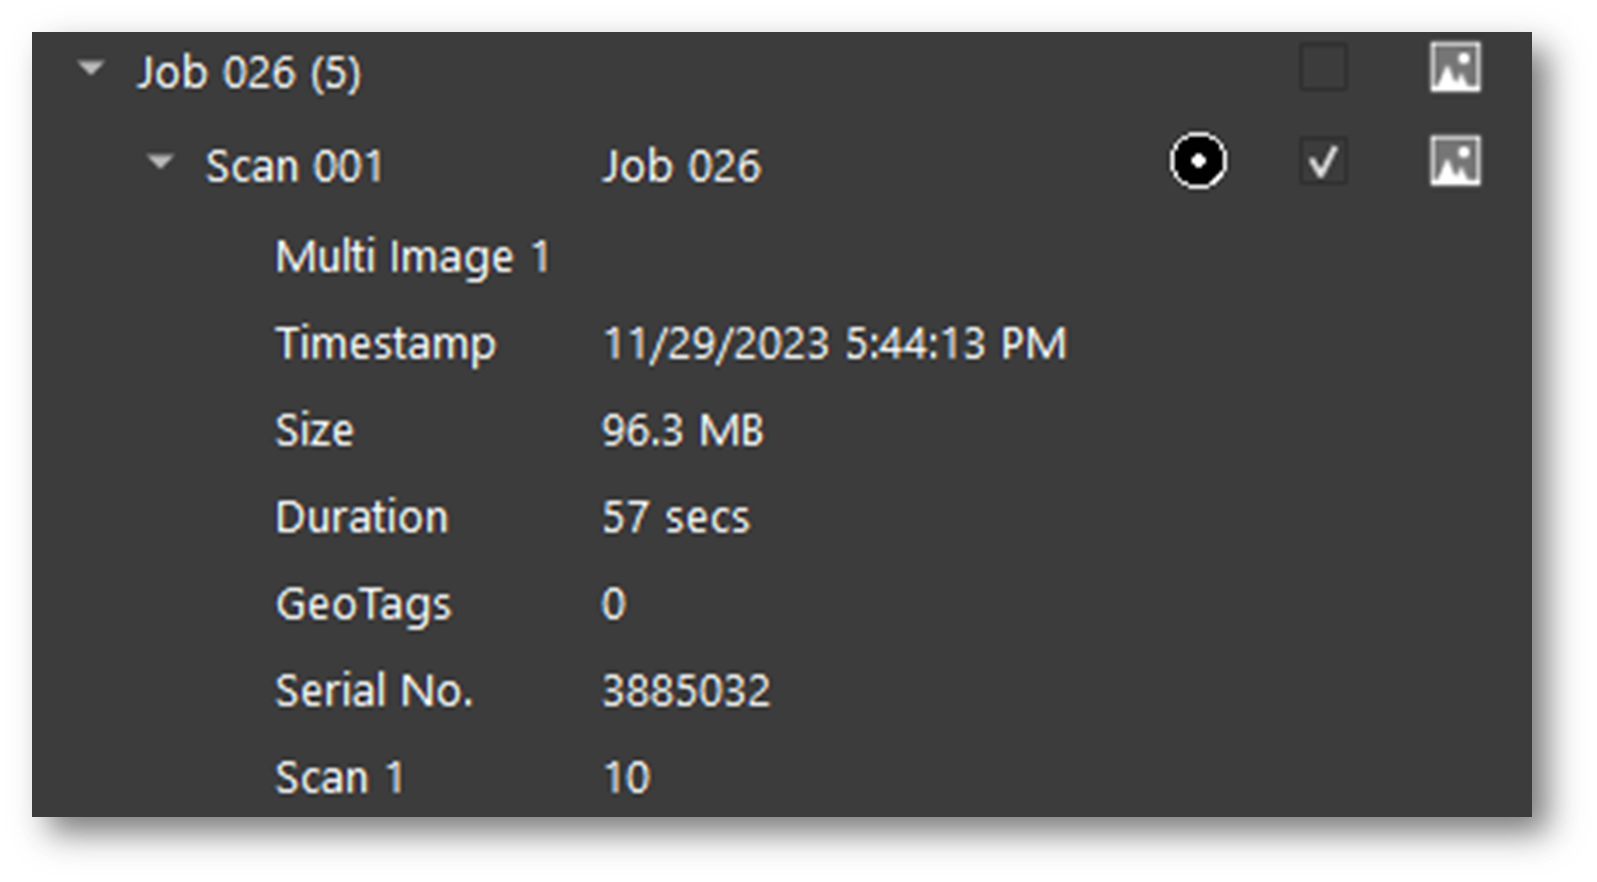
Listed under each Job are the size of the scan, duration, and the number of GeoTags.
Select the walks to import by using the checkboxes to the right of each Walk.
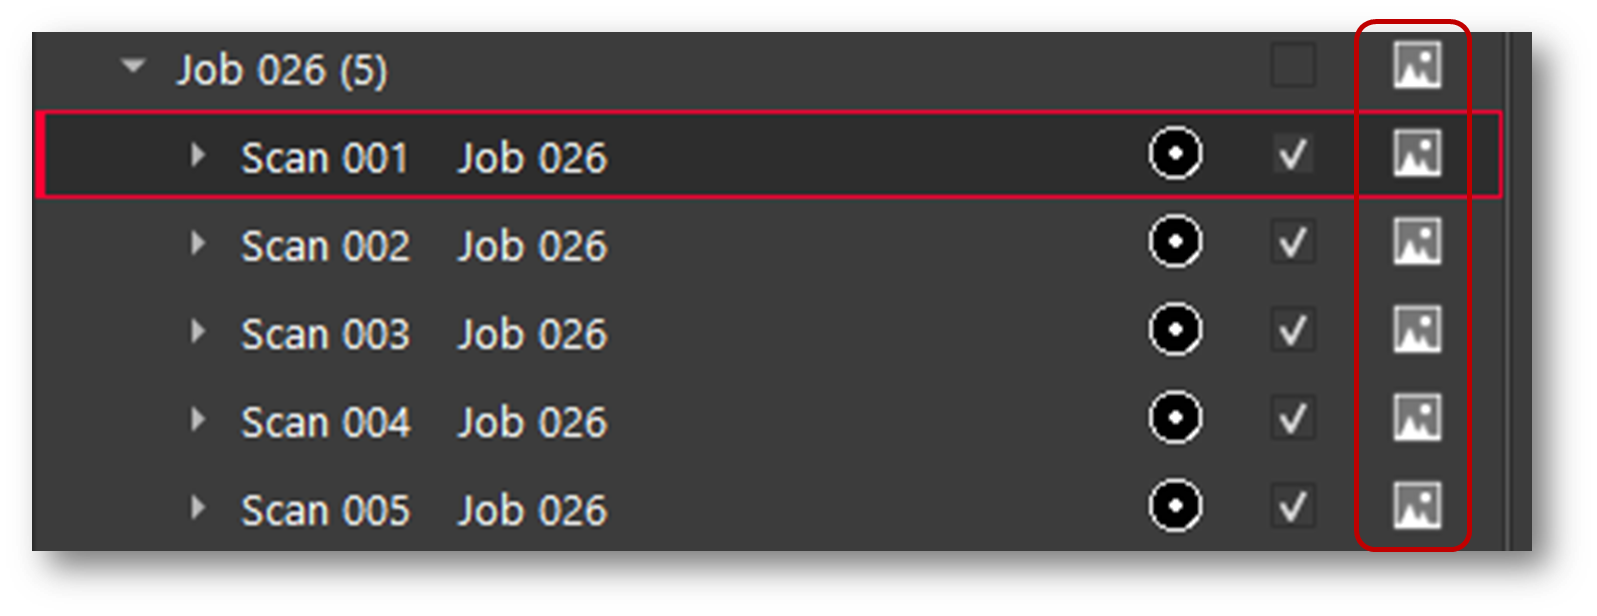
Then, on the lower right side of the import area select the interval for WayPoint creation The default is one WayPoint every 10 m or 30 feet.
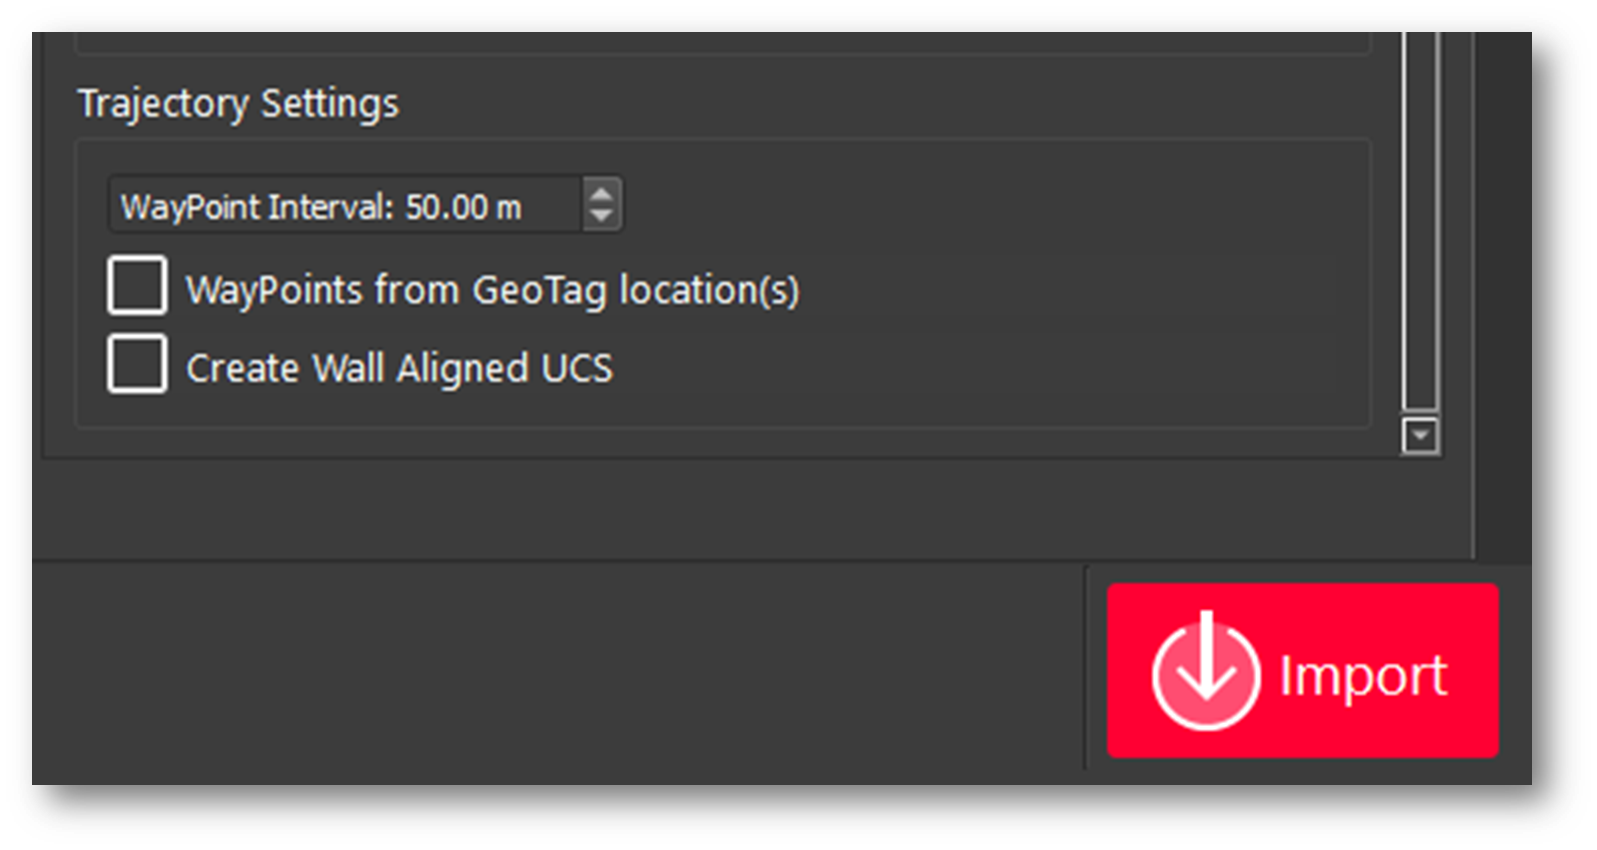
Enter an interval for Waypoint creation by distance along the trajectory of the Walk.
WayPoints are inserted setup positions that only contain pano image data.
The shorter the interval, the more WayPoints will be created.
Each WayPoint will take approximately 30-40 seconds to import.
Note: Increasing the number of WayPoints will result in longer import times.
Click the Save copy to local folder check box and then select a download location using the browse button to save a local copy of the scanner data to disk. The file extension is *.b2g.
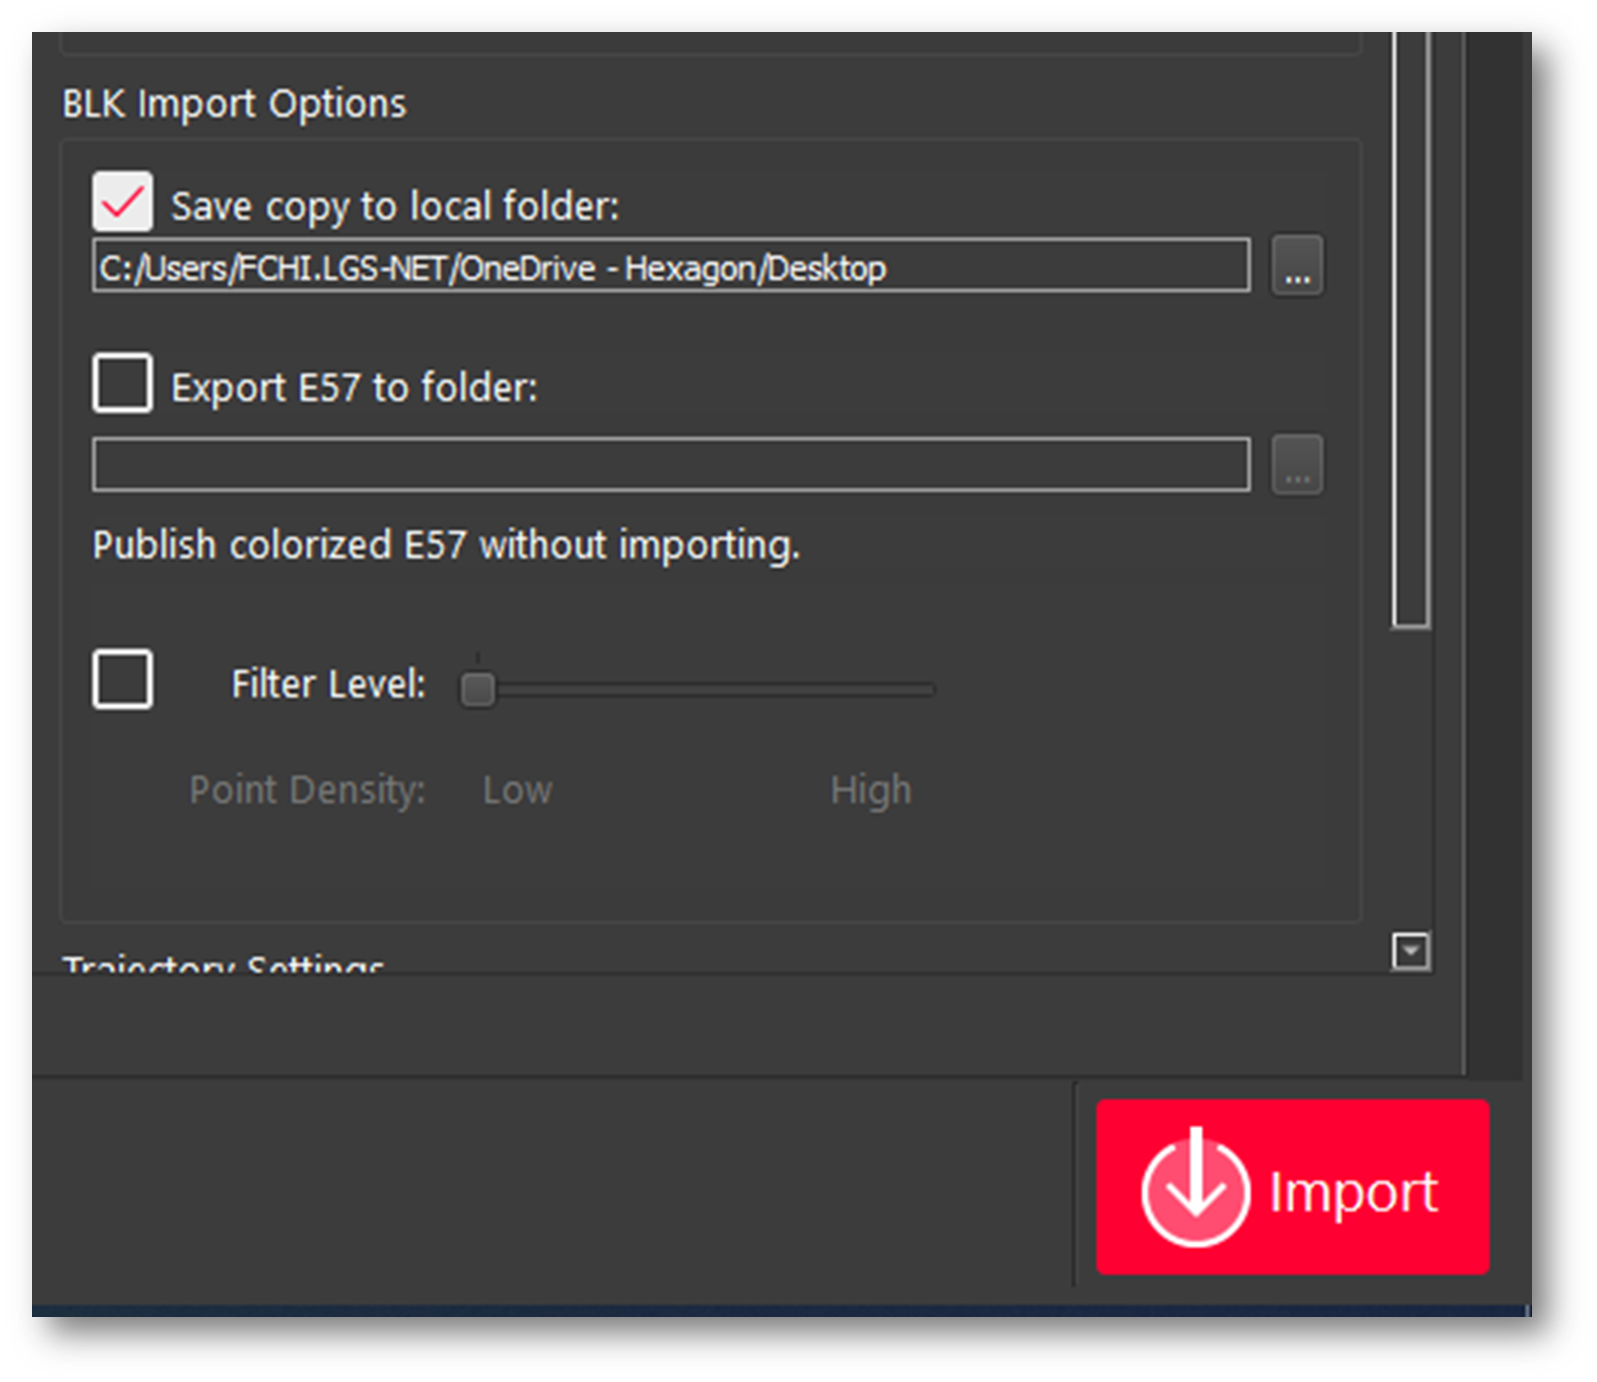
Note: This step is not necessary but recommended as best practice. Please always store a backup of your raw data.
Click Import to begin the import process.
Import B2G and Export to E57
Importing BLK2GO PULSE data into the Import area and then directly exporting to E57.
Using this approach, the data will NOT be imported into Cyclone REGISTER 360 PLUS.
This is a direct export to E57 with a colorized point cloud without WayPoints.
Import a B2G file or connect to a BLK2GO PULSE scanner.
If BLK2GO data is detected in the import area an option to export directly to E57 appears in the right-side panel of the import area. Check the Export E57 to Folder check box and then click the import button.
An E57 file of the BLK2GO data will be written to the selected folder.
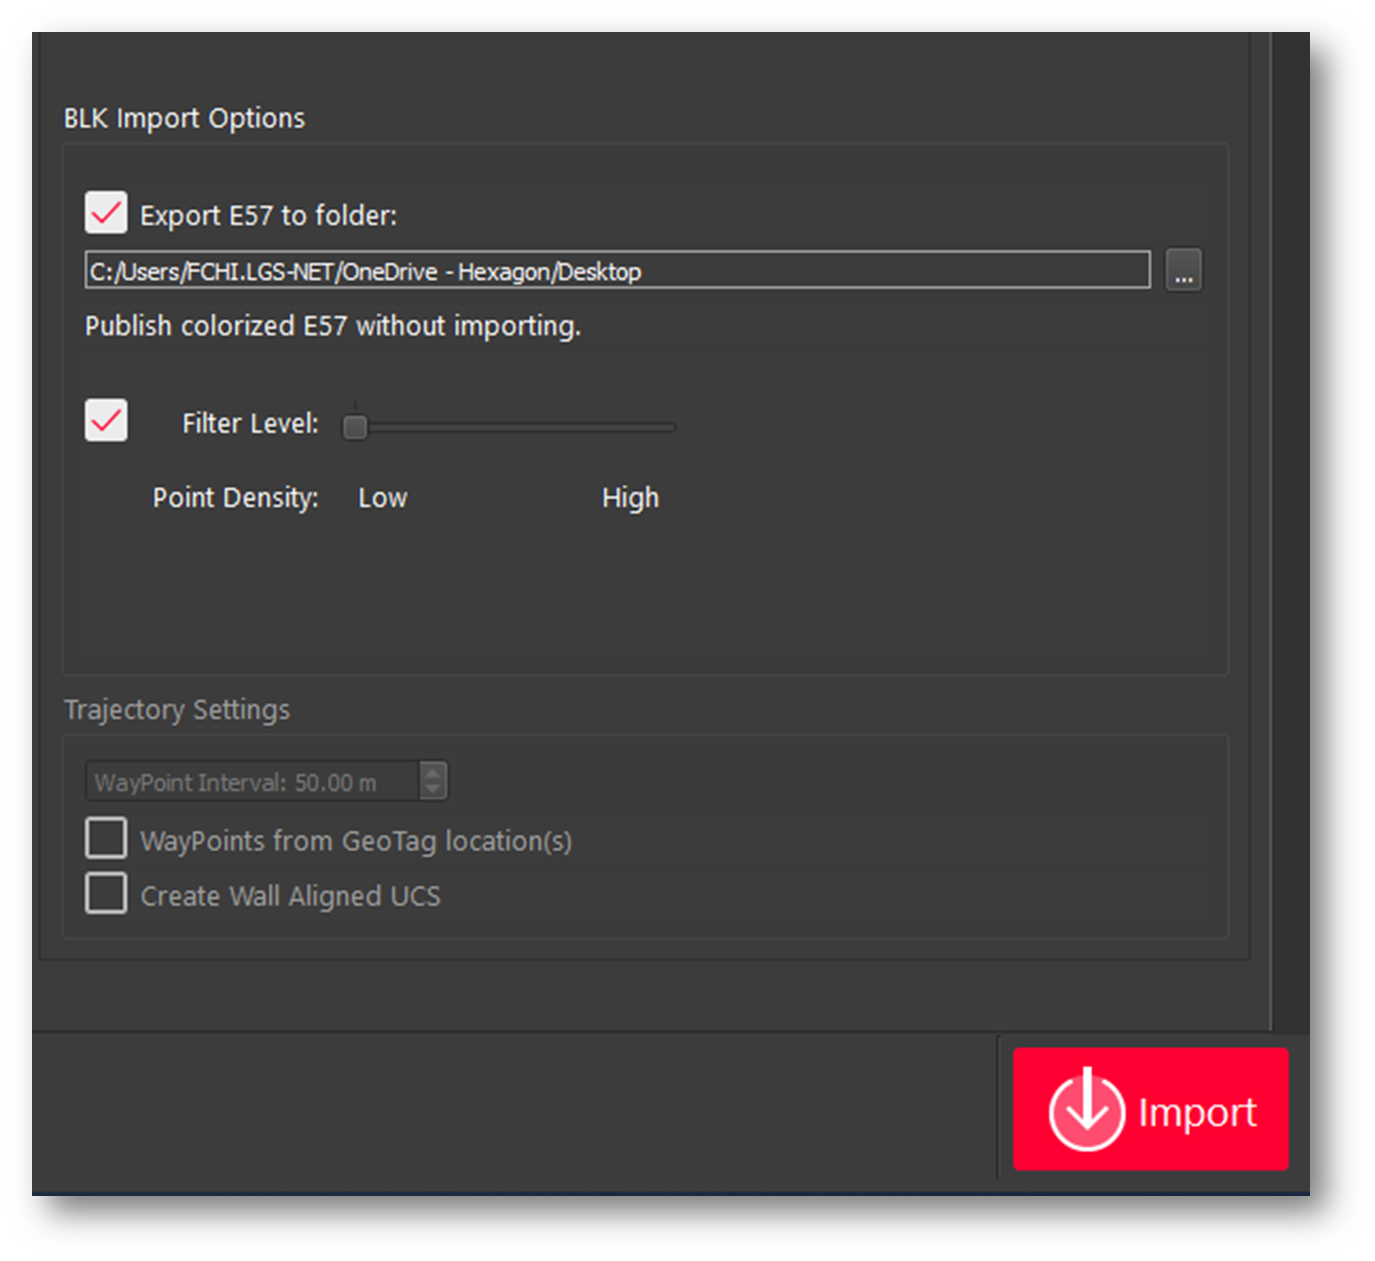
Note: This process saves time versus importing the data into Cyclone REGISTER 360 PLUS if the only requirement is a colorized e57 without panoramic images.
Note: Due to the unstructured nature of BLK2GO PULSE data, e57 files created from the scanner will not be supported for import into Cyclone REGISTER 360 PLUS 2021.0 or earlier.
Note: Users should save original .b2g files for future use.
Quick import of data into REGISTER 360 without images and point cloud colors
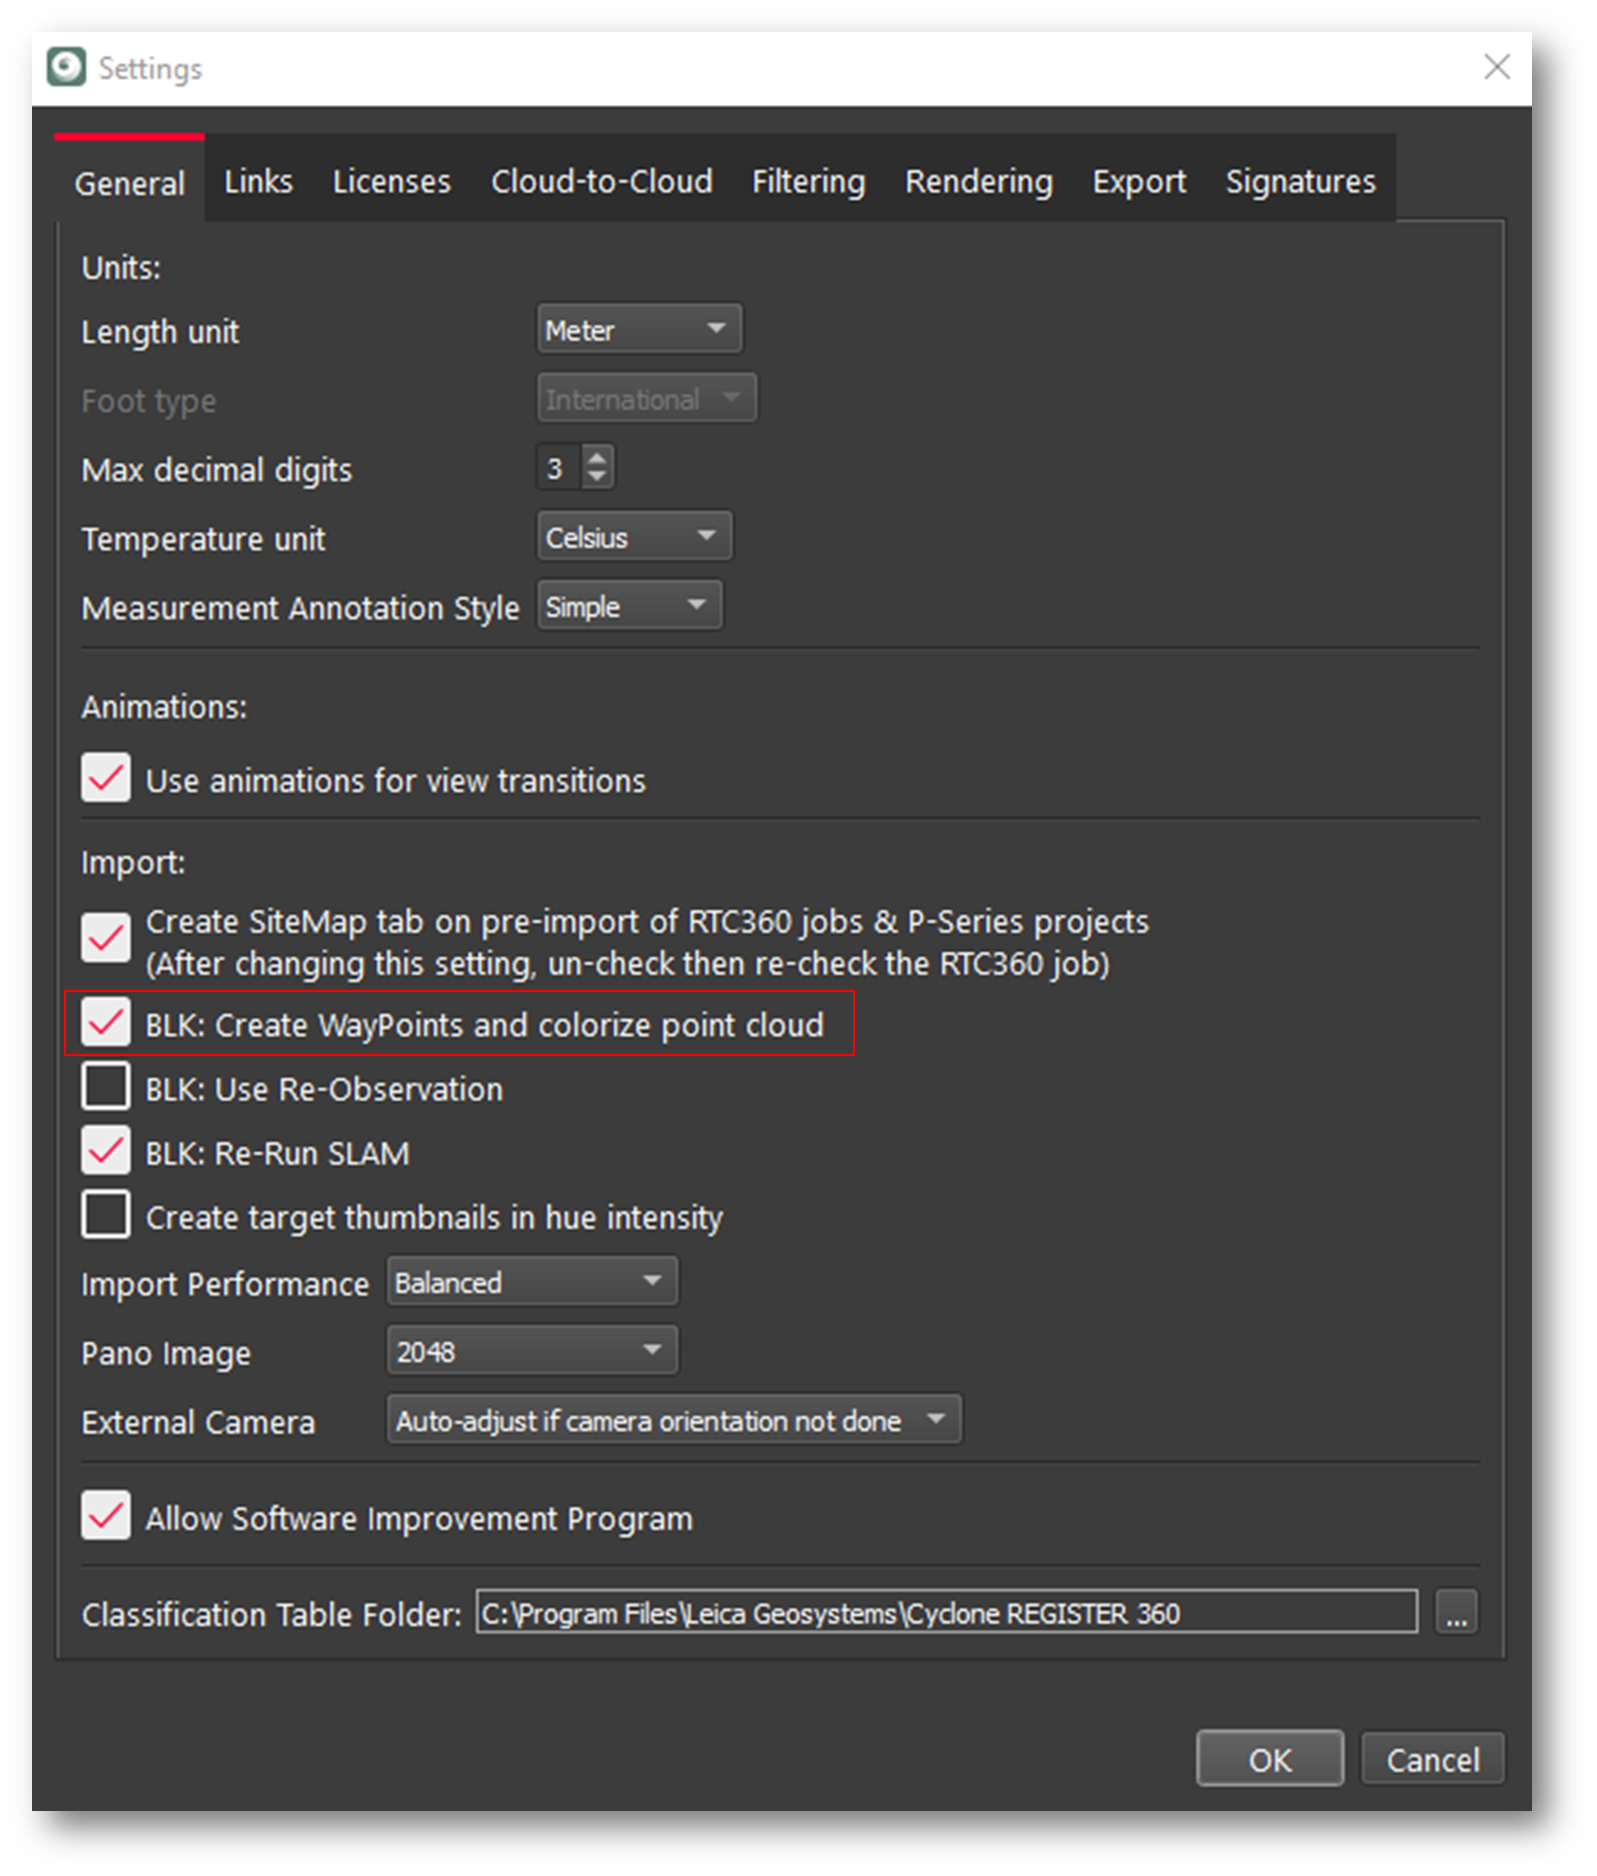
To import the data into Cyclone REGISTER 360 PLUS without panoramic images and without colorizing the point cloud, in the Settings menu uncheck, the option “BLK2GO: create WayPoints and colorize point cloud”.
Note: Using this option will save import time as the point data is not colorized and the creation of Panoramic images is skipped.
Processing BLK2GO PULSE data in Cyclone REGISTER 360 PLUS
The BLK2GO PULSE Walk (Walk is the name of a unique BLK2GO PULSE capture event with images and GeoTags) will appear in the SiteMap area as a single Setup with the number of WayPoints determined by the user-defined trajectory settings in the Import area.
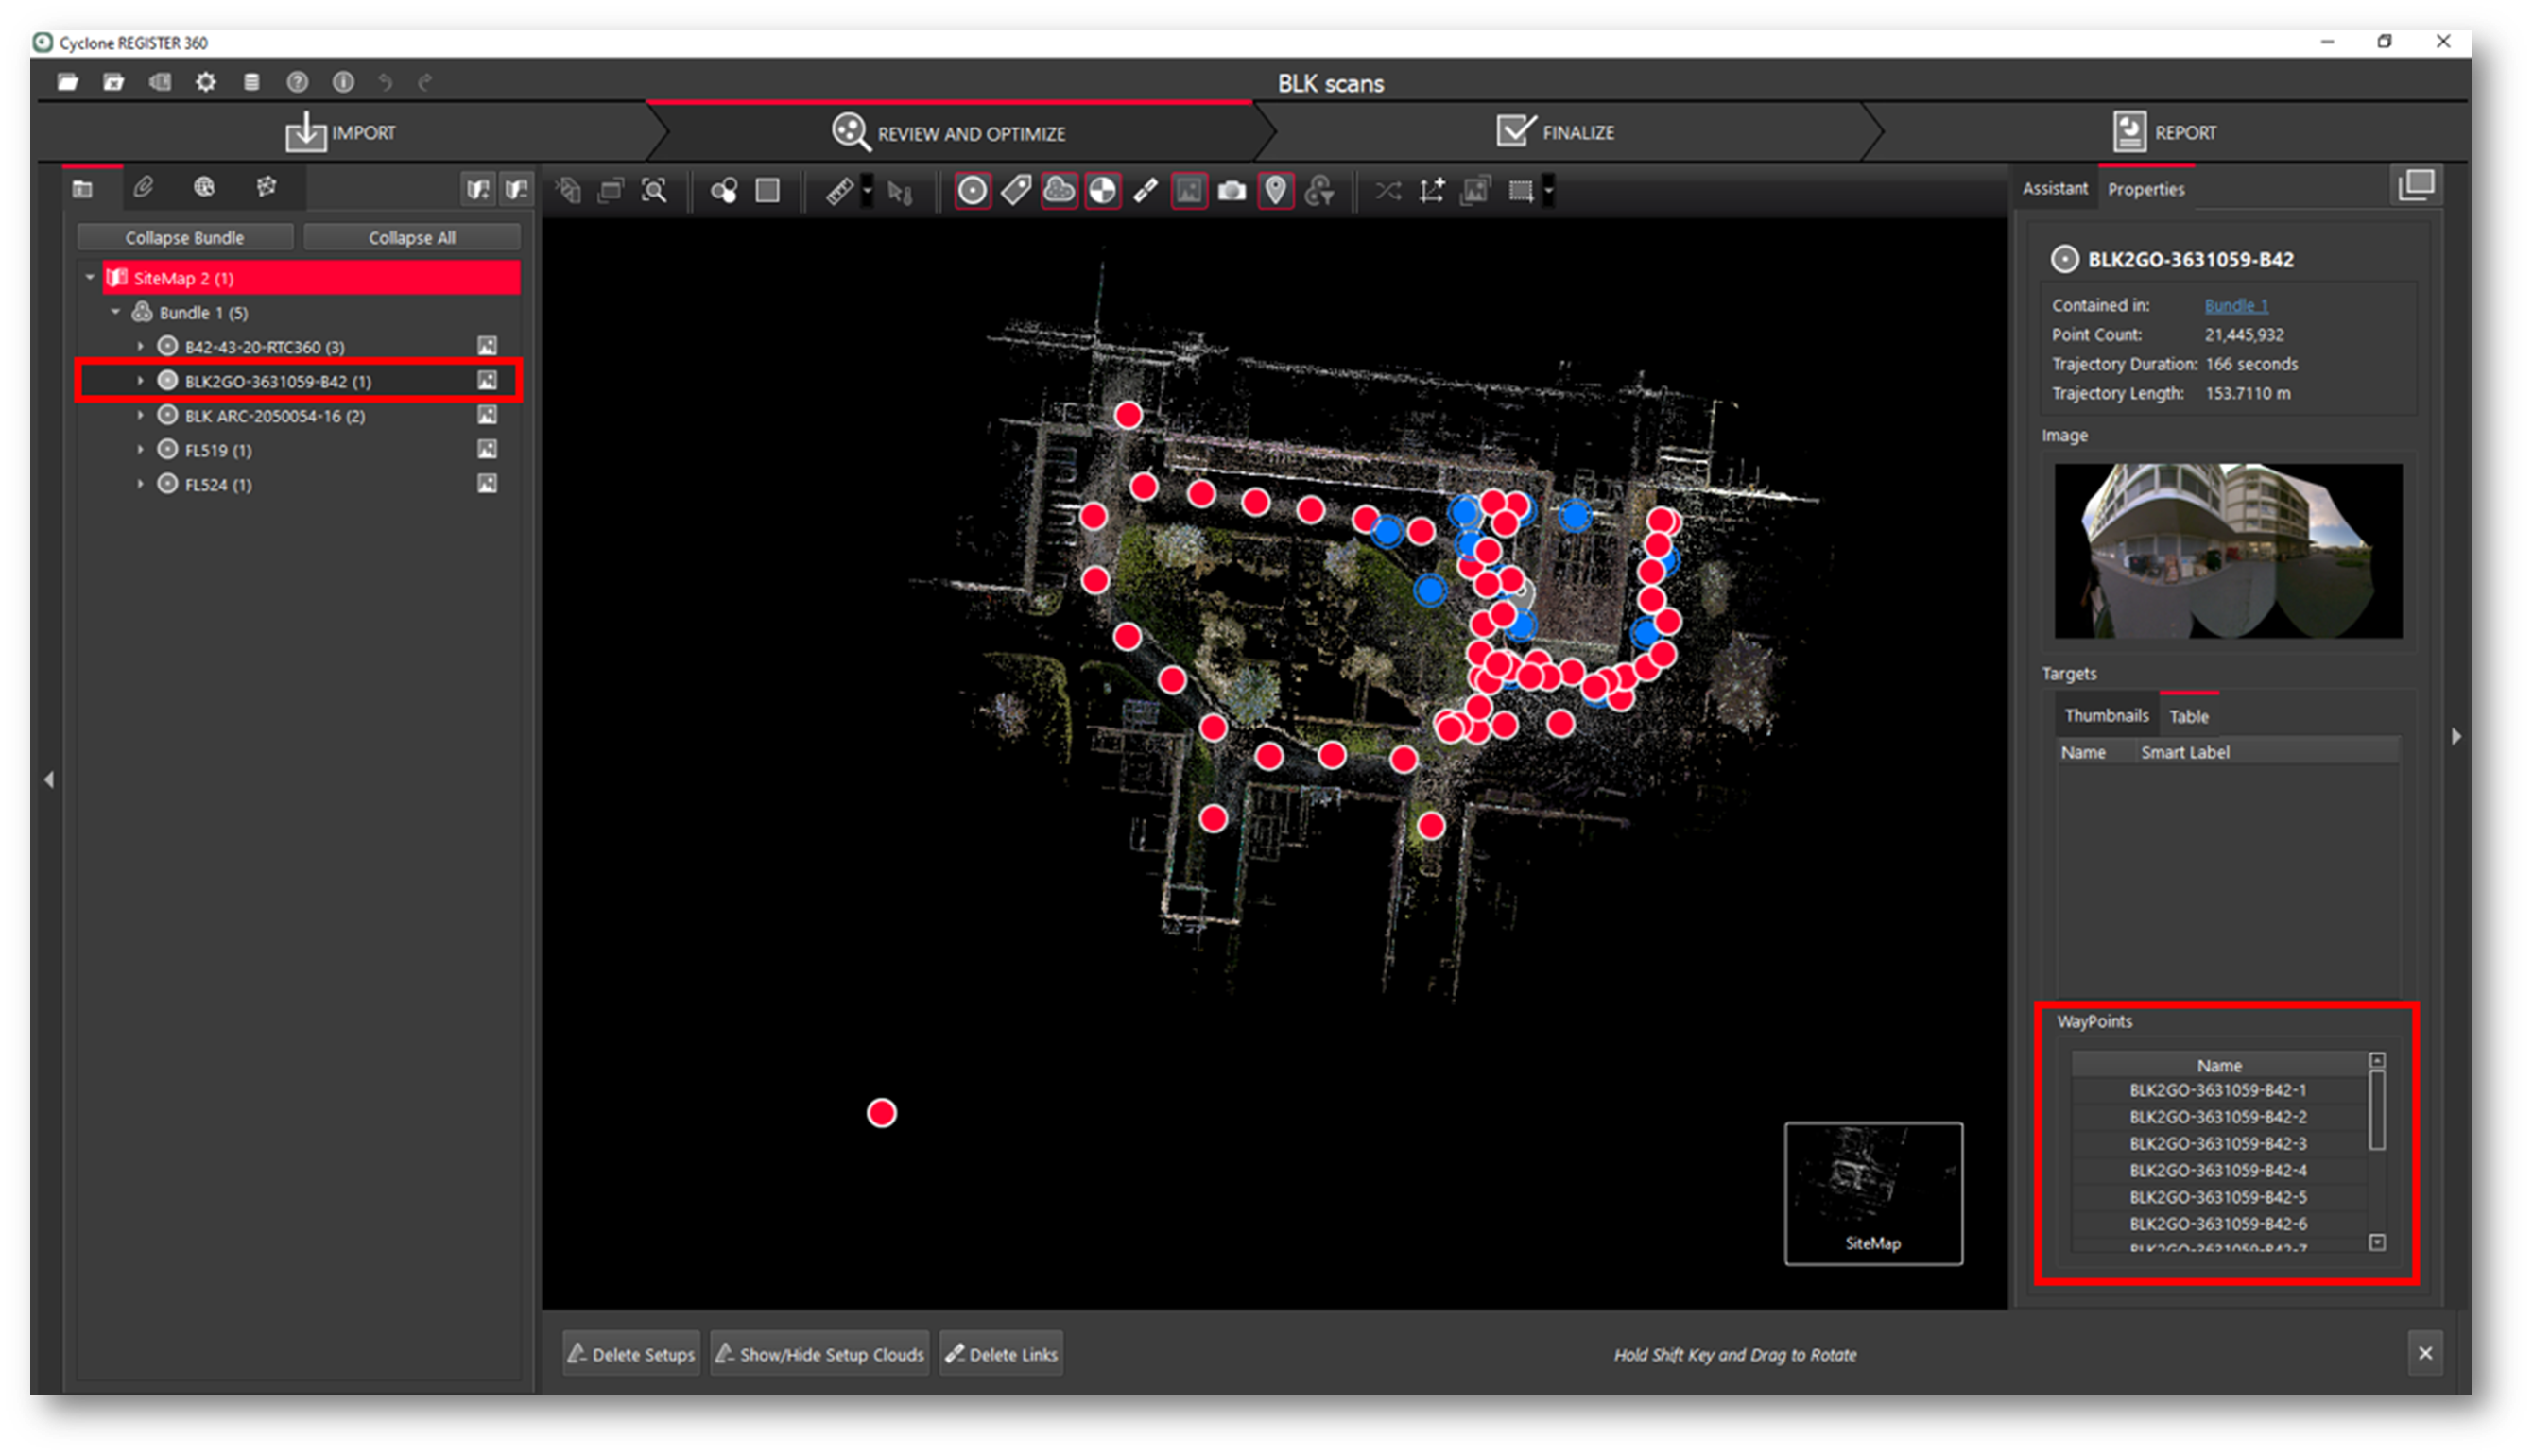
Each WayPoint contains a panoramic image to support traditional visualization options. The WayPoint locations are listed in the right panel under WayPoints.
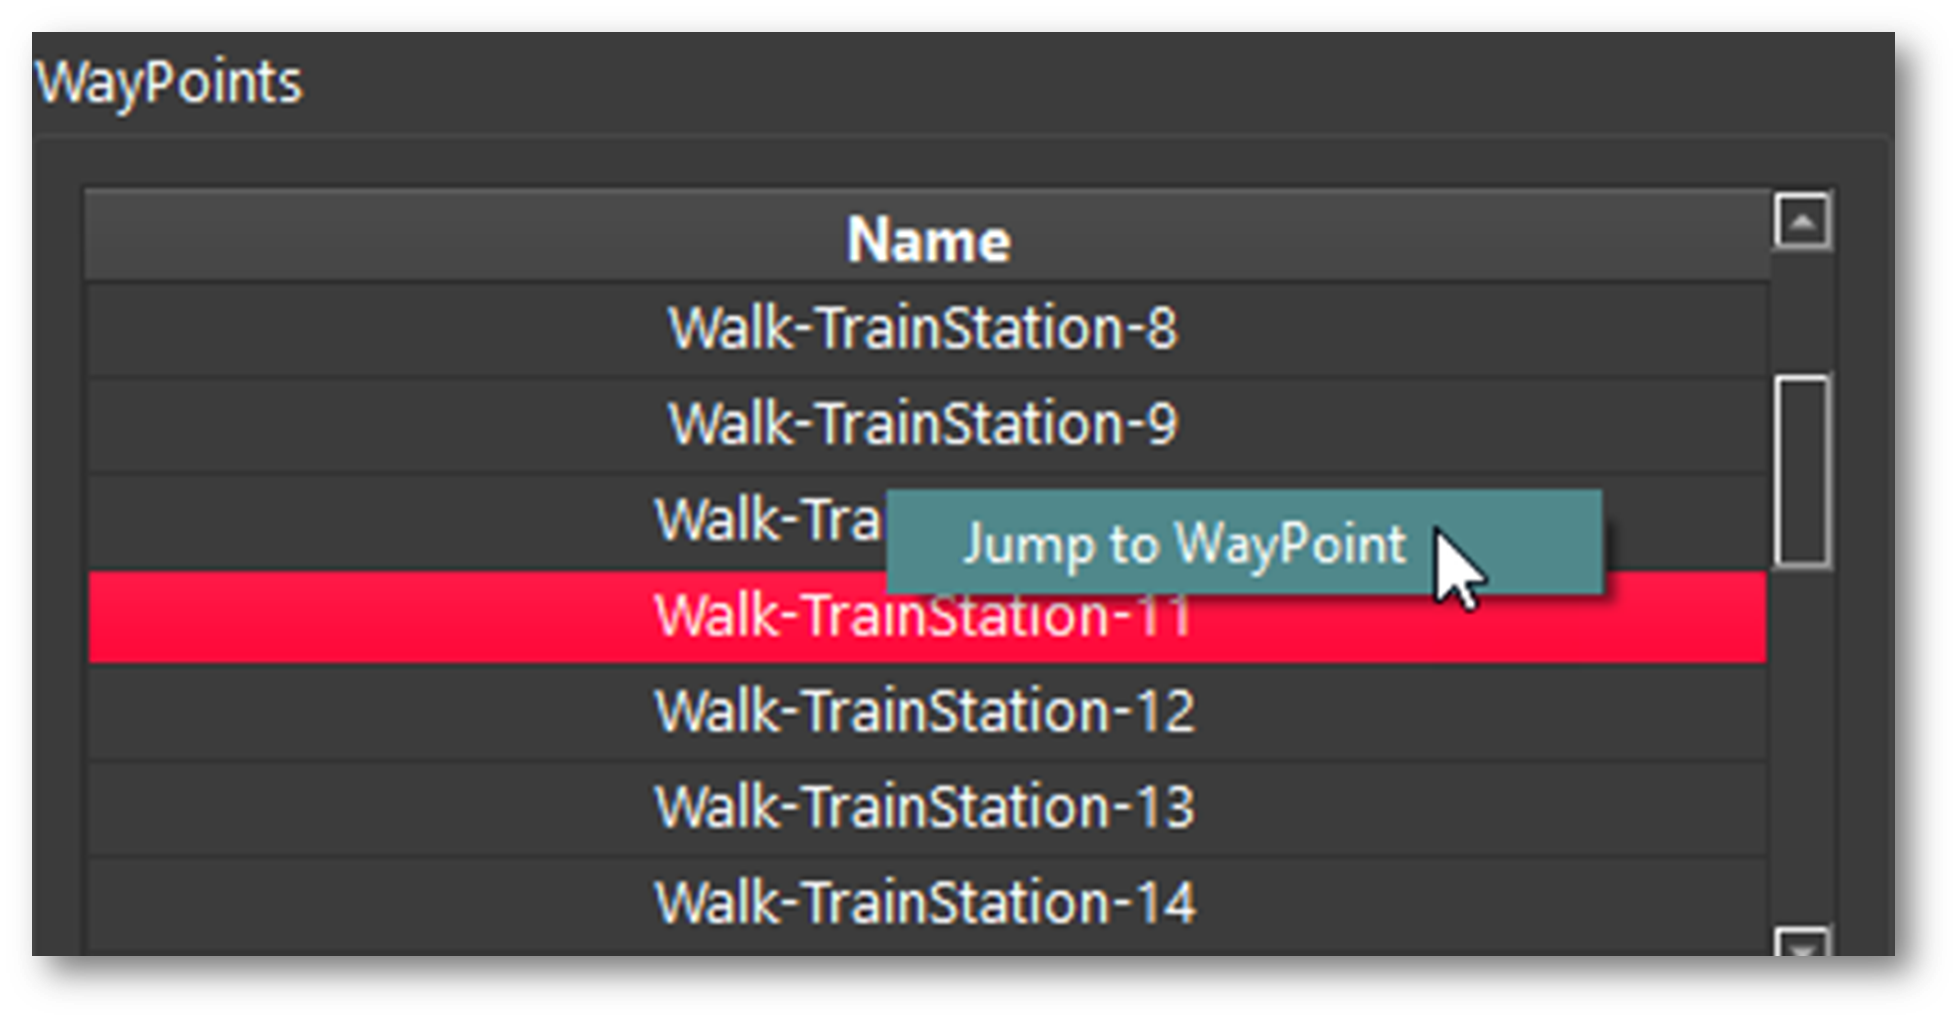
Fly into the selected WayPoint from the right-side menu by right-clicking WayPoints and selecting Jump to WayPoint:
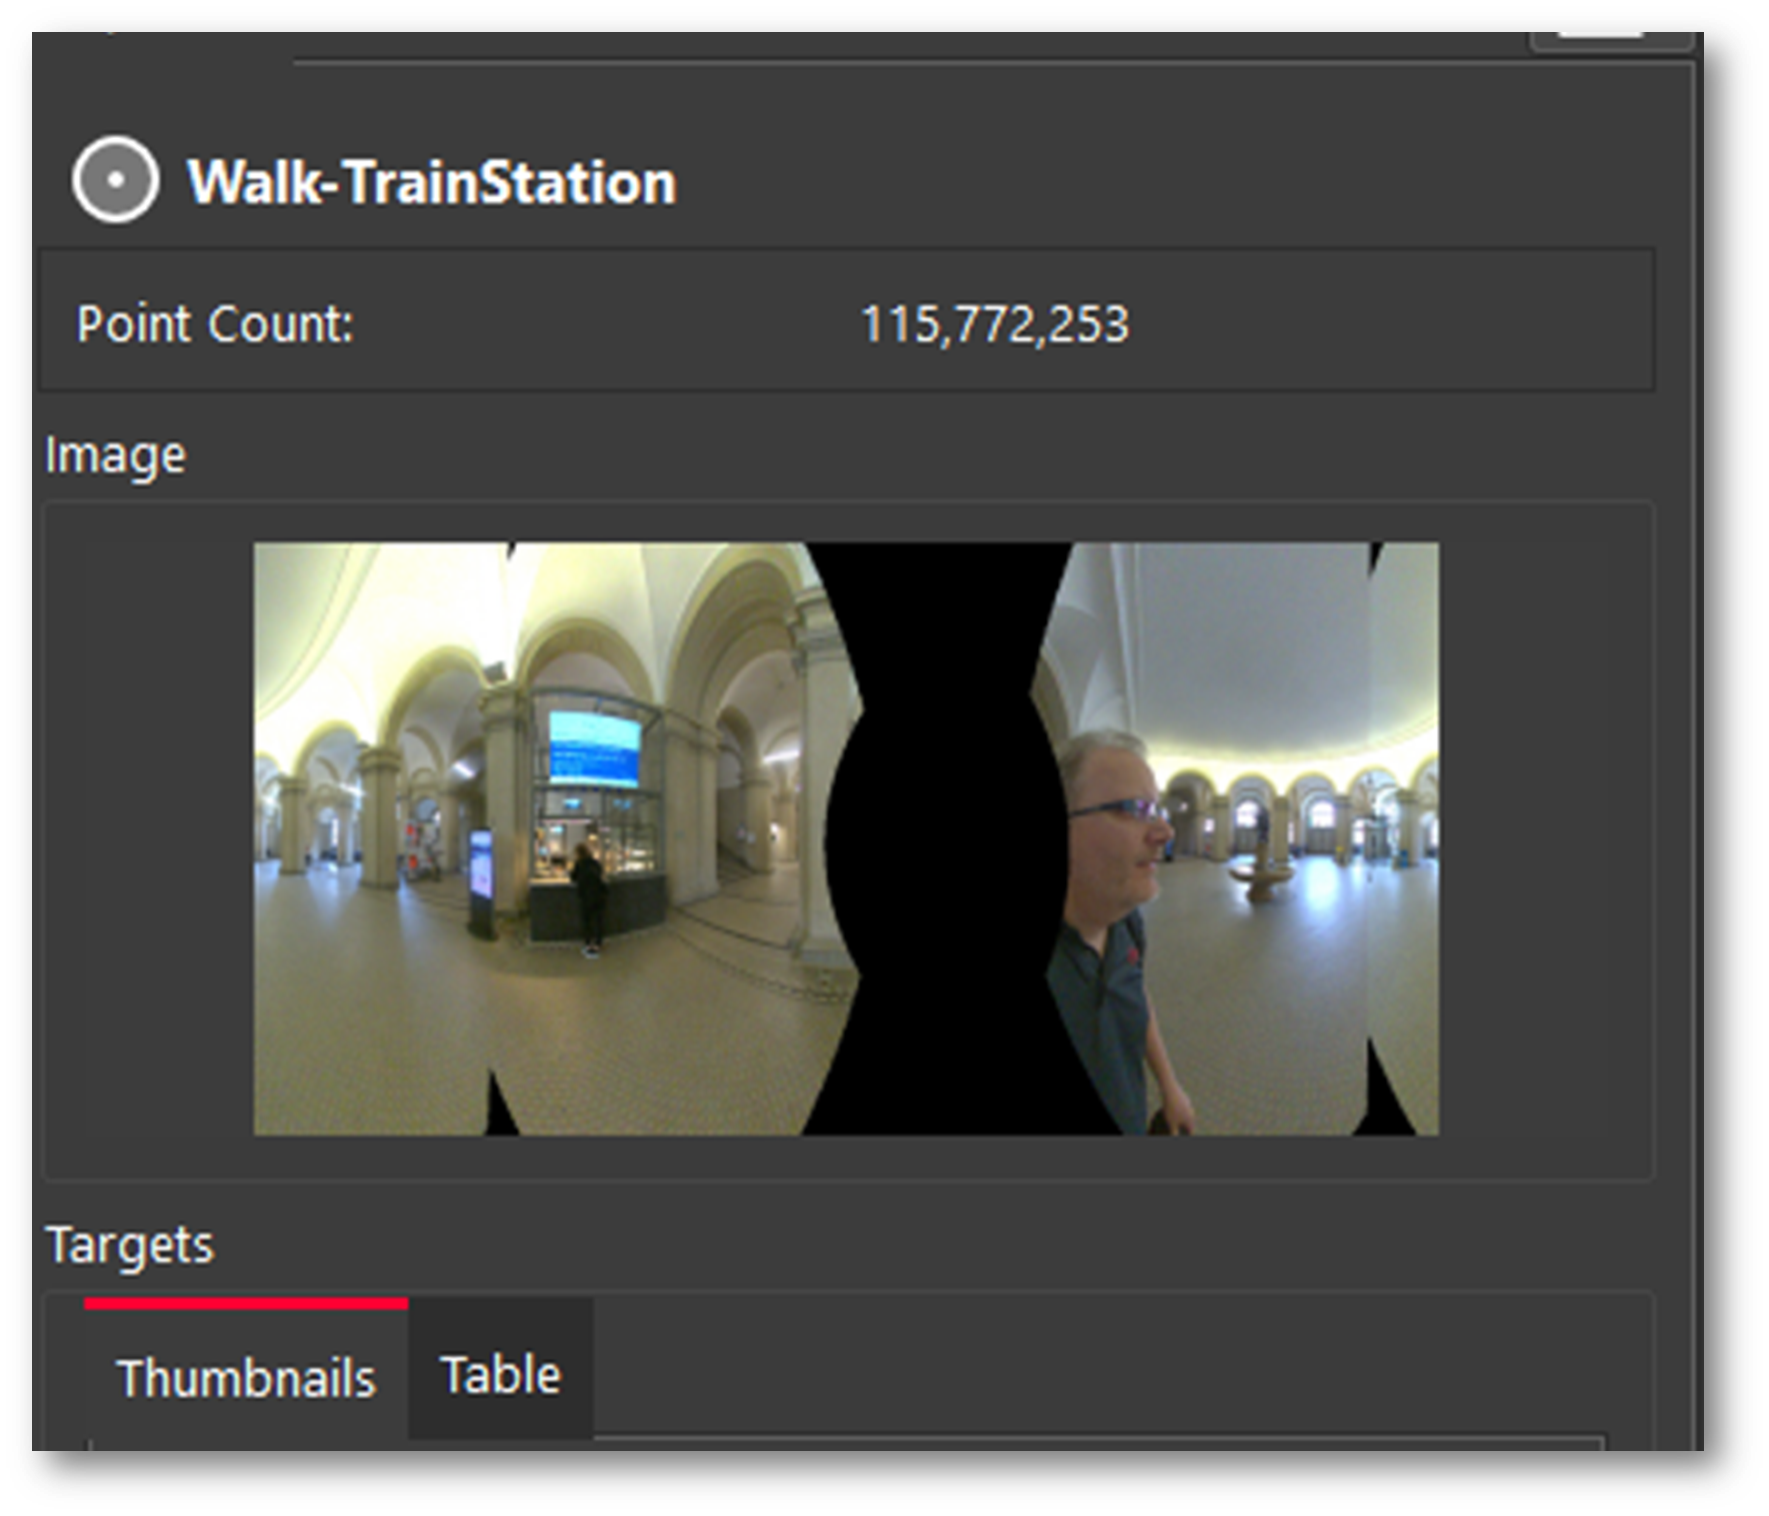
Scroll through all WayPoints using the up and down arrow keys on the keyboard. The Image will change in the right-side panel showing the different WayPoint images:
Each WayPoint has the following abilities:
Fly into the point cloud to view panoramic images and point cloud.
Selection in the SiteMap to Pan and Rotate scan
Selection in the SiteMap area with another scan to perform registration by:
Visual Alignment
Target matching (with inserted targets)
Registration supported to another BLK2GO PULSE Walk or Setup (i.e. RTC360, BLK360, BLK360 G1, P-Series, C-Series)
Publish to Jetstream, LGSx, and TV as panoramic image Setup locations.
Visual Registration with BLK2GO PULSE data is performed in the same manner as for any other data imported into Cyclone REGISTER 360 PLUS:
In the SiteMap area, select a single Setup or WayPoint and then Multi-Select another setup or WayPoint.
Fence selection will also work to select the desired Setups and Walks.
Moving the Setup and or Walk-in proximity to another will make suggested links appear.
Select a suggested link to enter the desired registration type.
Click the Visual Alignment button on the action bar to enter Visual Alignment.
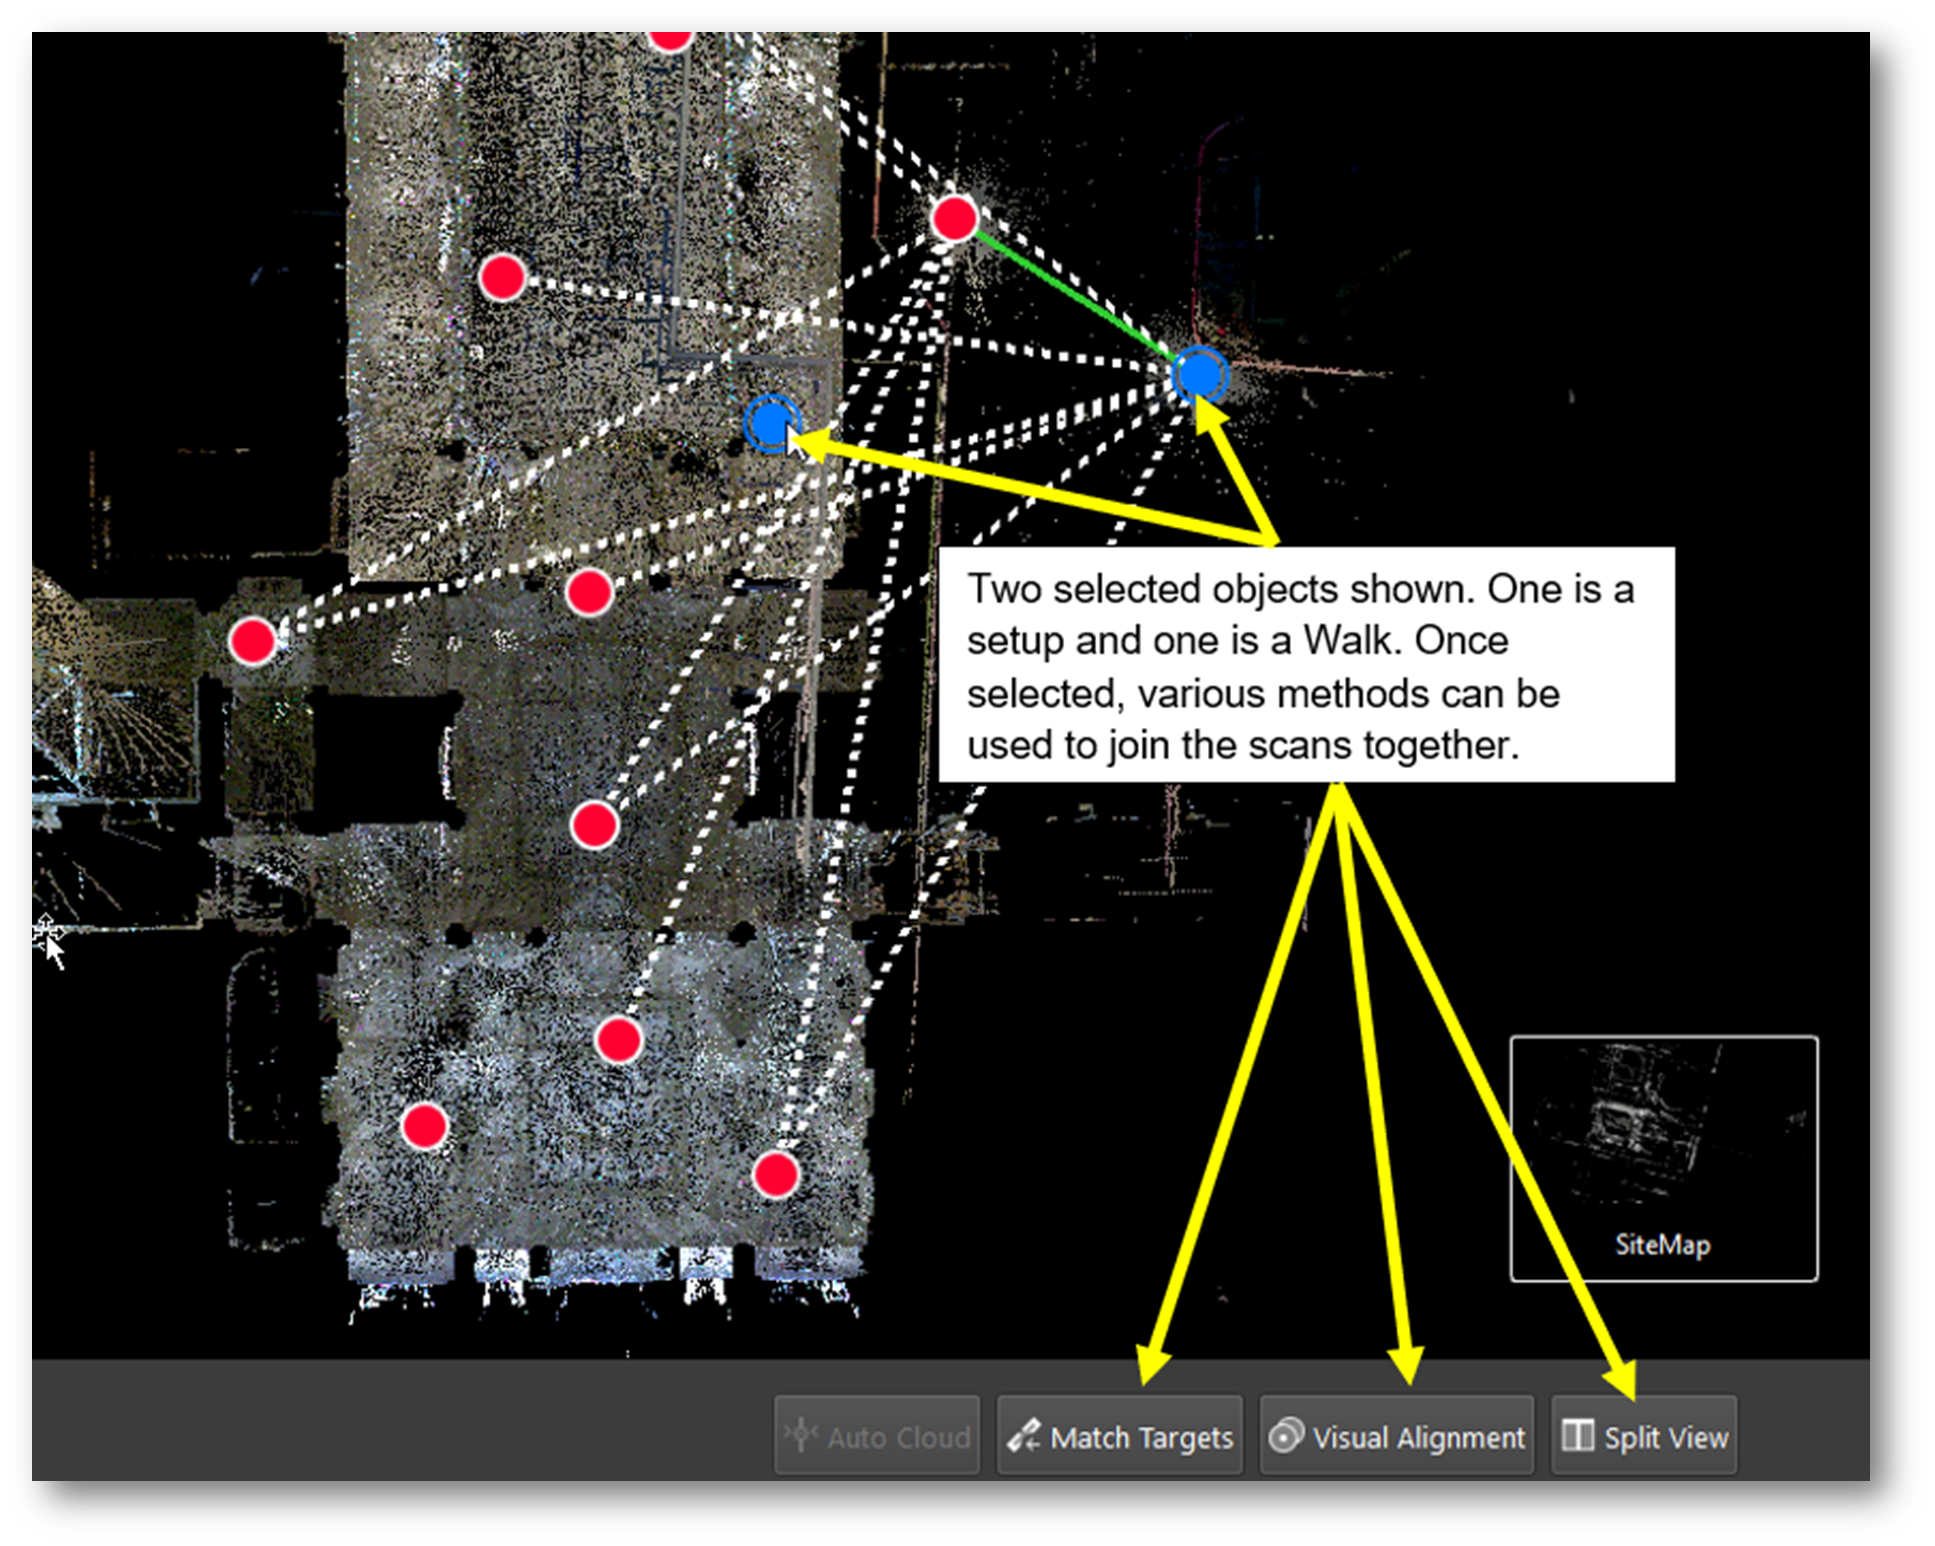
Support of the BLK2GO and BLK2GO PULSE with Cyclone FIELD 360
Cyclone REGISTER 360 PLUS now supports data from BLK2GO and BLK2GO PULSE scanners collected using the Cyclone FIELD 360 application version 5.0.
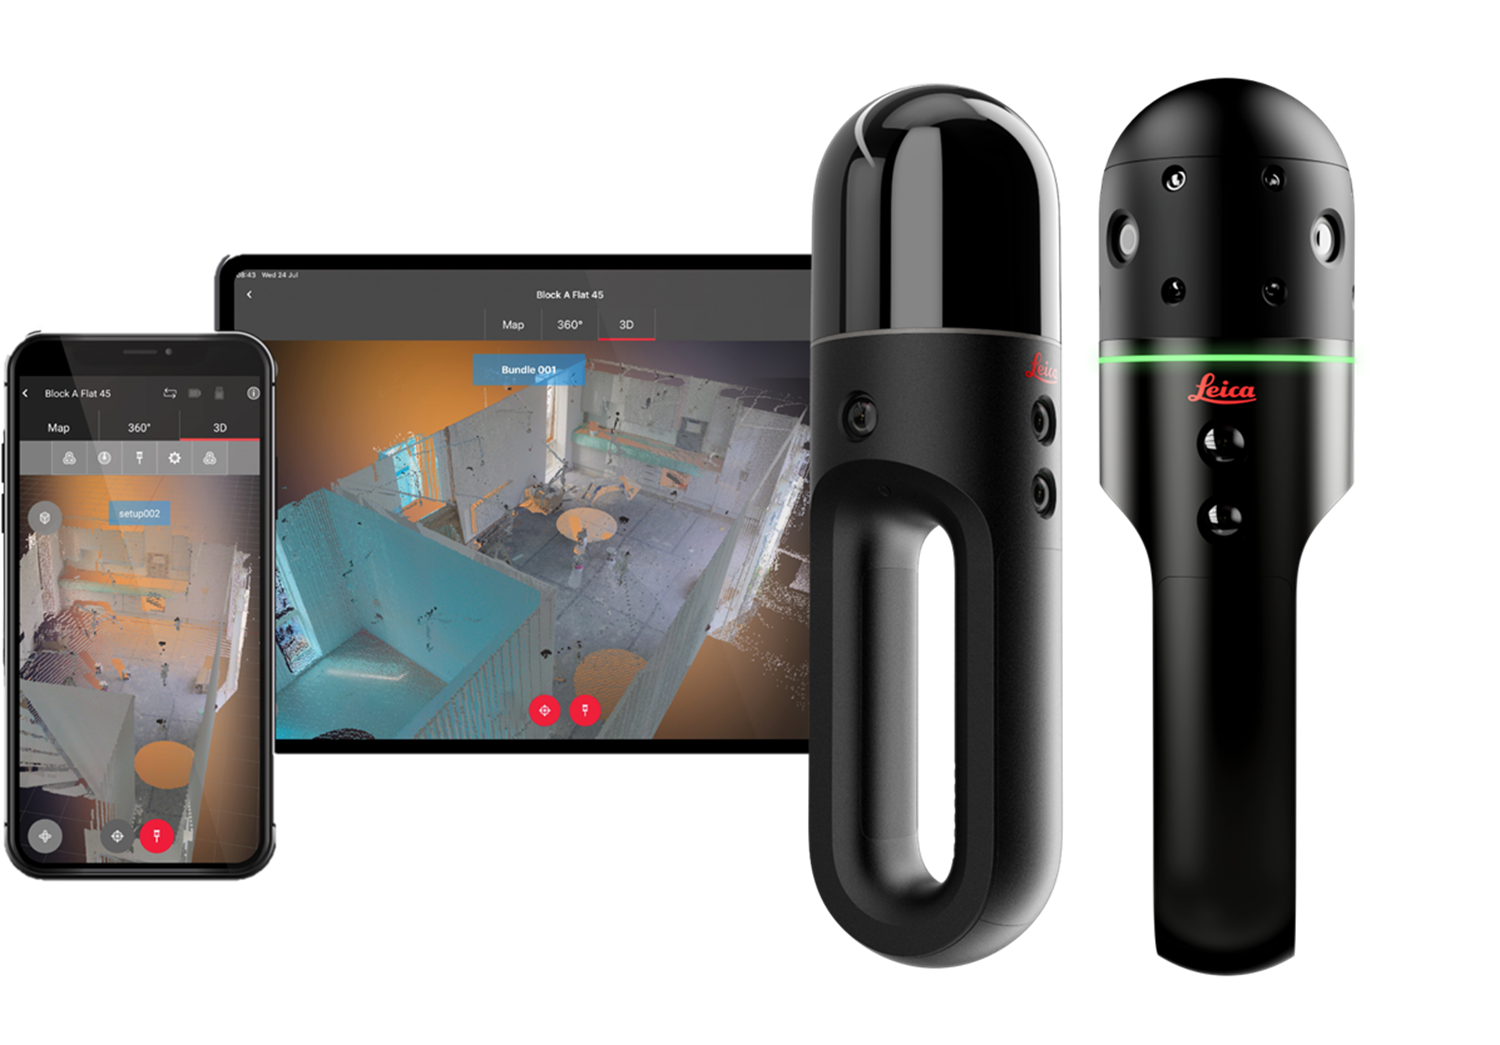
The Cyclone FIELD 360 app is a robust tool that enables control of the BLK2GO and BLK2GO PULSE scanners, provides a first-person view of captures, allows instant preview of captured data, ensures quality assurance and control, and aligns data directly in the field.
With the latest update, BLK2GO and BLK2GO PULSE kinematic scanners can sync with Cyclone FIELD 360. This allows for the creation of Jobs, Links, GeoTags, etc., where all the added information will be synced back to the scanner. This ensures a smooth and efficient workflow from the field to the office when data is imported from BLK2GO scanners into Cyclone REGISTER 360 PLUS. The benefits from the following features added in FIELD 360 include:
Full transfer: All scan data and edits made in the Cyclone FIELD 360 app will be transferred to Cyclone REGISTER 360 PLUS, including scan names, links, tags, clipping masks, and measurements.
Job structure: The scans will be organized in a hierarchical structure that matches the Cyclone REGISTER 360 PLUS Projects, making it easy to navigate and manage data.
Links: The links created in the Cyclone FIELD 360 app will be imported as pre-registration links in Cyclone REGISTER 360 PLUS, saving time and improving accuracy.
GeoTags: The tags added in the Cyclone FIELD 360 app will be imported as annotations in Cyclone REGISTER 360 PLUS, enriching the point cloud with multimedia information such as images, audio, and video.
Export options: Point cloud data from the Cyclone FIELD 360 app can be exported to various formats such as E57, and PTX, and shared with Leica TruView Cloud. With this update, the trajectory can also be exported to CSV, as well as detail images to JPEG, and the point cloud can be uploaded to Reality Cloud Studio.
The support of BLK2GO and BLK2GO PULSE in Cyclone FIELD 360 has enhanced the field-to-office workflow with a kinematics scanner by adding the possibility to attach additional tags (image, video, text, voice messages) to the point cloud data. Additionally, multiple BLK2GO and BLK2GO PULSE point cloud data can be aligned straight in the field and create cloud-to-cloud links, which will be further transferred to Cyclone REGISTER 360 PLUS. With this update, a seamless enhanced workflow from field to office with the BLK2GO and BLK2GO PULSE scanners, Cyclone FIELD 360, and Cyclone REGISTER 360 can be enjoyed.
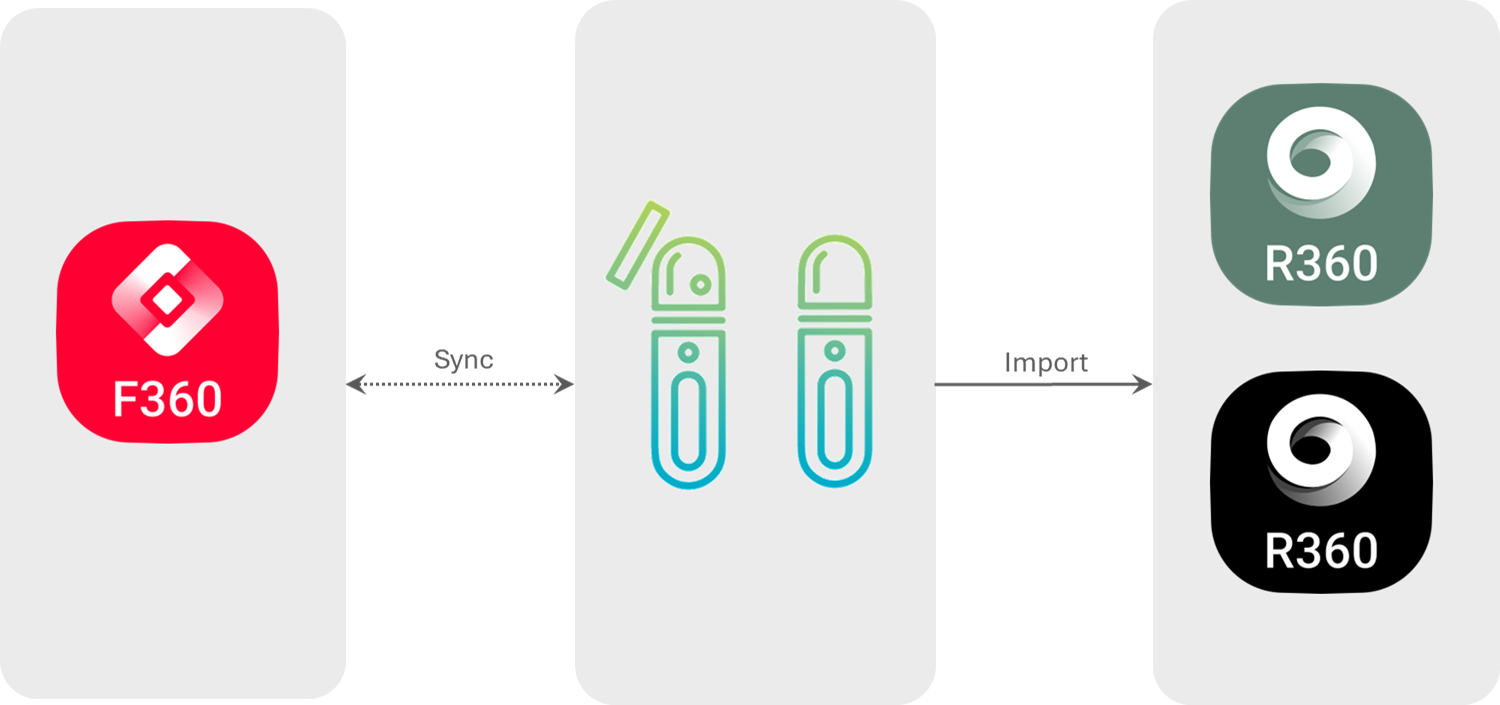
The support of BLK2GO and BLK2GO PULSE in Cyclone FIELD 360 has enhanced the field-to-office workflow with a kinematics scanner by adding the possibility to attach additional tags (image, video, text, voice messages) to the point cloud data. Additionally, multiple BLK2GO and BLK2GO PULSE point cloud data can be aligned straight in the field and create cloud-to-cloud links, which will be further transferred to Cyclone REGISTER 360 PLUS. With this update, a seamless enhanced workflow from field to office with the BLK2GO and BLK2GO PULSE scanners, Cyclone FIELD 360, and Cyclone REGISTER 360 can be enjoyed.
Note: Import from BLK2GO to REGISTER 360 PLUS is outlined in Support Leica BLK2GO PULSE section in this document.
Faster and efficient import of BLK kinematic data with on-demand generation of cloud-to-cloud registration data
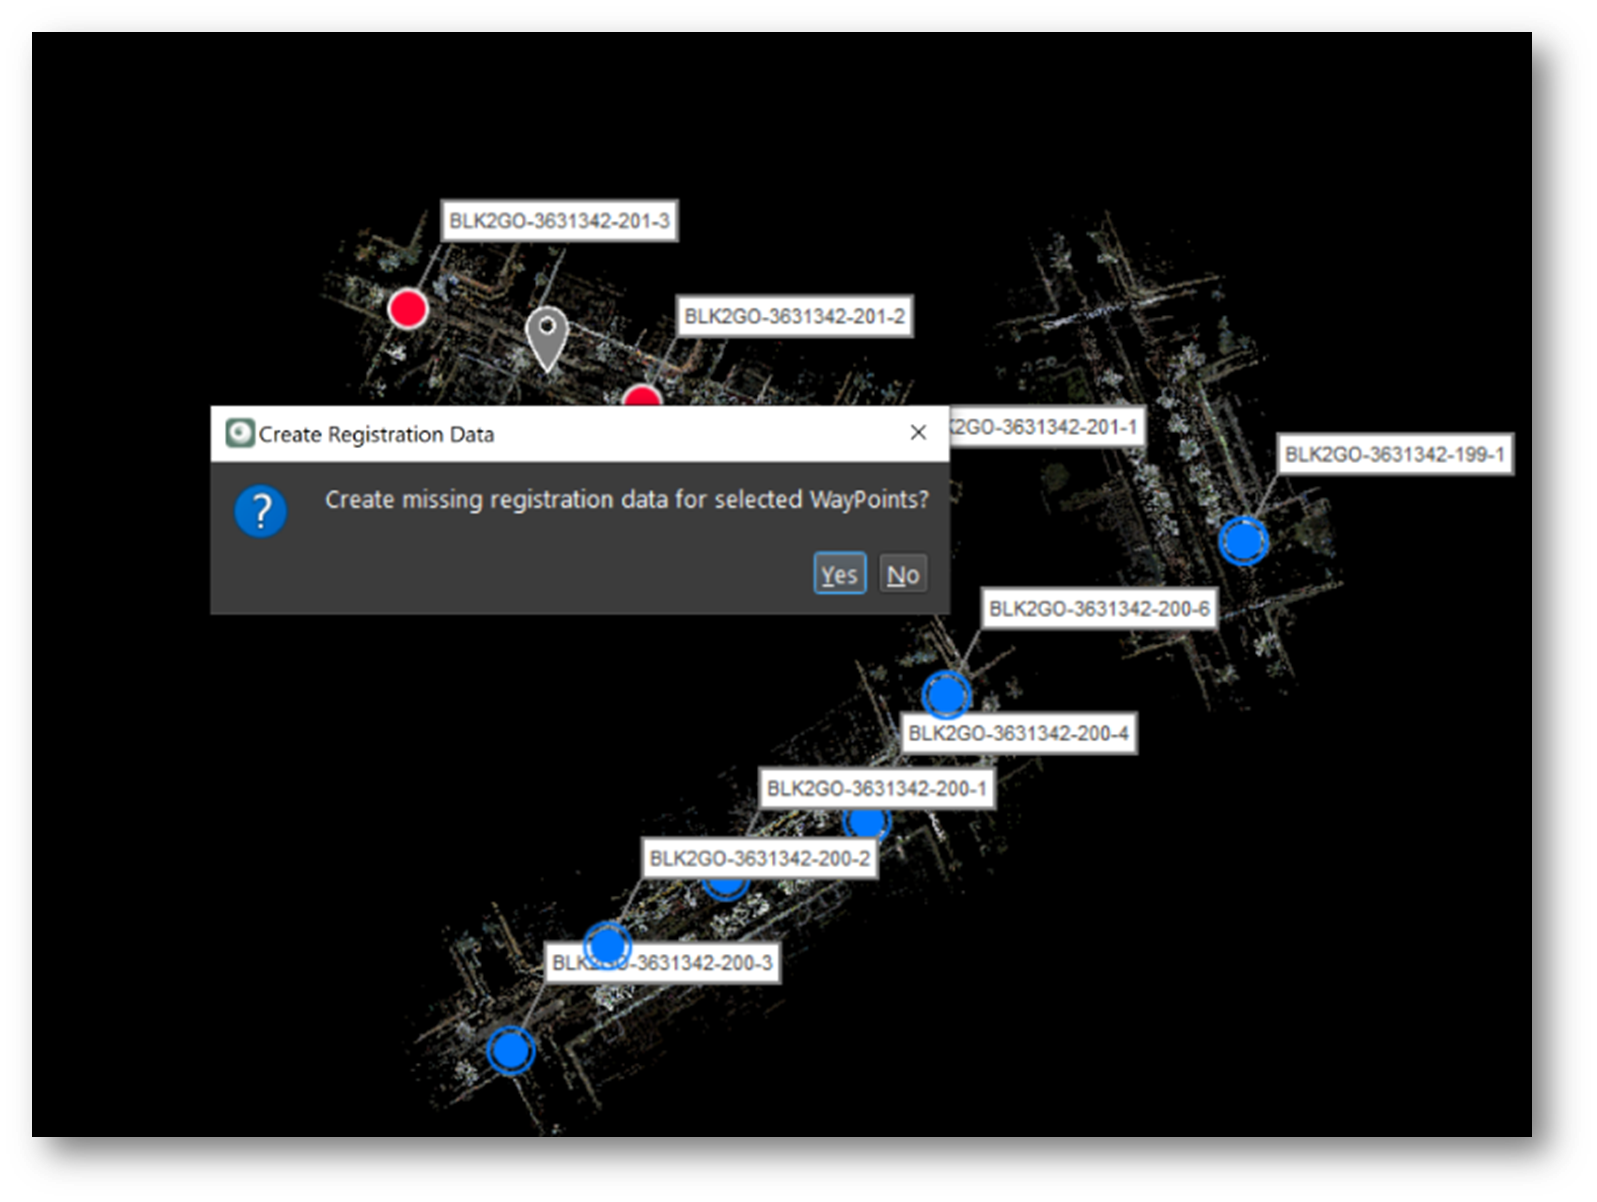
Cyclone REGISTER 360 PLUS 2023.1 offers a faster and more efficient way to import BLK kinematic data. Instead of creating Cloud-to-Cloud registration data for all WayPoints upon import, which can take time and disk space, Cyclone REGISTER 360 PLUS will only create the missing registration data for the WayPoints that need it for Cloud-to-Cloud registration in Visual Alignment. A dialog will inform the user that Cyclone REGISTER 360 PLUS will create this cloud on demand before entering Visual Alignment. This feature will save time and disk space.
Walk Duration and Distance
All BLK kinematic scanner data now shows the Walk distance and duration in the properties panel.

Improved GeoTag visibility for BLK kinematic data
GeoTags are now visible from all WayPoints for BLK kinematic data. This allows for easier navigation and identification of the GeoTags in the Project. In alignment with this new feature in Cyclone REGISTER 360 PLUS, a new slider has been added to the TruView Cloud to set the visibility of GeoTags by distance from the WayPoint. This helps to filter out irrelevant GeoTags and focus on the ones that are close to the current view. This improvement has been tested and confirmed for other unstructured point cloud data.
Classification-enhanced Cloud-to-Cloud Registration
A new feature has been introduced to improve the accuracy of cloud-to-cloud registrations using point classification. This feature allows users to refine the registration process by adjusting point constraints to focus on specific classes. The “Update Cloud-to-Cloud Points” option is available in the Classification Viewer, and a progress bar provides real-time feedback during the update process. This feature applies to all Setups within the SiteMaps, ensuring consistency across projects.
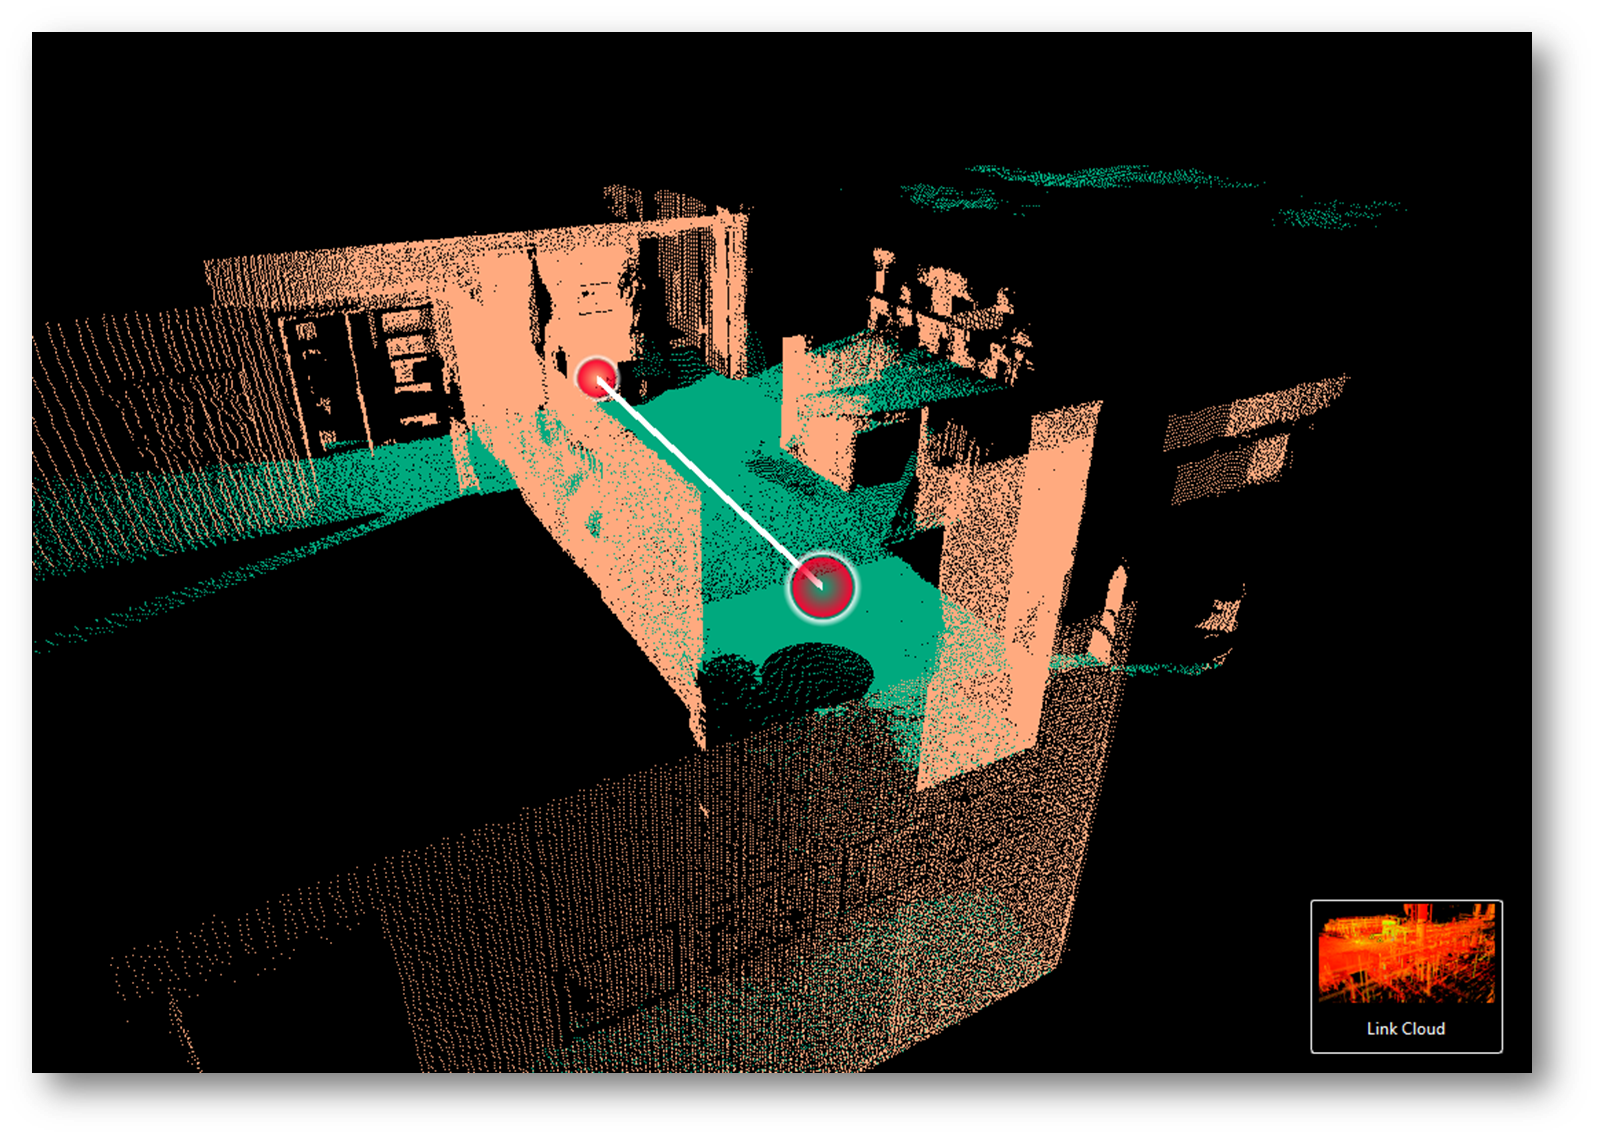
to conduct classification-aided Cloud-to-Cloud registration:
Select the desired Setups/Bundle/SiteMap in the “Review & Optimize” module and open the Classification Viewer.
If no Classifications are listed, click “Classification Manager” and choose your items.
Toggle the visibility of Classifications in the Classification Viewer Dialog and use the “Update Cloud-to-Cloud Points” feature.
Switch from Point Cloud View to Visual Alignment View to see the updated data.
Continue toggling Classification visibility and updating cloud-to-cloud points until you achieve your desired data.
The cloud-to-cloud registration will now focus on your chosen classes.
This enhancement simplifies the process of refining cloud-to-cloud registrations and helps achieve more accurate results.
New Rendering Mode: Shaded Surface Lighting
In this release, a new Shaded Surface Lighting rendering mode is introduced that improves point cloud visualization. This feature allows transformation of point clouds into shaded surfaces that dynamically respond to the lighting and the camera perspective, providing an immersive experience. As the camera's perspective changes within the scene, the point cloud dynamically responds to the lighting conditions, resulting in a realistic and engaging visualization.
The Shaded Surface Lighting rendering mode simulates the behavior of light reflecting on the shaded surfaces. When viewing a surface directly, it appears at its brightest, closely resembling real-world behavior. As the perspective shifts and the surface is viewed at an angle, it gradually darkens, enhancing the realism of visualizations.
The Shaded Surface Lighting mode can be accessed and toggled On/Off using the “Shaded” icon in the Toolbar.

 unshaded points |  shaded points demonstrate clearer distinction between surfaces. |
|---|
This render mode is available for all point cloud coloring modes, including Color from Scanner, Hue/Intensity, Grayscale Intensity, Color by Classification, Color by Bundle, and Color by Setup.
Color Mode | Shaded Surface (Off) | Shaded Surface (On) |
|---|---|---|
Color from Scanner | 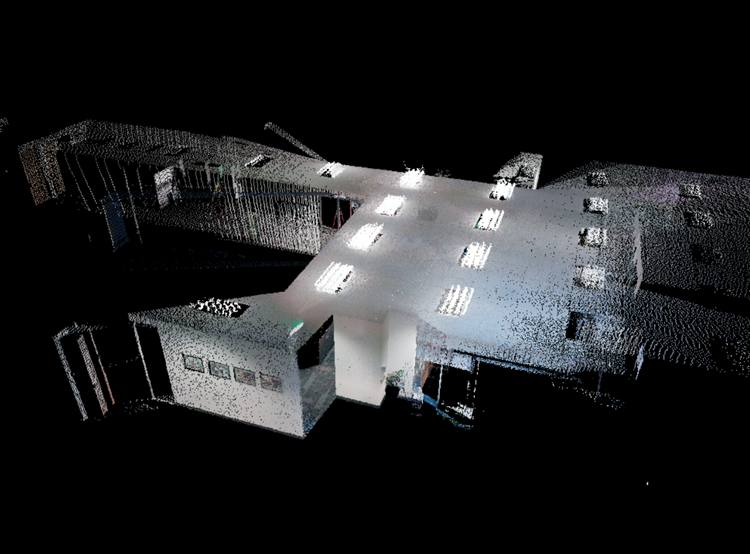 | 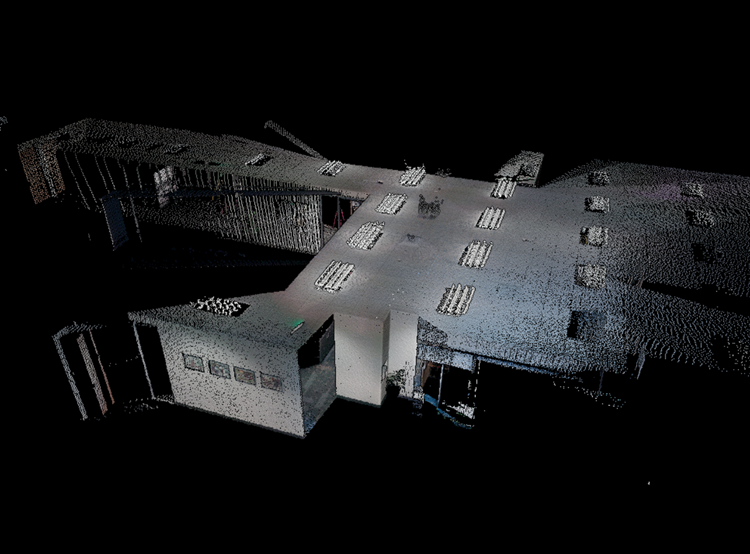 |
Hue/Intensity | 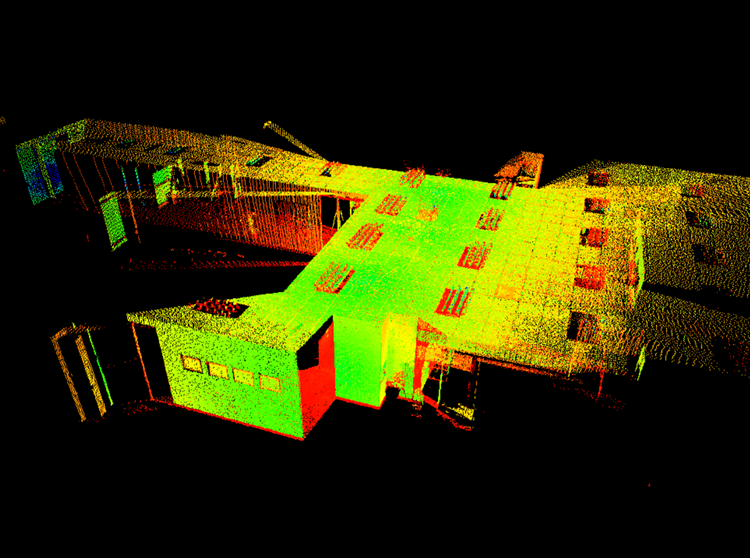 | 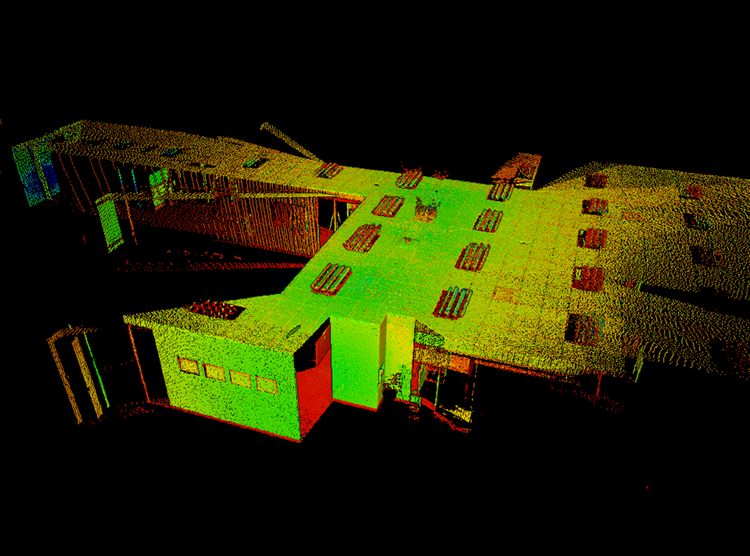 |
Grayscale Intensity | 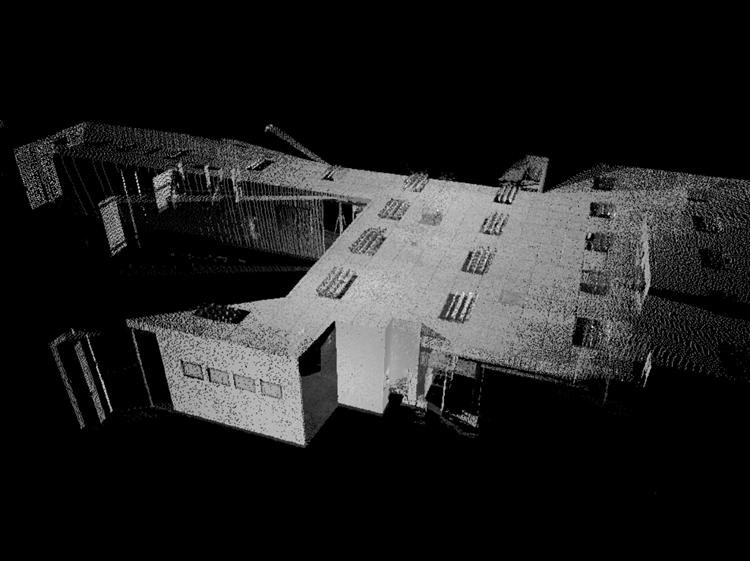 | 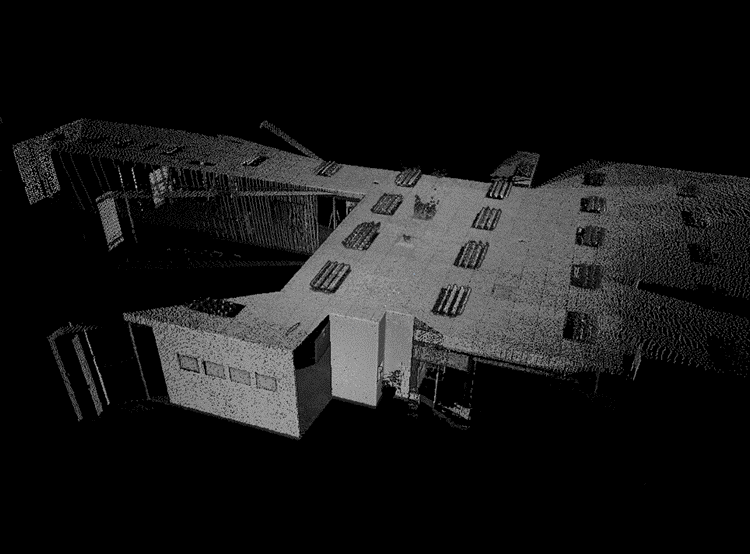 |
Color by Classification | 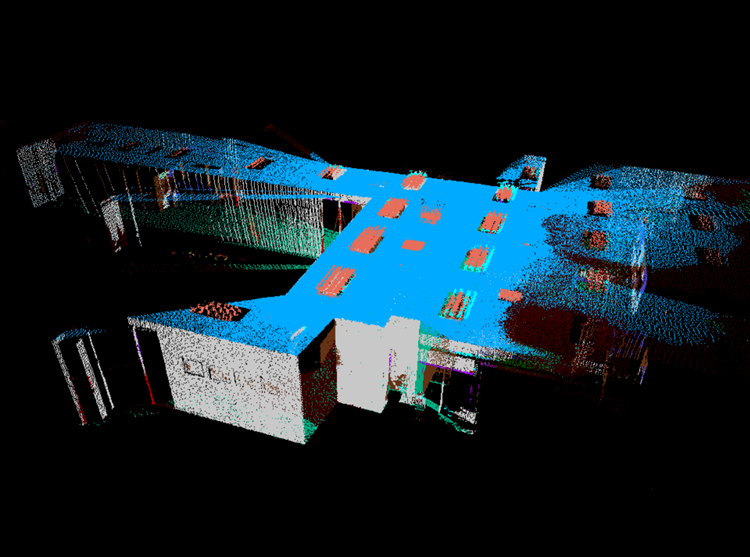 | 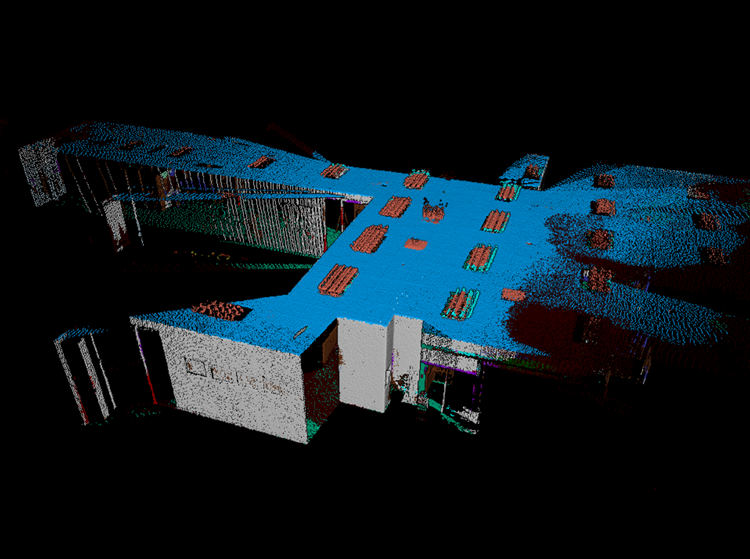 |
Color by Bundle | 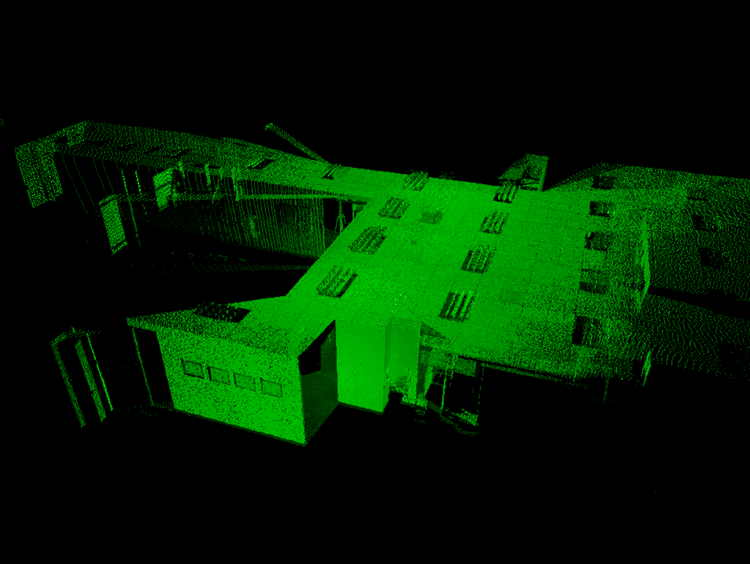 | 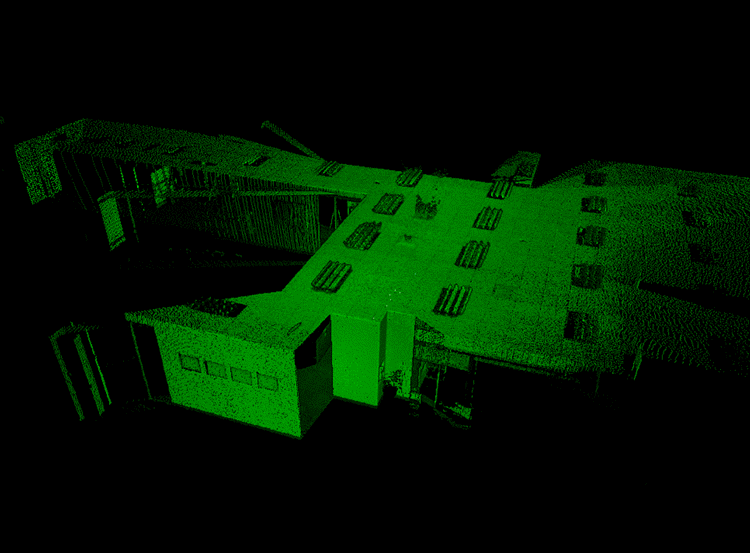 |
WayPoint Creation for Panoramic Images in E57 Files upon Import
A new feature has been added to Cyclone REGISTER 360 PLUS that allows the creation of WayPoints for each panoramic image contained in an unstructured E57 file upon import. This feature enhances the user's ability to navigate and understand the spatial context of the data. It provides a more comprehensive view of the data and improves the overall user experience.
Note: To support the import of panoramic images, the E57 file format must be properly written and include the necessary information.
Export BLK kinematic Data to e57 with Waypoints and Images
The E57 exporter in Cyclone REGISTER 360 now supports exporting of BLK kinematic data, i.e., BLK2GO, BLK2FLY, and BLK ARC, with WayPoints and rectified images. This feature was previously available only in the CLI tool b2g2trajectory, but now it can be accessed from the program interface from the Report | Publish Options:
This improvement applies to all registrations in Cyclone REGISTER 360 PLUS that have BLK kinematic data. It also allows exporting separate Setups, in addition to the single point cloud or unified point cloud.
As an example, to export a bundle that has BLK2GO and RTC360 data, the following steps can be followed:
In the Report area, select Export Options for E57 and choose Separate Setups.
If a WORLFLOW license is available, the exported file will include the additional waypoints and rectified images from the BLK2GO setups, as well as the regular RTC 360 data export.
This feature enhances the functionality and flexibility of exporting BLK kinematic data.
Redesigned Dialog and Enhanced Tools for ‘Export Panoramic Image”
The latest release introduces a new dialog that replaces the previous “Export Panoramic Images…” pop-up menus. This redesigned dialog simplifies the selection of image format and resolution. You can access this feature by right-clicking on SiteMap tree items, Bundle tree items, Setup tree items, or WayPoint items in the Review & Optimize section.
To export a panoramic image:
Right-click on the desired item in the Review & Optimize section.
Select the export option.
A dialog will prompt you to choose the folder location for export.
Choose your preferred image format (JPEG, EXR, or both) for export.
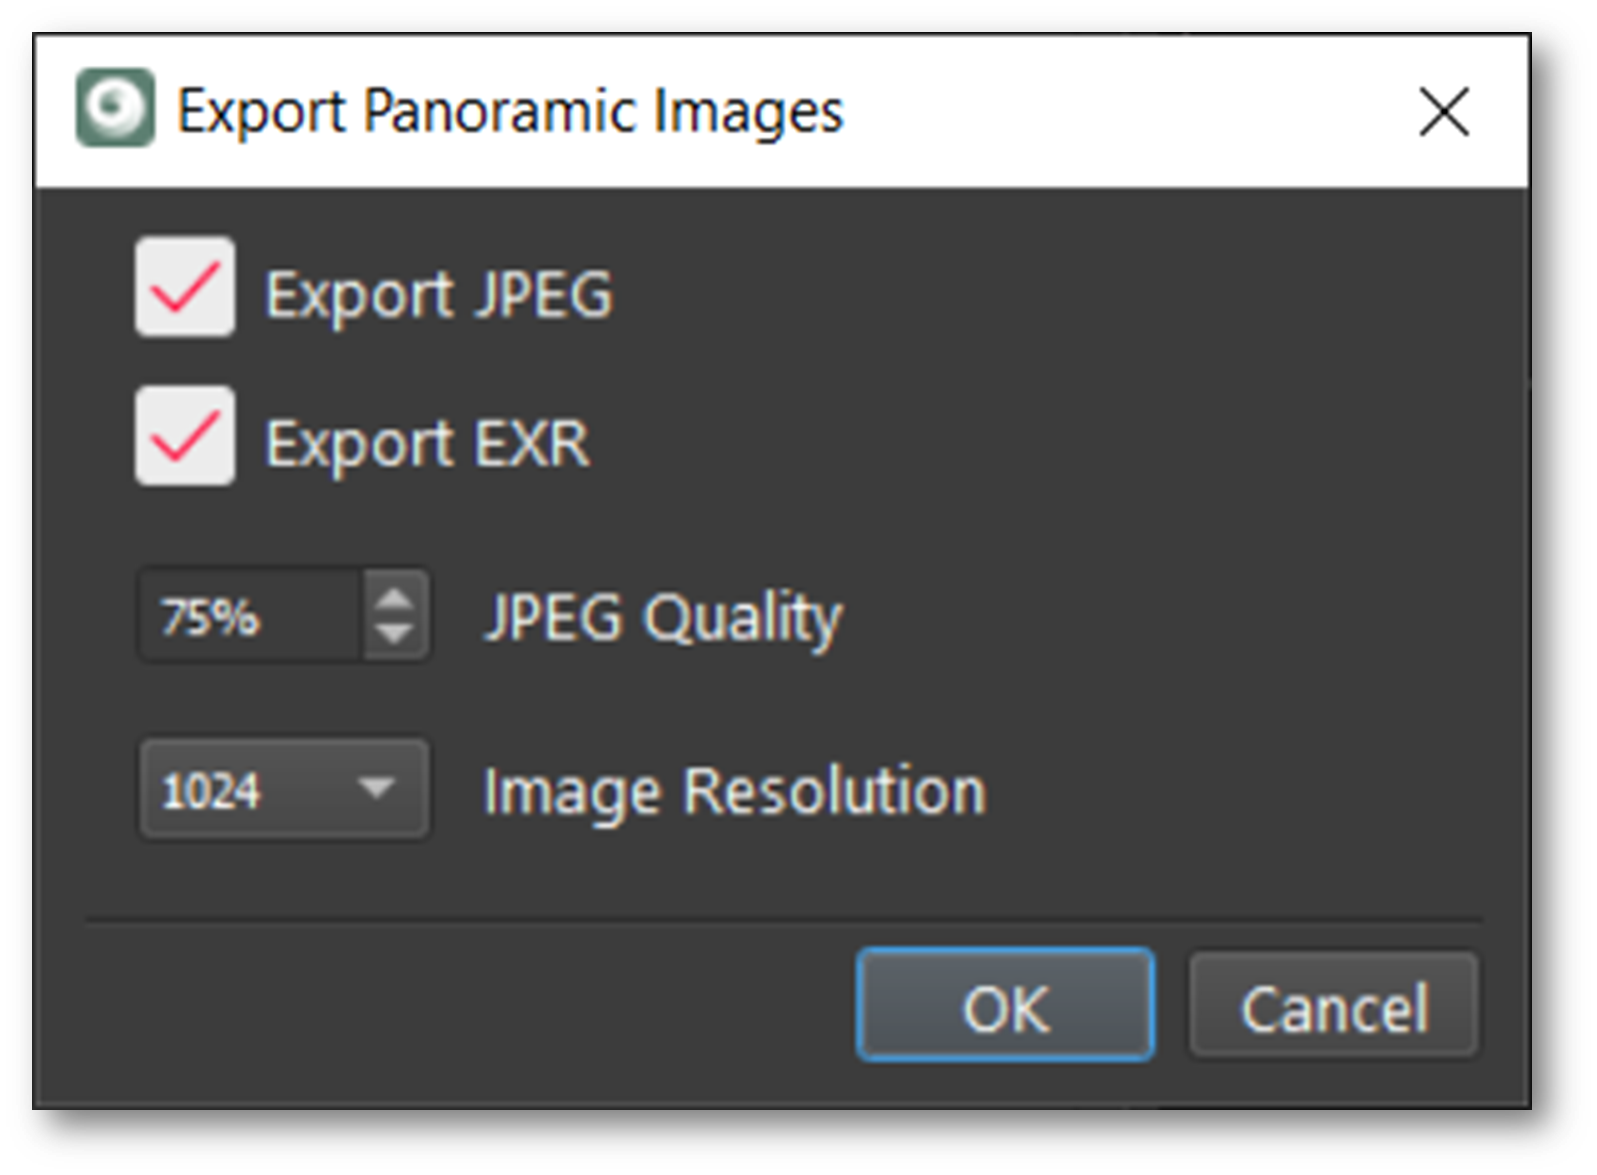
Note: The tool will only export the maximum image size available for the selected resolution, regardless of the image resolution selected. For example, if the imported resolution is 1K, then only a 1K image will be exported, irrespective of the selected export resolution.
Option to Delete All Targets in a Bundle or a Setup
The “Delete All Targets” command, accessible by right-clicking on a Bundle in the Project Explorer panel, allows users to delete all targets associated with the selected Bundle. This includes targets used by other objects.
This feature helps users remove unwanted or redundant targets from their Projects quickly and easily.
To delete all targets:
Right-click on the desired Bundle in the Project Explorer panel.
Select the Delete All Targets command.
To delete individual targets from a Setup, use the Delete Targets for Selected Setup command in the Project Explorer panel.
Note: This feature only deletes targets not included in any links. If you want to delete targets used for calibration or alignment, you need to unlink them first.
Limit Box Improvements
This release introduces a number of improvements and enhancements to the Limit Box experience as detailed below.
Subdivide a Limit Box into Uniform Sections
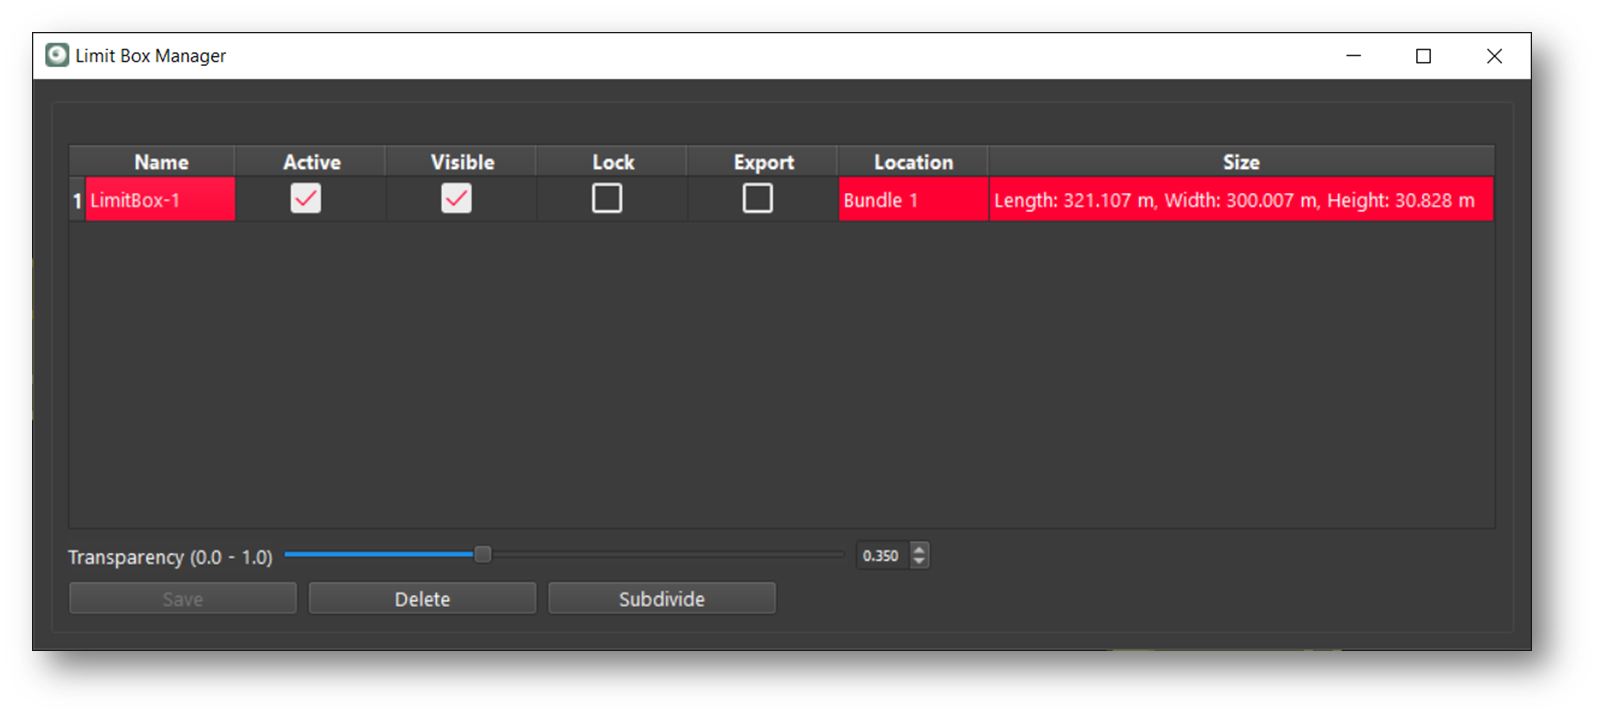
An option to ‘Subdivide’ has been added to the Limit Box manager. This feature allows you to split a Limit Box into smaller sections. Here’s a simplified step-by-step guide:
Create and save a Limit Box.
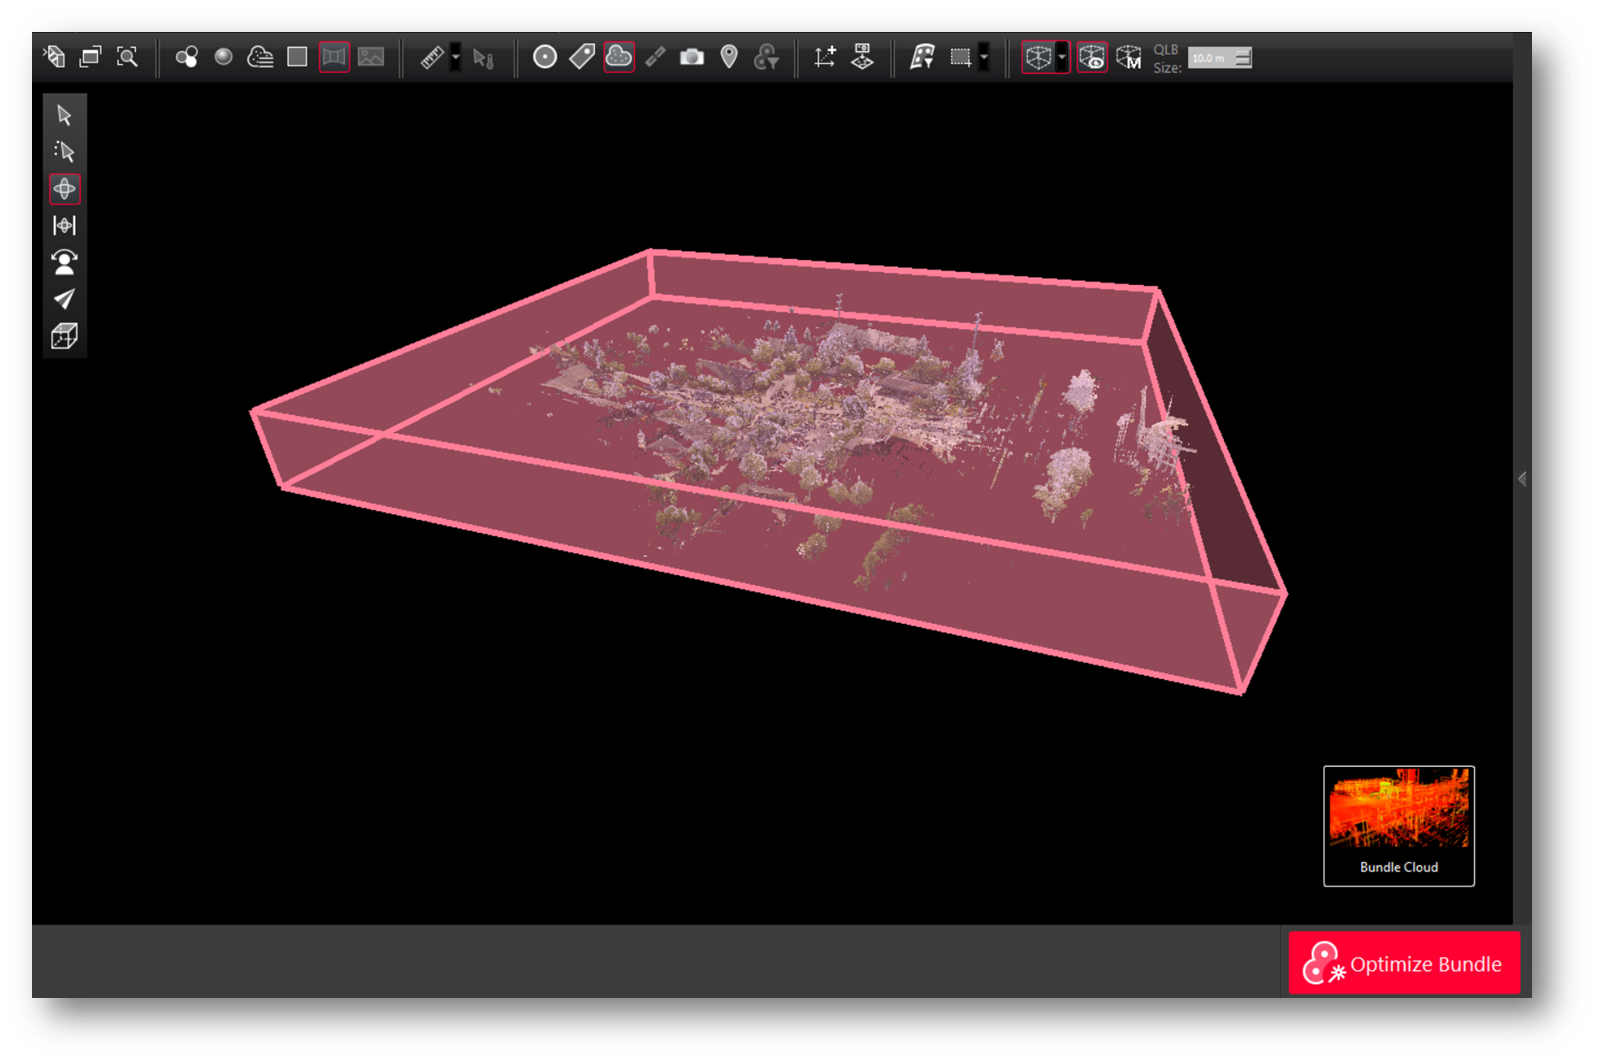
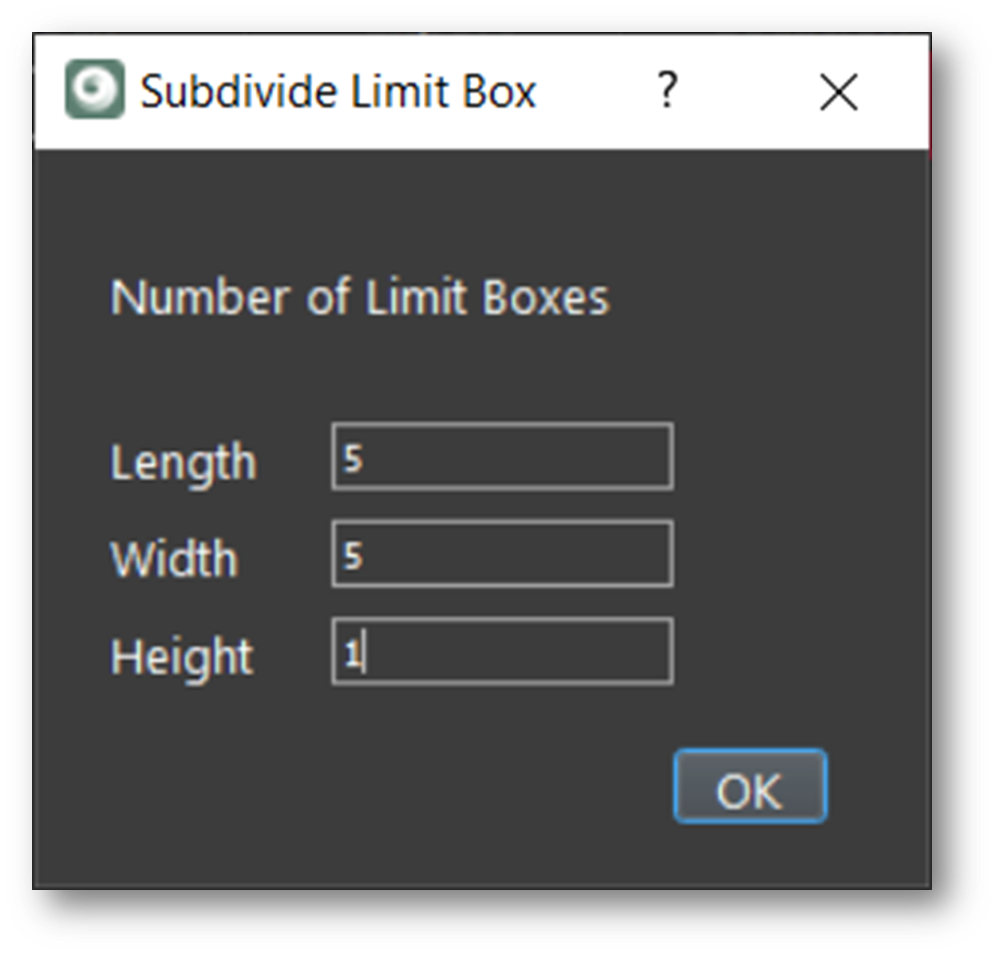
Select the saved Limit Box and click Subdivide.
Specify the number of sections for the height, length, and width.
The Limit Box is then divided and stored.
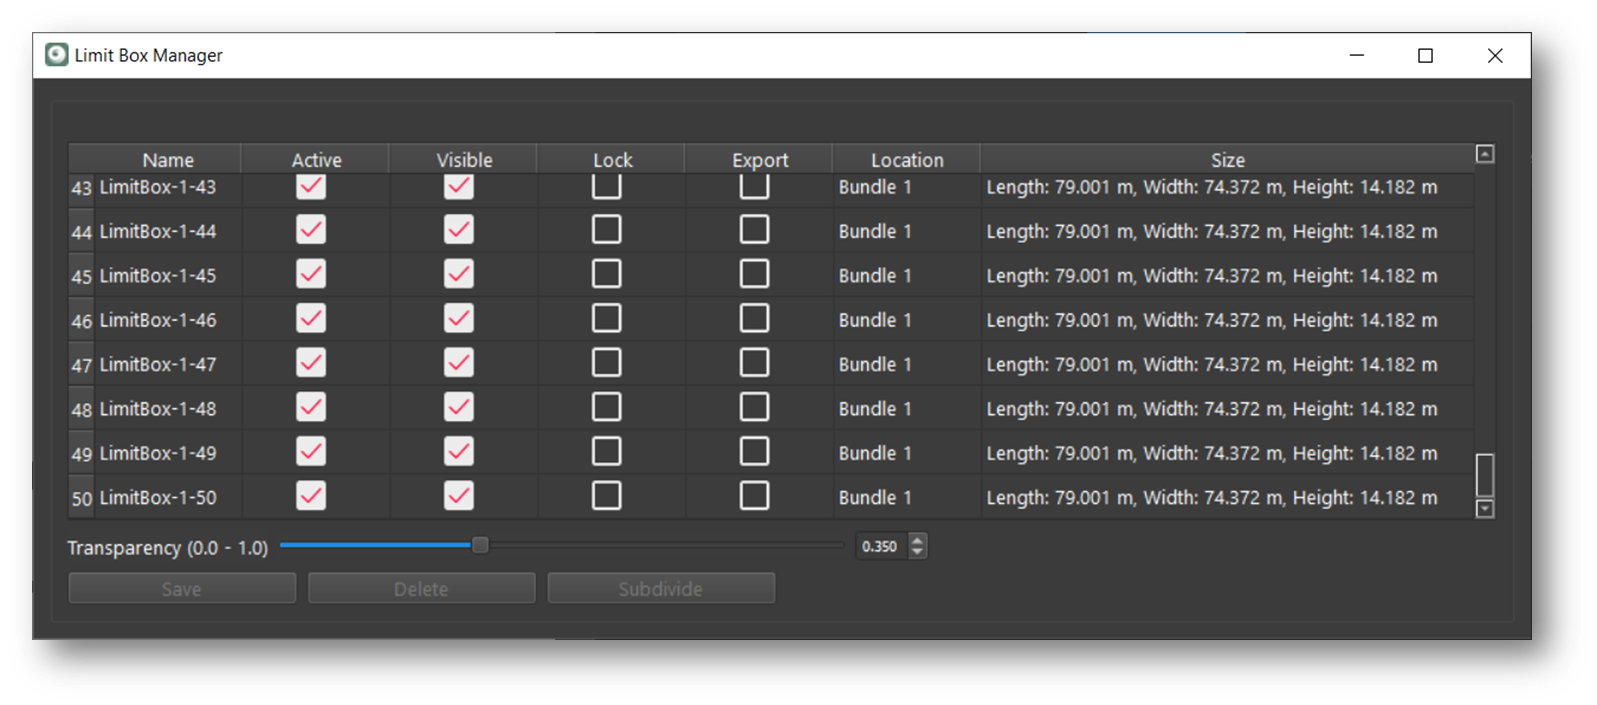
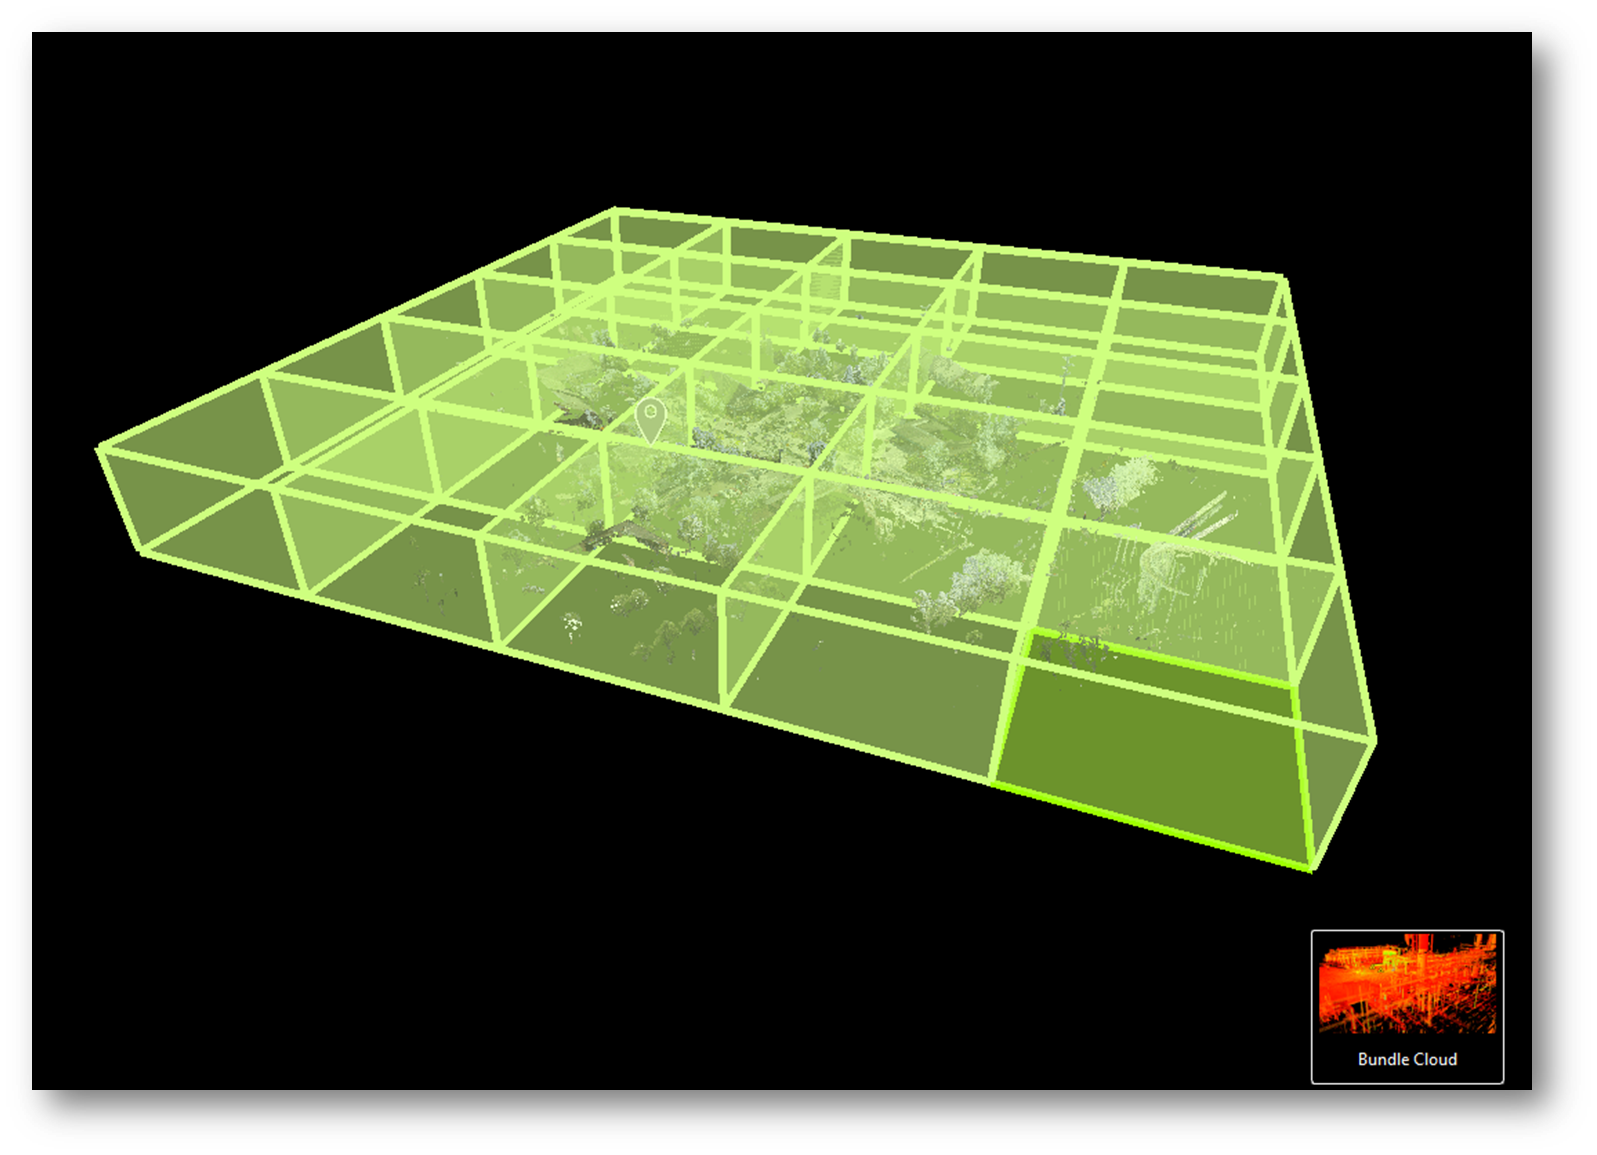
The newly created subdivided Limit Boxes are added to the Limit Box Manager with names based on the original Limit Box (e.g., LimitBox-1, LimitBox-2). This feature helps manage projects by dividing them into up to equal parts. This update enhances project management flexibility in Cyclone REGISTER 360 PLUS.
Systematically subdividing a large 3D reality capture dataset and publishing to single files can have several benefits, such as:
It can reduce the size and complexity of the dataset, making it easier to process, store, and share.
It can improve the quality and accuracy of the dataset, as each file can be captured and annotated with more detail and precision.
It can enable the use of different tools and methods for different types of data, such as point clouds, meshes, textures, etc.
It can facilitate the creation and update of a digital twin of the physical environment, which can be used for various applications such as planning, design, construction, operation, and maintenance.
Note: the total number of Limit Boxes cannot exceed 100.
Modify the transparency of Limit Boxes
This feature can be accessed from the Limit Box Manager panel, where users can create and edit Limit Boxes in different view modes. Users can now adjust the transparency level of all Limit Boxes using a slider in the panel. This feature can help users see through the l Limit Boxes and view the point cloud more clearly.
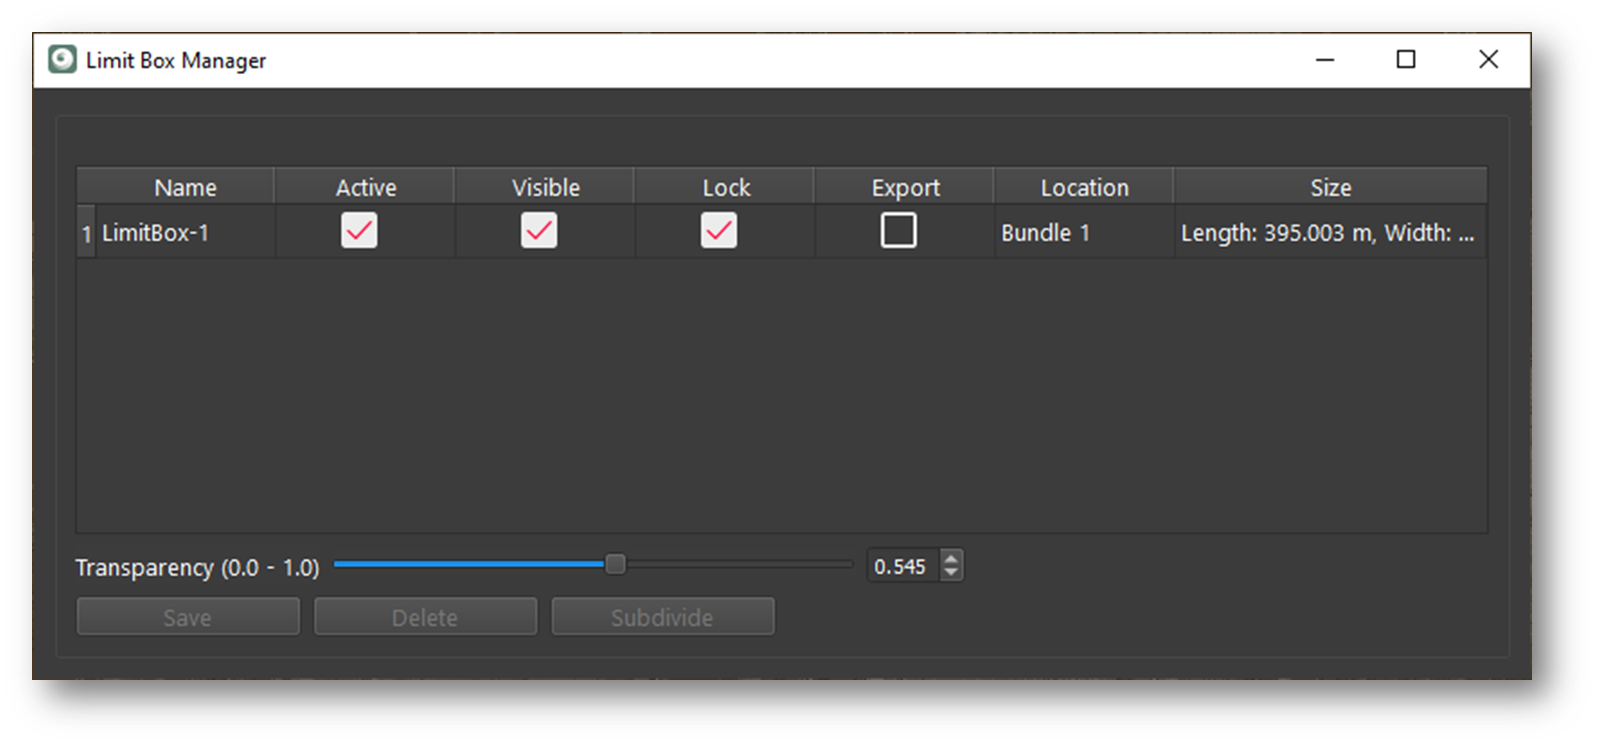
Lock Limit Boxes
This feature can be accessed from the Limit Box Manager panel, where users can create and edit Limit Boxes in Setup Cloud, Bundle Cloud, and TruSlicer view modes. Users can now check the Lock checkbox for each Limit Box to prevent accidental modifications of its size in any direction. The lock status will be persistent across sessions. Users can still toggle the Active and Visible checkboxes for locked Limit Boxes. This feature can help users to protect their Limit Boxes from unwanted changes and work with complex point clouds more efficiently.
Asset Handling Improvements
This release introduces a number of improvements and enhancements to the handling of Assets as detailed below.
Multi-select assets in the asset tab
Multiple assets can be selected in the Asset tab with Ctrl or Shift to apply commands such as delete, export, or rename. This can facilitate faster and easier Asset management. To use this feature, press the Ctrl or Shift key and click on the assets to select. Then, right-click on any of them and choose the command. The command will apply to all the selected assets.
Enable Assets such as videos and PDFs to be added to GeoTags
This feature can be accessed from the Setup Cloud view, where users can create and edit GeoTags by clicking on the Create GeoTag button on the top toolbar. Users can now select files with extensions *.pdf, *.mp4, *.avi, or *.wmv from their local folders and attach them to GeoTags.
This feature can help users enrich their GeoTags with multimedia content and share them with other Cyclone, TruView, and JetStream products.
Optimize Bundle with Cloud-to-Cloud Only
This option allows users to optimize a selected bundle using only cloud-to-cloud constraints, similar to the existing Optimize with Target Only option. This can be useful when users want to fine-tune the alignment of a bundle without using the targets in the project. This option can be accessed from the Project Panel by right-clicking on the desired bundle. When this option is selected, Cyclone REGISTER 360 PLUS will ignore any links within the bundle that can only be constrained by targets and use only the links that have cloud-to-cloud constraints.
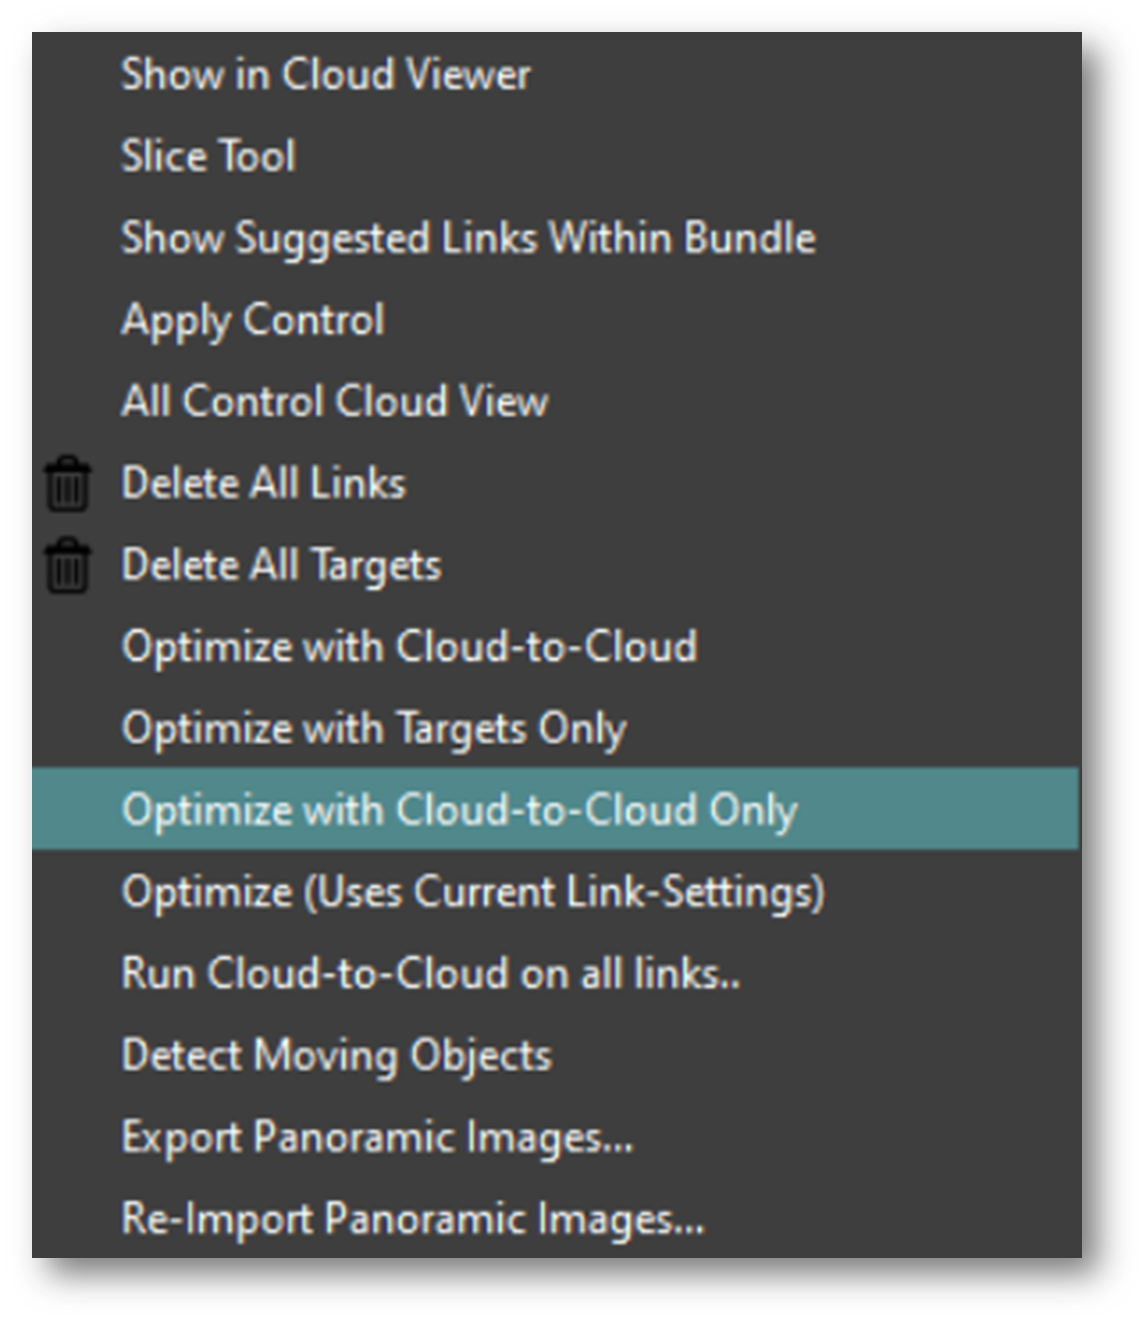
Note: If there are no cloud-to-cloud constraints for a link within the bundle, the link will not be deleted, but it will not be used for optimization. Users can also choose to optimize a bundle using the current Link Settings that may use both targets and cloud-to-cloud constraints by selecting the Optimize Bundle option.
The difference between Optimize Bundle with Cloud-to-Cloud Only and Optimize with Cloud-to-Cloud is that the latter will add cloud-to-cloud constraints back to all links in the bundle if the Optimize with Targets Only command was used previously.
Option to Use Level from Dual Axis Compensator (DAC) when using Applied Control
This new feature allows users to achieve feature parity with Cyclone CORE for applying control to a bundle without changing its level. This is useful when users want to preserve the level of a Setup that is collected with a laser scanner with Dual Axis Compensator (DAC), regardless of the control’s level accuracy.
When this feature is enabled, Cyclone REGISTER 360 will apply control to a bundle but keep its Z vector unchanged, giving it the same weight for the level as the control.
Note: This is similar to a nested registration in Cyclone CORE where users can register and freeze scans into a ScanWorld, then put it in a new registration and mark it as “leveled”, then add the control ScanWorld.
This feature can be accessed from the Settings under the Link tab. There is a check box that is off by default, labeled Use Level from DAC when using Applied Control. Users can turn it on or off as needed.
Import unstructured data with UCS or Applied Control by default
This new feature allows users to import unstructured data (such as LGS, e57) with a User Coordinate System (UCS) or Applied Control and have them selected by default in the Review and Optimize area. This can save time and avoid confusion when working with multiple coordinate systems in a project.
Previously, when importing unstructured data with a UCS or Applied Control, the software would display the local coordinates by default and the user would have to select the sitemap and check the UCS or Applied Control manually.
If the file has one or more UCSs, the software will make the first UCS listed active by default. Users can still switch between different coordinate systems as needed.
Added the “Global Bundle Error” value to the PDF Report
Added the “Global Bundle Error” value to the “Overall Quality” section in the PDF report. This value shows the average error of all links in the bundle and is formatted according to the user’s preference from Settings.
Note: Previously, only the group error values were available.
Improved Performance upon publishing Selected Setups
In previous versions of Cyclone REGISTER 360 PLUS, the software would process all Setups in the Project for cleaned points when users published selected Setups. This could cause unnecessary processing and long waiting times.
In the latest version, the performance of this feature has been improved by only processing the Setups that are selected for publishing. This can help users save time and resources by avoiding irrelevant Setups.
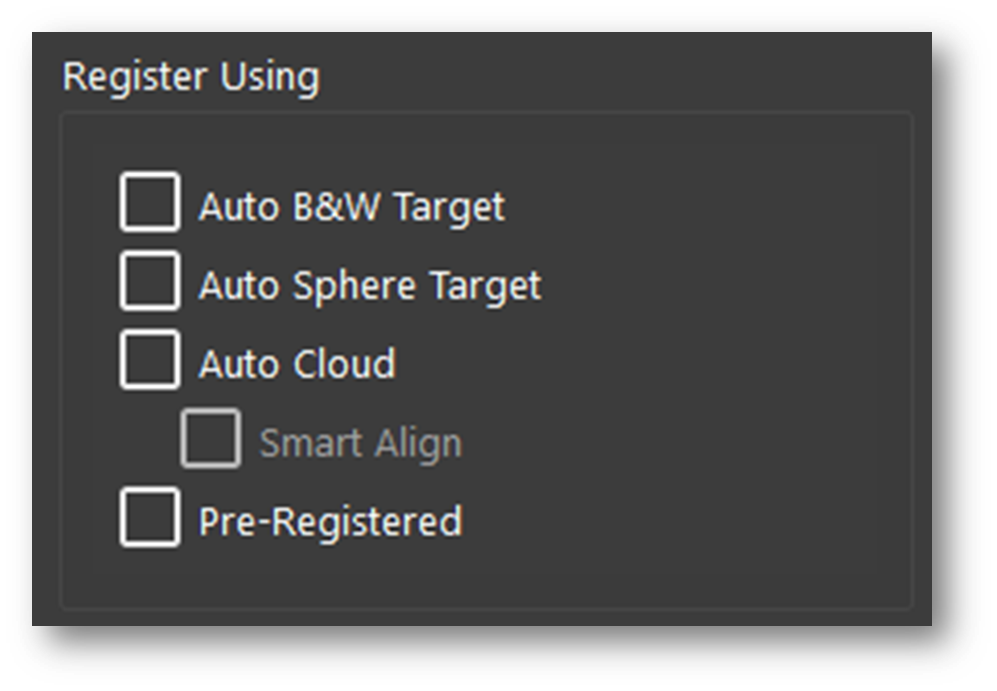
Save options in the Import area for “Register Using” Settings
Cyclone REGISTER 360 PLUS now allows users to save their preferred settings for the “Register Using” options in the Import area. This feature enables users to customize their workflow and speed up the registration process.
Improved Cyclone REGISTER 360 PLUS project file management.
Cyclone REGISTER 360 PLUS has changed how it tracks project files to prevent data loss and improve performance. This means that: to prevent data loss and improve performance:
The following list summarizes some of the improvements:
Deleting a finalized registration only removes its specific files.
While compacting a Project, the process will remove the unneeded files.
The user can compact multiple Projects at once to reduce their size and free up disk space.
Compacting a Project closes it first to ensure all deleted objects are removed.
Compacting a Project does not affect the quality or functionality of the versions or finalized registrations.
Creating and deleting versions and reconnecting to a server is faster for large Projects.
CLI Tools: Export BLK kinematic Data to RCP (Cloud)
The CLI tool in Cyclone REGISTER 360 PLUS has a new feature that allows exporting BLK kinematic data (BLK2GO, BLK2FLY, and BLK ARC) to RCP (Cloud) format without importing the file first. This feature requires a Cyclone WORKFLOW license and can be activated by running the CLI tool from a CMD window with the following command:
Register360.exe -b2g2rcp [b2g directory] [export directory]To use this feature, users need to set the desired Waypoint creation interval along the trajectory in Cyclone REGISTER 360 PLUS before running the CLI tool. The CLI tool uses the settings from the last BLK import for processing.
Removed Camera-based Rendering Option
Camera-based rendering is no longer needed in 2023.1.0, as it has been replaced by a more efficient and accurate method. Therefore, the dialog and check box for enabling camera-based rendering has been removed from the rendering tab of settings. Users can still adjust the other rendering options from the same tab.
Updated SDKs and Microsoft redistributable packages:
Cyclone REGISTER 360 PLUS has updated the SDKs and Microsoft redistributable packages that are used by some of the 3rd party libraries. This ensures compatibility and security with the latest Microsoft Visual C++ runtime libraries. Customers do not need to install any additional components to use these features.
Bug fixes
Fixed an issue where the point cloud was rotated compared to the background image when entering the Finalize area.
Fixed an issue where 0 kb size GeoTags caused a crash upon import.
Fixed an issue where Target fitting was inconsistent on some scans.
Fixed an issue where hidden classes got deleted when using the Fence delete command.
Fixed an issue that created empty classes when running classification.
Fixed an issue that prevented reloading classes from working with manually added classes.
Fixed an issue where E57 created from 3DR would not import.
Fixed an issue where the get image of world satellite and street map tiles did not work in the import area.
Fixed an issue where GeoTags containing no note information from Cyclone FIELD 360 did not import correctly.
Fixed an issue where imported PTX files used the incorrect tilt information.
Fixed an issue that exported the incorrect coordinates when using a UCS for panoramic image export.
Fixed an issue where the command Prioritize Targets did not function properly.
Fixed an issue where videos did not get imported from the BLK2GO scanner.
Fixed an issue that made fence deleting very slow.
Fixed an issue where GeoTags created with Cyclone FIELD 360 did not download using the BLK Data Manager.
Fixed an issue where the License Notification in the BLK Edition showed no information.
Fixed an issue that required images to be exactly 2:1 in ratio to Re-Import.
Fixed an issue where E57 files on Control imported with the Setup icon far from the point cloud.
Fixed an issue with E57 files created by NavVis where the WayPoints imported with the incorrect Z orientation.
Fixed an issue where Setup icons and labels did not appear in unstructured data in the Report area while viewing the point cloud.
Fixed an issue that resulted in no colored points when publishing to LGS with a mix of Setups with and without color.
Fixed an issue where the US survey feet coordinates did not carry over into RCS file.
Known Issues
LGS files from Pegasus OFFICE are not supported. Pegasus OFFICE was updated along with TruView and CloudWorx products to support the special LGS file that is produced by Pegasus OFFICE. The LGS file includes a trajectory, new image WayPoints positions, and image set rendering. These objects are not supported yet in Cyclone REGISTER 360 PLUS or Cyclone CORE. Cyclone CORE can import just the point cloud, but the depth maps, special images, trajectory, and new icons are not included.
FARO no longer shares the required SDK to support the import of FARO raw scanner files from the newest FARO Scanners.
The workaround is to import into FARO Scene and export an FLS or E57 file.
Classification Known Issues
In some cases, the Classified Point Clouds seem to disappear when switching between SiteMap and Bundle Cloud View or Setup View. Selecting Show/Hide Setups twice can refresh the screen and they will be visible. This is a test.
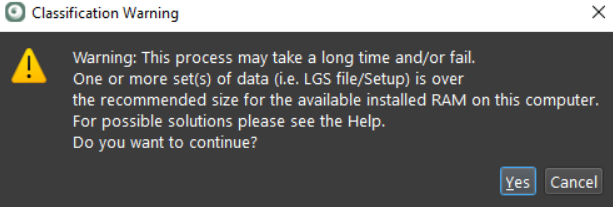
Auto-Classification runs one Setup at a time. In case a very large point cloud is detected, this warning will occur.
New BLK360 Known Issues
When downloading scans from the BLK360, progress is being made even though the dialog says 1% for much of the download.
When the BLK360 battery is low, download is not supported. The download button will not be clickable though no warning message is given.
When the BLK360 battery level is low, the charge percentage number is not shown.
When a download from the BLK Data Manager is canceled, there is an intermittent error that causes the program to hang. The workaround is to restart both the scanner and BLK Data Manager and reconnect.
If a download is unsuccessful, a user might receive a message stating “Downloaded 0 setup(s).” If you receive this message, please re-download those scans.
BLK360 scans will appear chronologically in the Download Manager while BLK2GO walks will appear in alphanumeric order.
The temp folder may not contain non-ASCII characters.
If there is a synchronization issue between the tablet and the scanner (which may be caused by a poor or interfering Wi-Fi connection) items created on the tablet using FIELD 360 such as links, images, and geotags may not be synced back to the scanner. The workaround here is to download the data from the tablet using FIELD 360 rather than directly from the scanner.
In rare cases, when importing using Auto Cloud, REGISTER 360 may hang. The data is imported correctly with links created, the workaround is to close REGISTER 360 and open it again.
When in a Setup View and the Panoramic images are turned off, occasionally the position of the camera changes and is inverted. Going back to SiteMap View and then into the setup again will fix the issue.
When a download from a BLK2GO scanner is canceled the user will not be informed.
Virtual target snaps below were clicked and the exported data has different coordinates to those in Cyclone REGISTER 360. The Workaround is to lock the bundle before applying control.
If a control file has a leading space (a space as the first character) then that line is ignored. The workaround is to manually delete the first line.
Export Panoramic images with the location coordinates and orientation in the user coordinate system i.e. in the control coordinate system.
When we import BLK2FLY GPS data with the 'Wall Aligned UCS' option, it ignores the UTM/State Plane coordinate UCS. The workaround is to not use Wall Aligned with UTM.
Save b2g file(s) function during import from the BLK2GO scanner is broken. The workaround is to use the Data Manager.
Re-import image command fails when trying to import the image(s) from a BLK360 scanner with a cable connection i.e. via LAN
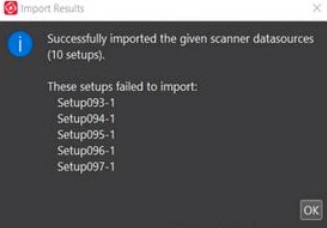
After importing from a BLK scanner (BLK360, BLK2GO, or BLK2FLY) if there were setups that were not selected for import, there is a dialog box that states “failed to import” on the un-selected setups. The expected behavior is that these setups should not be mentioned.
Scans that have more than one point cloud in a Setup are not properly displayed. This can be the case when a C10 has a full 360 scan and a highly detailed window scan. The scans still exist and can be exported.
If FARO scans fail to import, please contact Leica support. The scans collected from the newest FARO scanner may not be imported. Please contact Leica support for the newest FARO SDK. It may be the case that new software from FARO needs to be downloaded and installed separately.
After the recommended firmware update for BLK2GO, in some cases, setups are unable to be imported over Wi-Fi. The workaround is to import via USB-C cable.
Cyclone In some cases, when publishing to TruView Cloud setups do not appear in the SiteMap. The workaround here is to publish to LGS and import the file into TruView Cloud.
In rare cases, exports to LGS and RCP show different elevations on point cloud points than in Cyclone REGISTER 360.
Windows scaling works best when set to 100%. Setting it to 150% or higher causes some graphical errors.
Some dialog boxes cannot be rescaled correctly and the OK button is not shown in the dialog box.
Some panels have a dialog that does not fit correctly.
Setup icons are in some cases misplaced when data is published to TruView Cloud. The workaround is to set Windows Scaling to 100% as there seems to be an issue when set to 150%.
Scaling of 175% and 200% collapses the left side panel and cannot resize after collapse.
Some new dialogs will not have translations.
Some customers have reported Cyclone REGISTER 360 crashes when using AMD Ryzen 7 processors.
In rare cases downloading scans from a BLK360 may fail. The workaround is to restart the BLK360 scanner.
After downloading Setups from the scanner, this dialog will show if the number of Setups selected is less than the total Setups on the scanner. This dialog, while correct, should be ignored.
Inserting Virtual Targets with BLK2GO data can have issues if the Pano is on. The workaround is to turn off the pano image and then create a virtual target.
Cyclone REGISTER 360 Projects located on NAS drives are NOT recommended.
Due to variations between network deployments Cyclone REGISTER 360 projects may be unreliable or slow to respond when accessed from a network location.
Cyclone REGISTER 360 Projects located on NAS drives show <1MB in the Projects & Storage tab.
RCP publish will fail if the Setup published has zero points. The workaround is to restore the points for the Setup and publish again.
The cloud used for Cloud-to-Cloud registration cannot be cleaned by the Smooth Surface feature. Therefore, the options for which cloud to clean are not available.
There is an issue with publishing data to TruView Cloud with Applied Control for projects created in Cyclone REGISTER 360 prior to 2020.0. The Setup icons to do match the SiteMap. The solution is to create another Finalized Registration, and then re-publish to TruView Cloud.
Once imported into 2021.0, b2g files are changed and are not compatible with older versions of Cyclone REGISTER 360. Please make a backup copy of the b2g file BEFORE import.
After editing an HDR tone map, other Versions created will still show the original tone map in the thumbnail but the Pano and point cloud will be correct.
The 2-billion-point limitation has been removed from publishing to RCP.
30 GB of temp space is needed for every billion points exported to a single RCP cloud.
Using Export to Separate Setups does not use the same level of temp space. Temp space is not generally a problem when exporting separate Setups.
Virtual Machine (VM) environments are not supported.
Remote Desktop is only supported if Cyclone REGISTER 360 is opened in the remote computer first. Trying to open Cyclone REGISTER 360 through a remote desktop is not supported.
Cyclone REGISTER 360 will not detect the dedicated graphics card on computers with multiple graphics cards. Users must manually set the dedicated card for use with Cyclone REGISTER 360. This is done with the Nvidia Control Panel for Nvidia graphics cards, or with the Catalyst Control Centre for ATI/AMD graphic cards
Importing data over a network can cause issues, especially on Windows 10. The workaround is to copy the scan data to a local disk.
If memory issues arise, check that the virtual memory size is set to the same size as RAM.
Automatic image matching of imported panoramic images may not always be correct.
The zoom scale bar will be captured in the image in the import area using the satellite or street map.
Project thumbnails (the image shown in the project explorer) are not preserved in the *.raf export file.
F1 contextual help will not work with the Microsoft Edge browser as the default browser. The workaround is to set Chrome or Firefox as the default browser.
Files written to the temp folder at C:\Users\(user name)\AppData\Local\Temp\Register360, will be deleted after the program closes. These files will NOT be deleted if the program freezes or crashes.
In rare cases, the Bundle will show an optimized state, but there is still an unoptimized Link in the Bundle (not shown with a dotted line). Optimize the Bundle to resolve the issue or split the Bundle into smaller Bundles and look for the suspect dotted line Link, delete this Link, and re-optimize.
The currently active project should not be re-named from the Projects & Storage settings. You should close the project before renaming it.
When a Setup has a UCS created from it, the UCS must first be deleted before the Setup can be deleted from the project.
On rare occasions, HDR images may appear grey with very little variation. The workaround is to open the image with the Tone Map Editor and re-save the image.
Some graphic card anomalies can be caused by power management software. Please turn it off by setting the power management profile to High Performance.
Paper targets should not be placed on significantly curved surfaces. The workaround is to create a virtual target rather than using the algorithm to best fit these cases.
In some cases, if the scanner was inverted and automatically acquired targets, applying control fails. The workaround here is to manually acquire the targets.
A published RCP that has applied control with very large coordinates shows a black map rather than a colour image. The workaround is to create another map in ReCap.
Mac OS’s running Windows Boot Camp is not officially supported
Cyclone REGISTER 360 supports Windows 10 on Windows-native devices only.
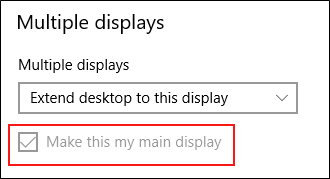
Issue with Multiple monitors using Windows Scaling higher than 100%.
If issues are encountered using Windows’s scaling settings higher than 100%, set the monitor that Cyclone REGISTER 360 is using to the main display.
When publishing to Jetstream Enterprise with a large number of assets:
As of REGISTER 360 2023.0.0, Jetstream Enterprise is no longer supported.
There can be an issue when publishing to JetStream Enterprise with a large number of assets in the project. The workaround is to publish the project to LGS and then import the LGS to JetStream Enterprise.
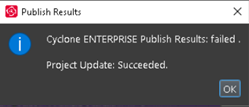
When Publish to Cyclone ENTERPRISE fails to open the proper landing page:
When publishing to Cyclone ENTERPRISE, you need to enter the Host Name and Port for the target server. The Host Name should only contain the top-level domain part of the URL. In some cases, a hostname may be valid for the connection test but will not work for publishing. In this case, the connection dialog will display the Project Selector. To solve this problem, edit the Host Name to remove all text after the Top Level Domain. For example, "https://mycycloneenterprise.com/abc...-////" should be trimmed to "https://mycycloneenterprise.com"
When publishing to Cyclone ENTERPRISE fails, this error message:
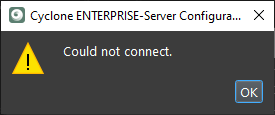
could mean that:
The server has low disk space
The network drive is disconnected
Invalid file path
Importing from Cyclone FIELD 360
Only BLK360 projects will appear when the user connects to Cyclone FIELD 360. Cyclone FIELD 360 does not store full project data for the RTC360\P-Series and should be imported directly from the scanner's USB memory stick.
Cleaned vs. Uncleaned pano layer publishing
When publishing an LGS file, the Hue and Greyscale pano layers will show the uncleaned cloud.
A workaround would be to publish to E57 and then re-import the data then publish to LGS.
BLK2GO E57 Support
Due to the unstructured nature of BLK2GO data, E57 files created from the scanner will not be supported for import into Cyclone REGISTER 360 2021.1 or earlier. Users should save original b2g files for future use.
Modified usage for Japanese OS
Japanese OS language preference is not selected by default and causes issues with some Cyclone REGISTER 360 imports.
The user can fix this by manually selecting the language within preferences.
On the Japanese OS machine, launch Control Panel
Select the region (地域) and click on the accept button indicated
Check "Use Unicode UTF-8 for worldwide language support"
Reboot
Non-ASCII characters
Non-ASCII characters are not allowed in the following conditions:
Import temp path
On computers with non-Latin user names, the user will not be able to create any project if the source data is stored anywhere under the user profile name. This issue will manifest itself in Japanese, Chinese, or any other language containing special non-Latin characters in the user name.
The SiteMap name cannot have non-Latin (Japanese, Chinese, etc.) characters for publishing to TruView Enterprise or TruView Cloud.
Usage file reporting issue for EnterpriseElite Customers
When using the standalone CLM installer, some EnterpriseElite users may find that the usage file (year-month.db) normally located at C:\Leica Geosystems\CLM\LogFiles does not get produced.
Please ensure your LGS.opt file (located here: C:\Program Files (x86)\Common Files\Leica Geosystems\License-Server\lgs.opt) looks like this:
DEBUGLOG +"C:\Leica Geosystems\CLM\LogFiles\lgs.log"
NOLOG IN
TIMEOUTALL 240
ENABLE_DB_HISTORY 1
PATH_DB_HISTORY C:\Leica Geosystems\CLM\LogFiles
ENABLE_DB_HISTORY should be set to 1 in this file. Please copy the file to a new location, edit it, and re-save it if the file says it’s read-only.
Installing CLM while a JetStream Enterprise service is running
As of REGISTER 360 2023.0.0, Jetstream Enterprise is no longer supported.
During the installation of CLM, users may encounter the following error message. This is commonly due to a service like JetStream running in the background.
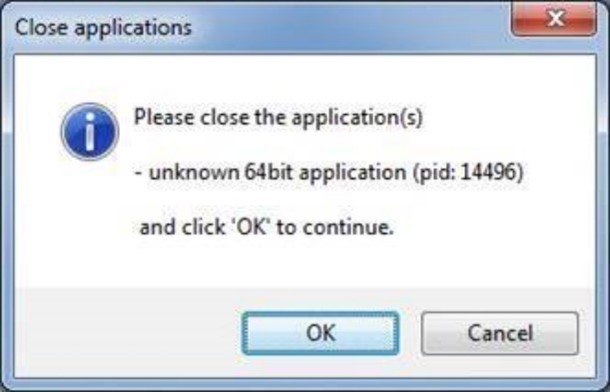
To enable the successful installation of CLM, please follow these steps:
Launch the task manager
Select the Services tab
Look up the process with the PID (Process ID) shown in the “Close applications” dialog
In this case, it is JetStream
Terminate the process so that CLM can be installed
After CLM is installed, click on the Services button in the Task Manager and restart the service
RCP Publish dialog progress reporting
When publishing an RCP file, the progress will appear to stall at a certain interval. Though the progress bar does not update, the export is progressing. Users may check the task manager to ensure that the service is still functioning.
Blurred images within ReCap
In some cases, E57 files published from Cyclone REGISTER 360, when imported into ReCap, may display blurred imagery when entering the Setup location sphere. This is a known issue with ReCap's handling of E57 files. RCP files published from Cyclone REGISTER 360 do not show any display issues.
The E57 export using the new Compatibility mode option (see details above in the feature description) may help with this issue.
LGS usage over the network
The use of LGS files is only supported when the files are saved locally. Due to variations between network deployments LGS files may be unreliable when published to a network location.
Hyperlinks in the Finalize area
Hyperlinks in the Master SiteMap in the Finalize area, once created, will hide behind the inserted image, but will still export to TruView, Cyclone ENTERPRISE, and LGS properly.
Deprecated Features
Leica Geosystems strives to provide support for the widest array of operating systems and file formats possible as is reasonable given current technologies and support from third-party partners.
With each release, we review our list of currently supported formats and operating systems in line with industry trends and announce product terminations.
Leica Geosystems may add or terminate support for a file format during any release. Obsolete operating systems will be supported for six months after their announced termination or the next major software release, whichever comes first. Server products will be supported in alignment with Leica’s Client License Manager (CLM) supported servers to guard users against incompatibility.
Cyclone REGISTER 360 2020:
TVG files are no longer published. Users should use the LGS format. If a TVG is required, users can Publish to TruView Local and run the dataset through the free utility Leica Pack&Go.
Cyclone REGISTER 360 2021:
Windows 7, 8, and 8.1 are no longer supported.
Cyclone REGISTER 360 PLUS 2023.0.1
FARO raw scan files from the newest FARO scanners are not supported due to a lack of availability in the FARO SDK.
Cyclone REGISTER 360 PLUS 2023.0.0:
Publishing to TruView Local and JetStream Enterprise is no longer supported.
Cyclone REGISTER 360 PLUS 2023.0.3:
ZFC scanner data files are no longer supported due to a lack of updated supporting MS redistributables.
iStar Camera images are no longer supported due to the lack of updated supporting MS redistributables.
Cyclone REGISTER 360 2023.0.3
This release of REGISTER 360 will only support MS redistributables supported by Microsoft.
Cyclone REGISTER 360 PLUS 2023.1
This release will no longer publish LGS files, only LGSx files. LGS files can be opened and converted to LGSx within the product.
Licenses
All users with valid CCP for either Cyclone REGISTER 360 or Cyclone REGISTER 360 PLUS or Cyclone REGISTER, or with CCP valid as late as 15 October 2023, can run this new version of Cyclone REGISTER 360 PLUS with no new license required.
All users with valid CCP for Cyclone REGISTER 360 (BLK Edition) or Cyclone REGISTER 360 PLUS (BLK Edition) or with CCP valid as late as 15 October 2023 can run this new version of Cyclone REGISTER 360 PLUS (BLK Edition) with no new license required.
Users do not need to migrate to a Cyclone REGISTER 360 PLUS or Cyclone REGISTER 360 PLUS (BLK Edition) license in order to run Cyclone REGISTER 360 PLUS if their CCP or subscription is valid.
