
December 13, 2023
What's New
For this release, a new data architecture has been implemented at the core of our Reality Capture software products and our popular file format, the LGS file. The update provides a next-generation solution for our Leica Reality Capture data and includes faster writing (publishing), higher compression, and new core architecture that will allow us to build out new capabilities and features to meet your growing needs, like file versioning (i.e., track changes to GeoTags, markups, etc.), in the future. There is a change to the LGS format as part of the new data architecture. The new format, called LGSx, will contain the new data architecture and will not be compatible with versions of Reality Capture software older than 2023.1.0 (this release).
In addition to updates to the data architecture, this release of CYE includes the following features:
Support LGSx file
The LGSx contains the new data architecture and will not be compatible with versions of Reality Capture software older than 2023.1.0 (this release).
All the new projects published or imported to Cyclone ENTERPRISE will have the LGSx format. The format of the project can be found in the “Format” field from the Project Information Panel in TruView LIVE or TruView desktop.
When publishing a backup copy of a Project, Cyclone ENTERPRISE will create a copy in LGSx format. In previous versions, an LGS file was created.
Cyclone ENTERPRISE also supports the importing of LGSx files. Users may drag & drop the LGSx file in the Project Import dialog or browse to the file directory. The supported file formats now include *.lgsx, *.lgs, & *.jsa.
Project Merge
Project Merge allows the merging of two Cyclone ENTERPRISE Projects by migrating objects between the two projects. This tool will enable new workflows for users who do multi-day scanning projects and/or who re-scan the same area over the course of a project to monitor progress. This can be used to combine projects that have complete, or partial overlap in them. Ensure that both projects are using the same UCS.
This feature is a critical workflow for transferring data from legacy products to Cyclone ENTERPRISE. Users who previously migrated to Cyclone ENTERPRISE while maintaining old projects in TruView or JetStream can now reunite unsynchronized versions of the same project existing in both systems.
The project that will receive the data is named Destination Project, and the project that the object will be imported from is named Source Project.
Select objects can be imported from the Source to the Destination. The supported object types include GeoTags, Assets, and SnapShots.
Note: both Source and Destination projects may contain Point Cloud, Pano images, GeoTags, Assets, Snapshots, Models, UCSs, Clips, etc. The merge function provides section and conflict management tools to manage any duplicates or conflicts.
The Project Merge function is only available for the following user roles:
-
Supervisor
-
Administrator
-
Group Admin
-
Project Admin
The following instructions describe the steps for merging projects:
-
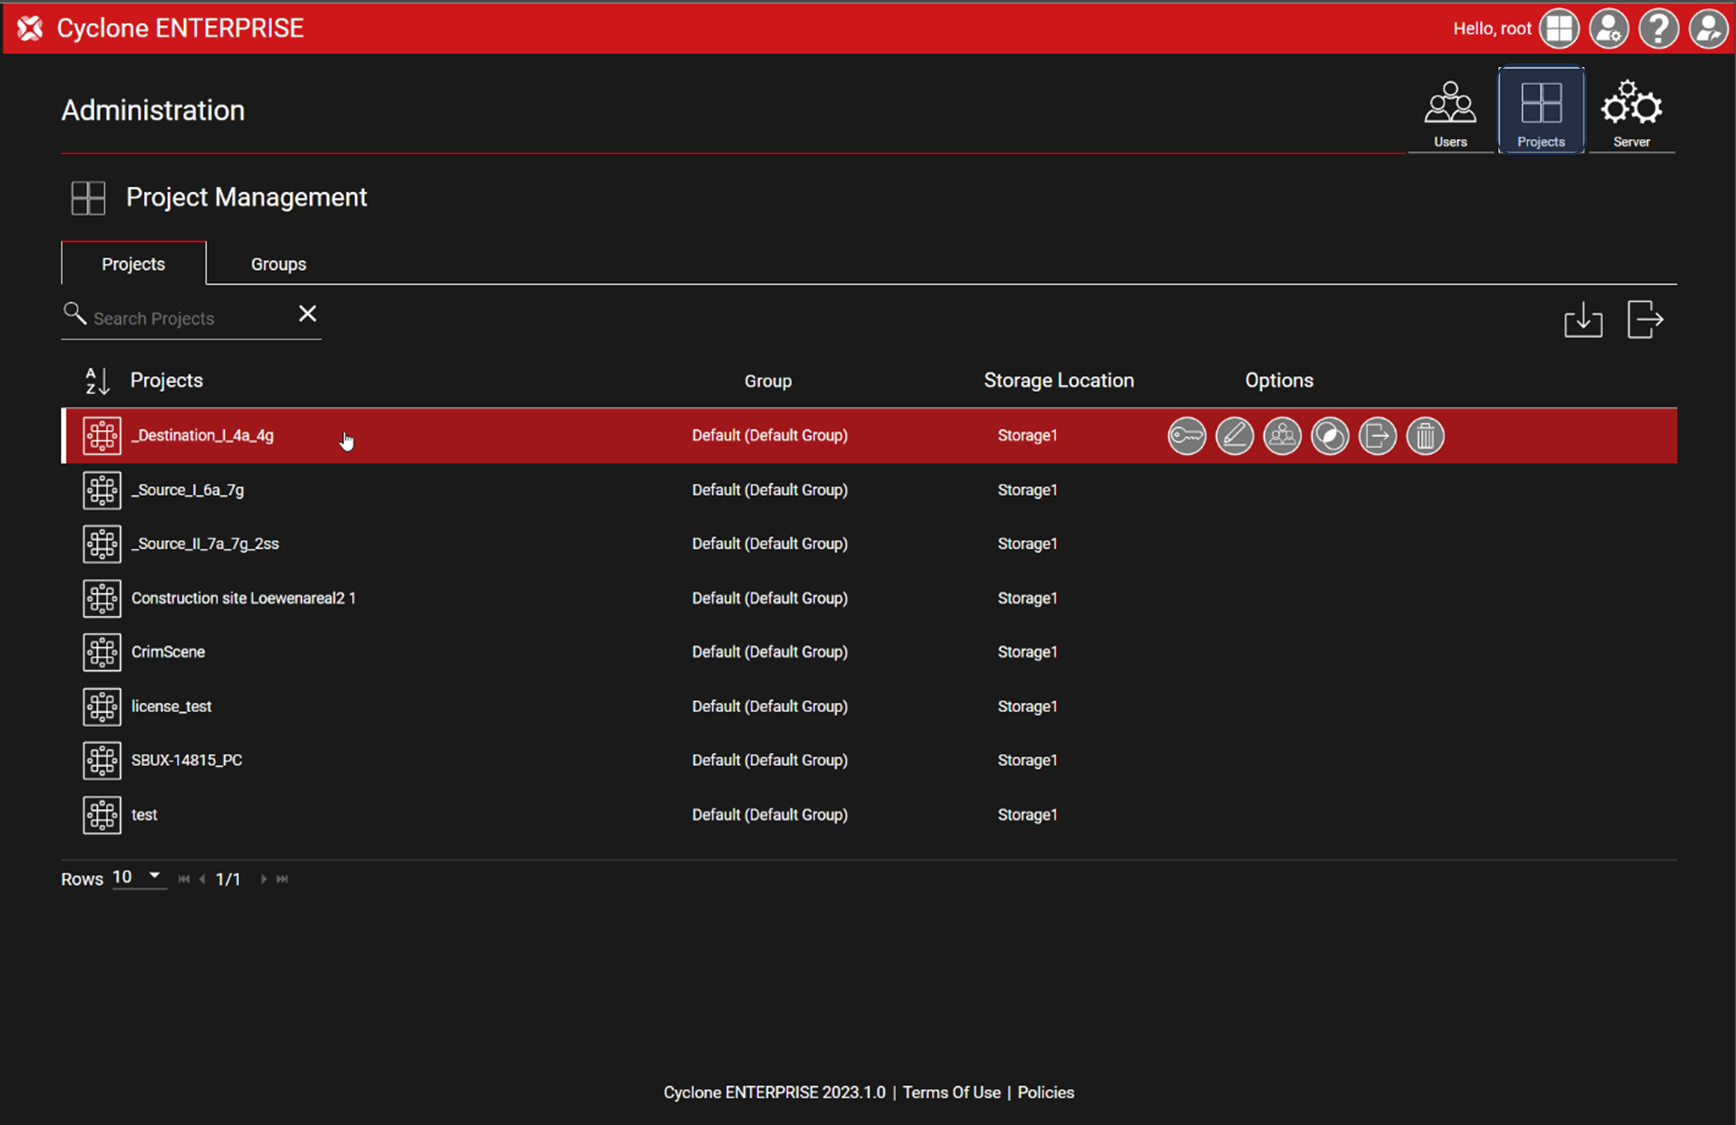
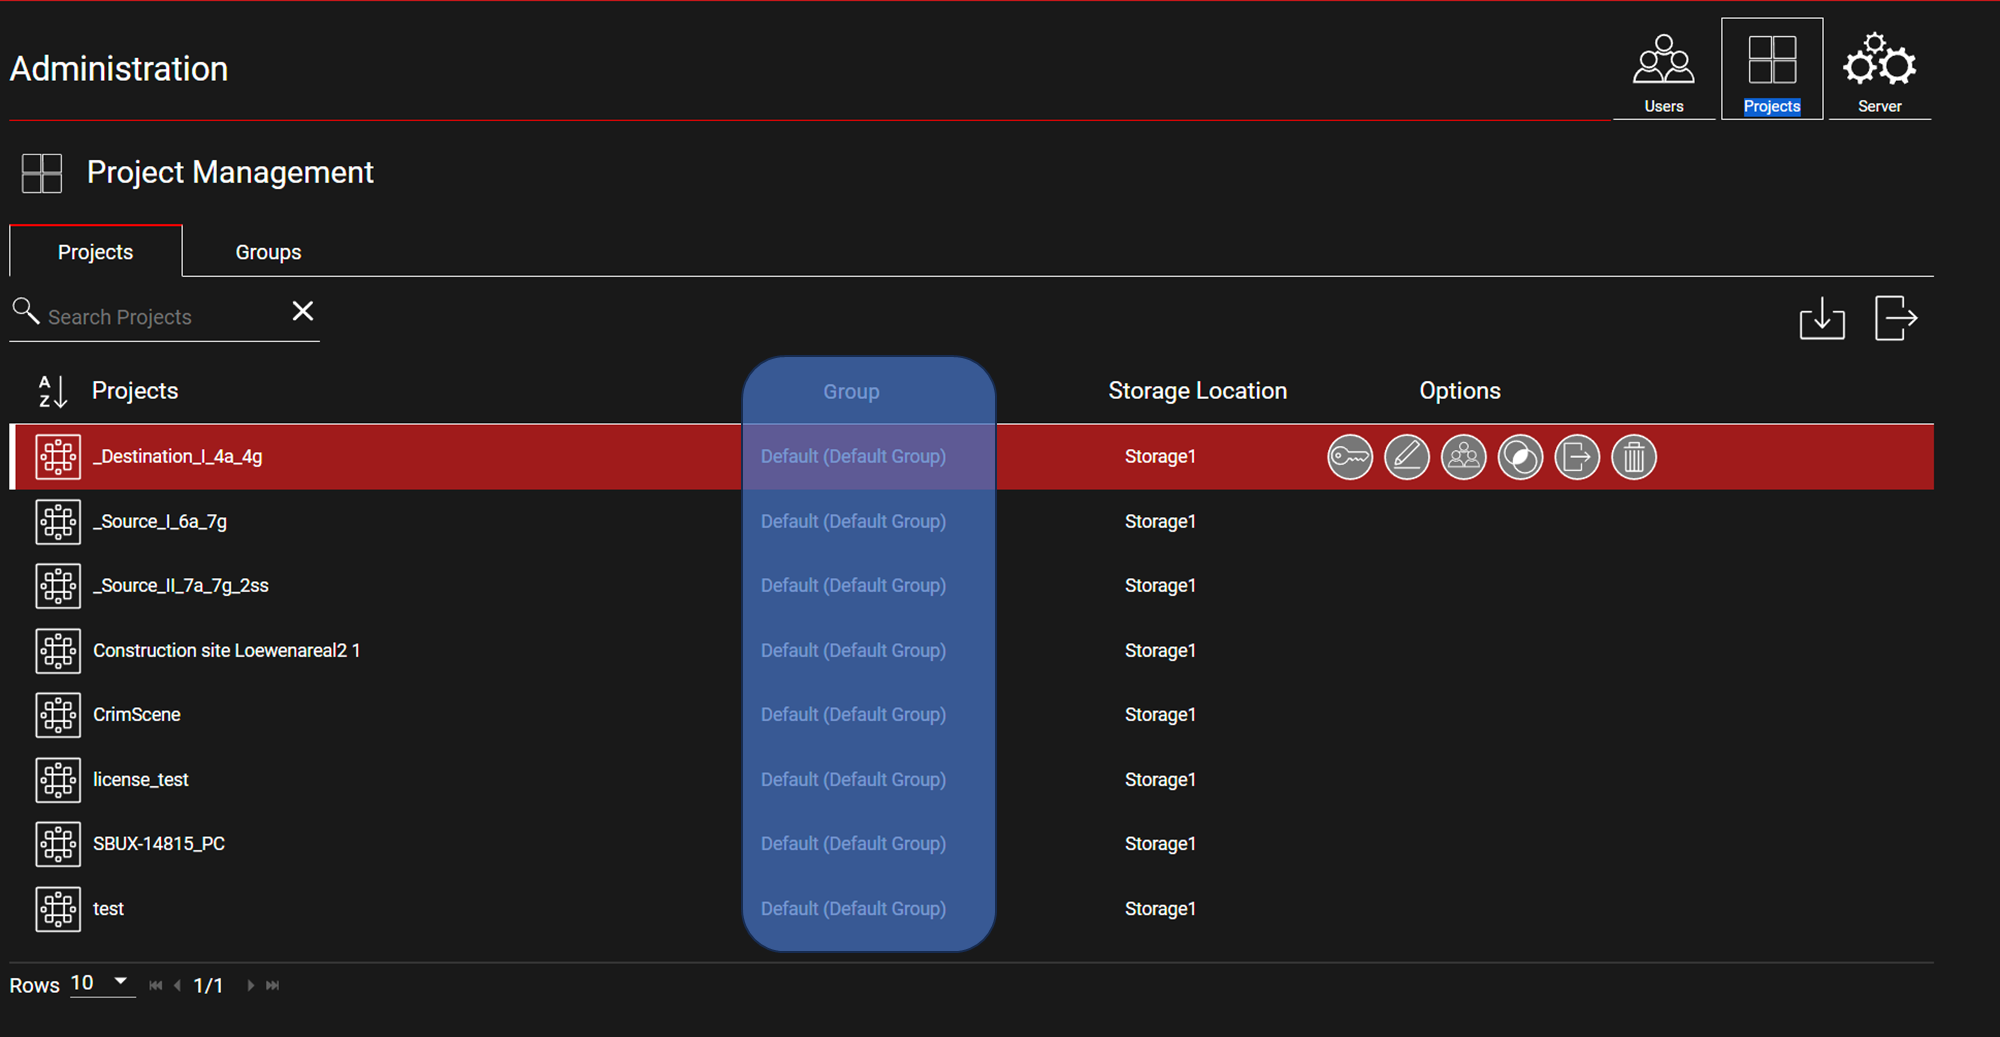
Go to Administration | Project Management.
-
Select a Project; the selected Project will be the Destination Project where the objects will be imported.
-
Click on Merge in the Options of the selected Project.
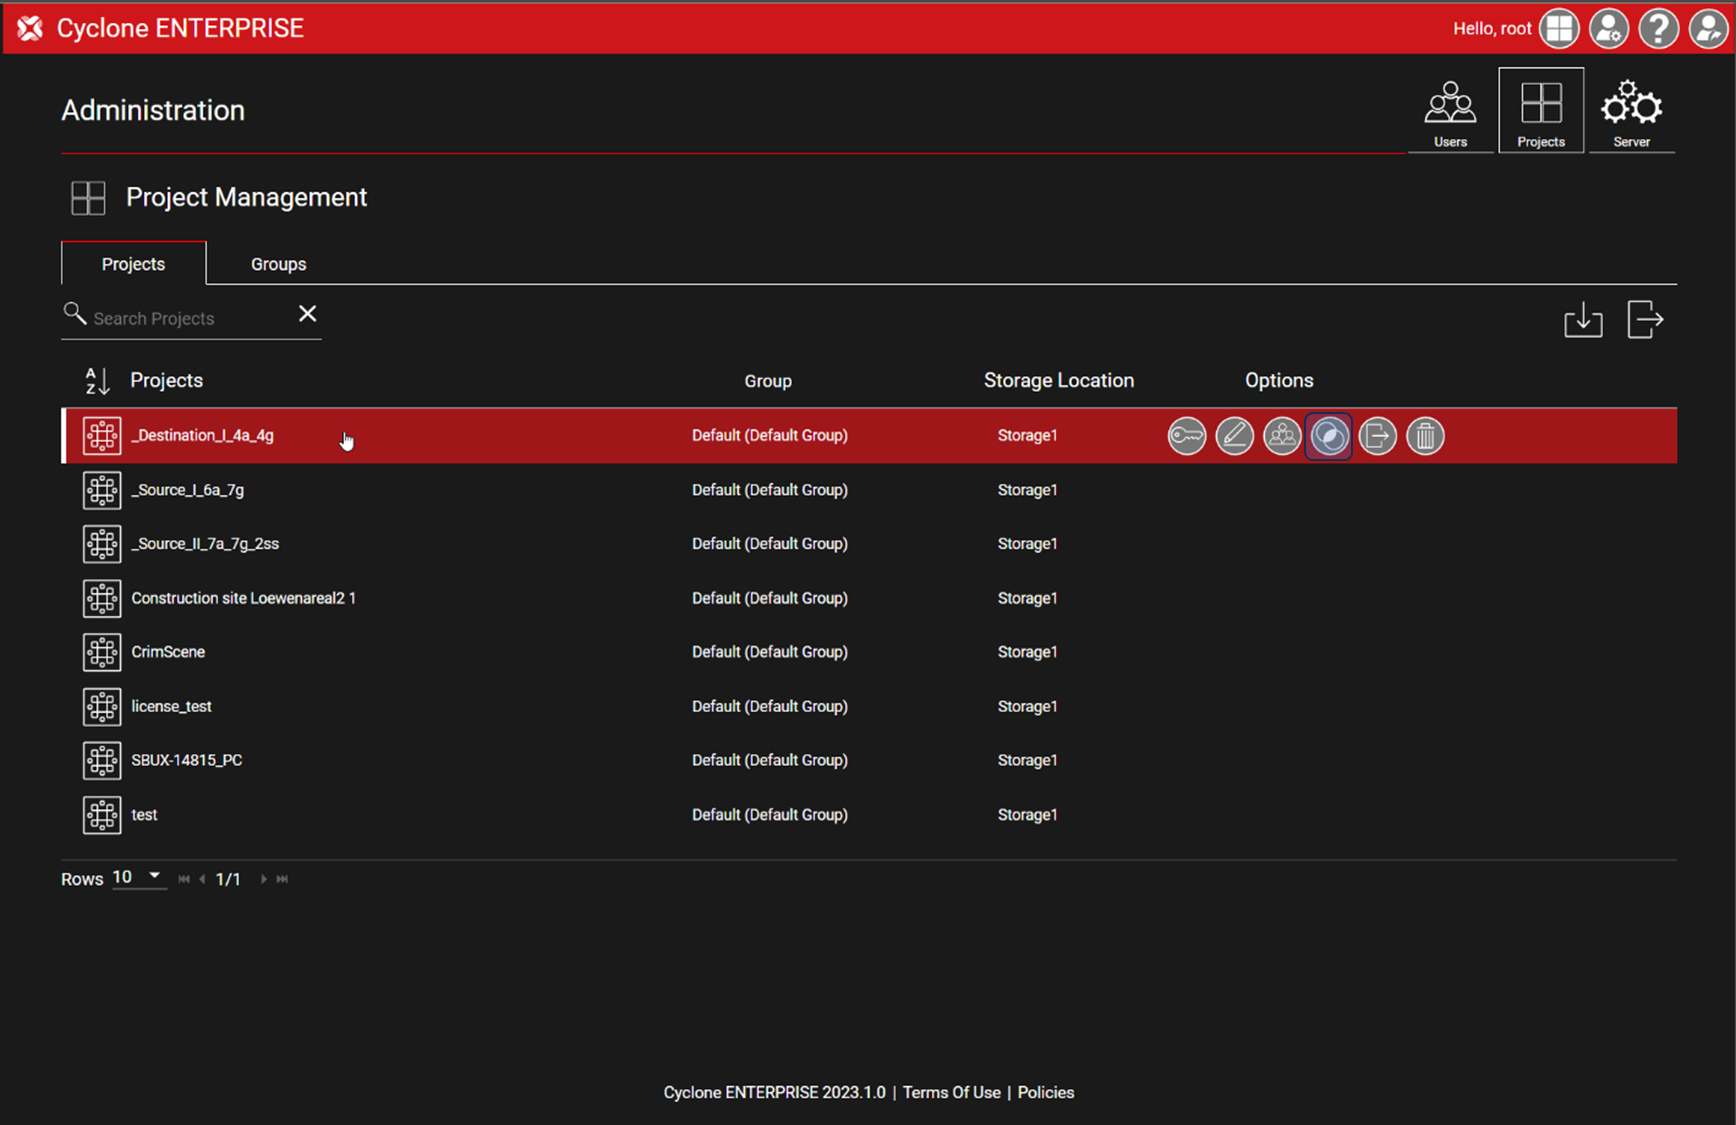
Note: Project Merge is ONLY available for Supervisor, Administrator, Group Admin, and Project Admin user roles.
-
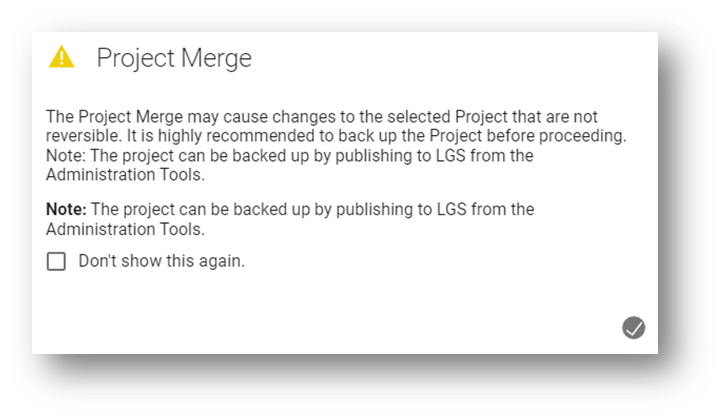
A warning message will be prompted that provides information on how this process may impact the existing Projects.
Note: It is recommended to back up the Project before proceeding.
Note: You may choose not to show the message again by clicking on “Don't show this again”. As a result, the message will not be shown in the current user session.
-
Select the Source Project from the list of Projects.
-
This dialog is the same as the Project Selector with the same view toggle, group toggle, and sort and search functions.
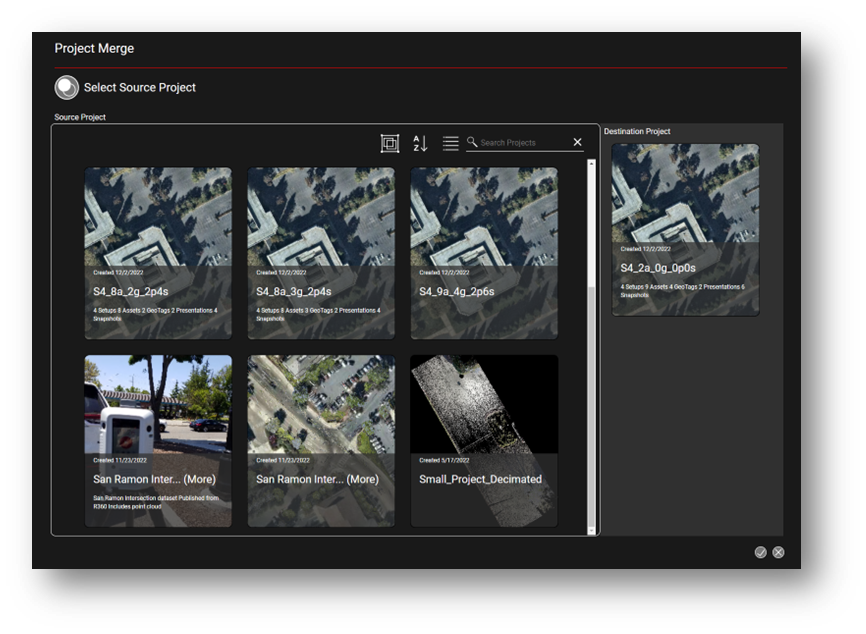
-
Once both Projects are selected, click OK to proceed.
-
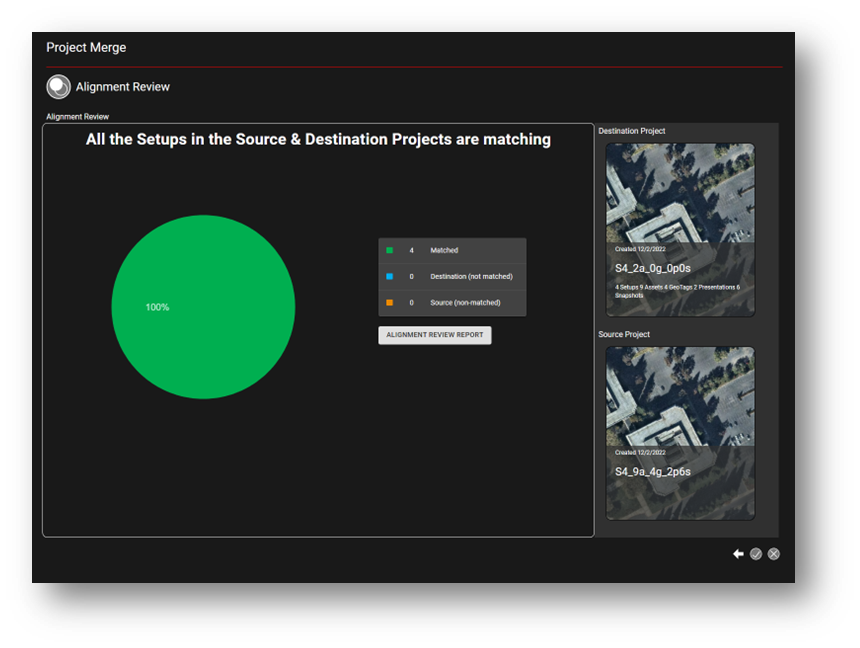
To review that the Projects are selected correctly, Cyclone ENTERPRISE will provide an Alignment Review report to show the matching and non-matching Setups.
-
This is an alignment analysis report for Setup coordinates in the selected Projects
-
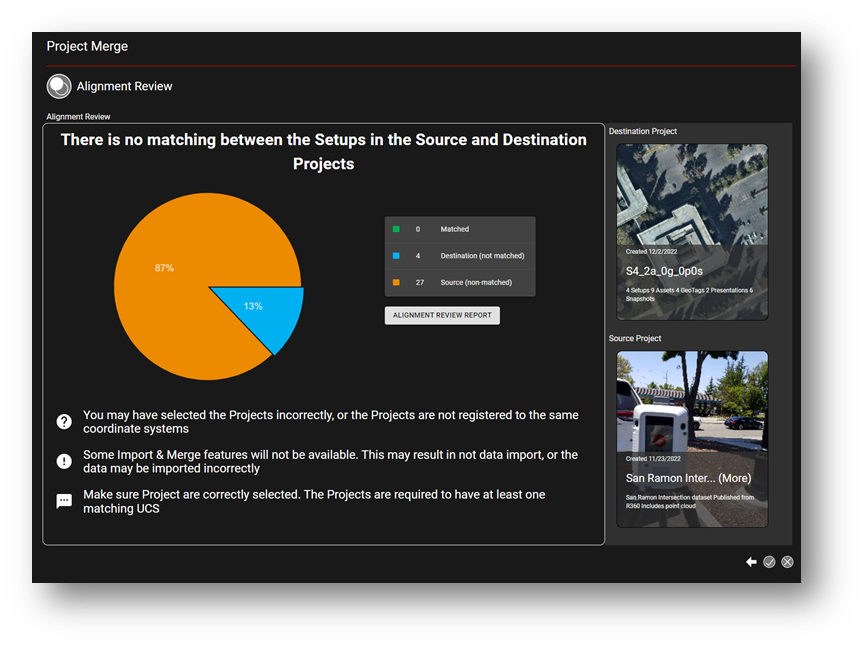
The report provides a list with the number the matched, and non-matched Setups, which is a pie chart of the percentages of matching and non-matching Setups.
-
The alignment analysis is independent of having multiple UCSs in the Projects. It means the same Projects should be matched regardless of having different UCSs.
-
The report is color-coded as the following:
|
|
Matched from both Destination and Source Projects |
|
|
Non-matched from Destination Project |
|
|
Non-matched from Source Project |
-
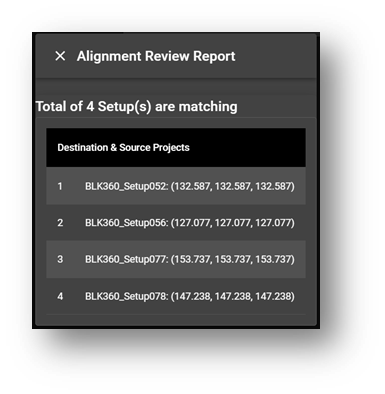
The Alignment Review Report also provides a detailed list of the Setups and their coordinates. This is useful to diagnose scenarios with no or partial matches.
-
The table below summarizes the Project Merge alignment scenarios and shows how Destination and Source projects align in each scenario. It also lists possible reasons for partial or no matches and the potential result of proceeding with the Merge without matching projects. The table also includes suggested actions to resolve non-matched projects. The information in the tables is also interactively provided in the program depending on the scenario.
|
Scenario |
Destination |
Source |
Message |
|
All Setups are matching |
|
|
|
|
Not all Setups are matching |
|
|
|
|
No Matching was found |
|
|
|
-
Proceed to
Merge Functions if the project alignment requirements are met:
-
The previous steps were to review data preparation and select appropriate Projects to ensure alignment.
-
In this step, the user chooses objects to import and resolves potential conflicts and duplicates.
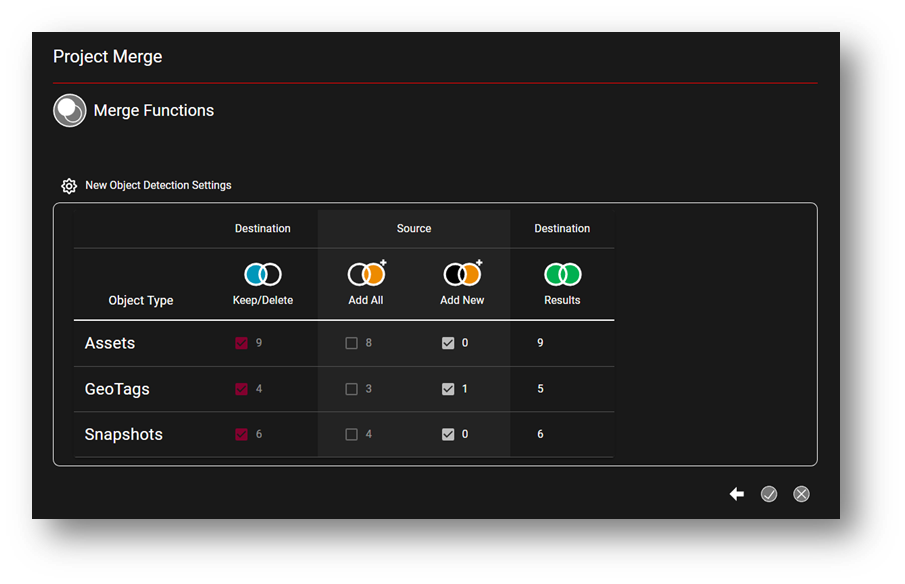
Merge Function dialog include the following components:
-
New Object Detection Settings:
-
Allows modifying the options that identify objects as new or existing.
-
-
Destination (Keep/Delete): Counts the existing object in the Destination Project. It also allows the user to take action on whether to keep or delete existing objects from the Destination Project (the default option is to “Keep”).
-
Source counts “All” and “New” existing objects in the Source project and allows to choose which objects to import:
-
“Add All” adds all objects from Source. This may result in duplicates.
-
“Add New” only adds the new object found in Source that does not exist in Destination (default option).
-
-
Destination dynamically shows the object counts in the Destination project as a result of the Merge completion.
Note: The following table list all possible combinations for Merge Functions, with a detailed description for each combination. Only “Allowed” functions are available.
|
Rule |
Combination (See above graphic for reference) |
Description |
|
Allowed |
☒ | ☐ ☒ |
This combination will keep all existing objects from the Destination and Add New from Source. This is the default setting. |
|
☒ | ☒ ☐ |
This combination will keep all existing objects from Destination and add all objects from Source. This may result in duplicates. |
|
|
☒ | ☐ ☐ |
This combination will make no changes to the objects in the Destination. |
|
|
☐ | ☒ ☐ |
This combination will delete all objects in Destination and will replace them with objects from Source |
|
|
Not Allowed |
☒ | ☒ ☒ |
Not a valid combination |
|
☐ | ☐ ☒ |
This combination will delete destination objects and import New. This is not valid because all objects will be new once objects in Destination are deleted. |
|
|
☐ | ☒ ☒ |
Not a valid combination |
|
|
☐ | ☐ ☐ |
Not allowed, because it will delete everything |
-
At the last step, the
Finalize dialog shows the result object counts if the Merge operation is completed.
-
To proceed, click OK.
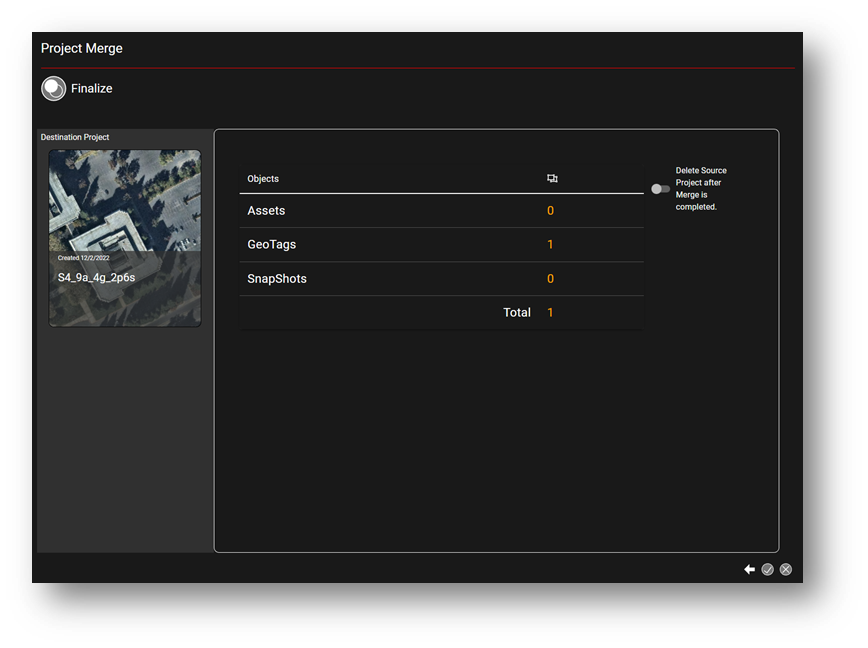
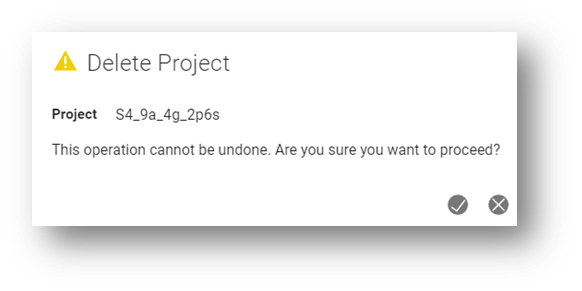
-
The user may enable the “Delete Source Project after Merge completion” option to delete the Source Project. If the Delete option is selected a “Delete Project” message will be prompted that requires approval to proceed. The Source project will be permanent deleted and cannot be restored without original data.
10. Once the Merge is completed, the Destination Project will be updated to include the imported object for the Source Project
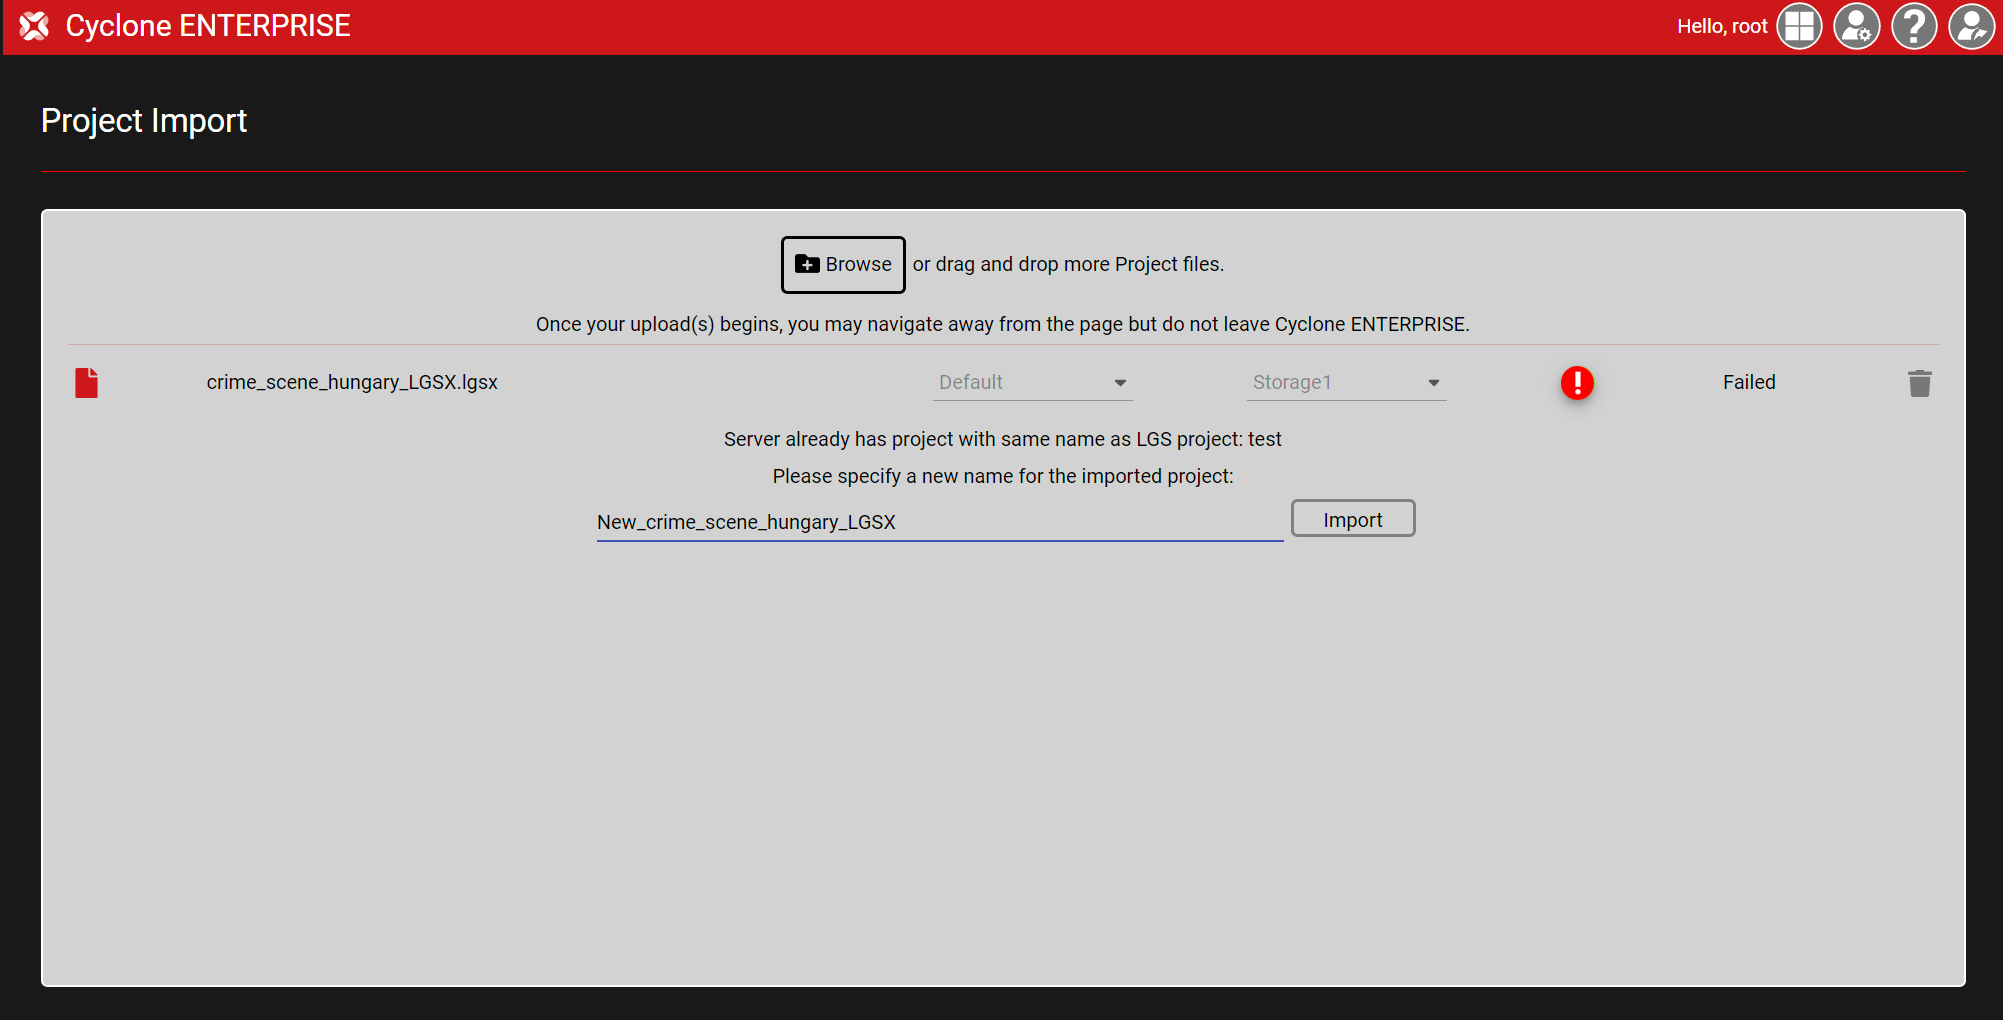
Handing of the duplicate Project names
When importing a Project file (*.lgsx, *.lgs, *.jsa) into Cyclone ENTERPRISE, it is possible that a Project with the same name already exists. Previously, the existing project should have been renamed from Admin Tools before the import. Now, the program offers a convenient way to handle the situation by allowing the user to set a new name to the project during the import process.
Increase displayed Project name character counts
Cyclone ENTERPRISE now displays more characters per Project name in Project Navigator. This helps with adding, organizing, and identifying Projects with similar naming conventions.
The Project's Group is accessible from the Project Admin
The Project’s Group assignment is displayed in the Administration | Project Management | Projects tab for easy identification and modification.
Automatic login in Windows support
To support a wide range of client devices, Cyclone ENTERPRISE utilizes server-side graphics rendering. With the previous Cyclone ENTERPRISE version 2022.0.1, the application must be able to access the user’s desktop session to render point cloud and panoramic images. In order to do this the user must manually log on to Windows every time the server restarts.
This requirement poses operational challenges to our customers who aren’t running the server 24/7, or those running Cyclone ENTERPRISE in the cloud using server instances. This document provides instructions for a workaround that enables automatic logon in Windows.
Note: The workaround has been tested on the Windows Server operating system.
The following items describe the required steps:
-
Verify that Cyclone ENTERPRISE is operating normally. This can be done by opening the Cyclone ENTERPRISE homepage on a remote computer and opening a Setup that contains point cloud or panoramic images.
-
Download the Microsoft utility AutoLogon from https://docs.microsoft.com/en-us/sysinternals/downloads/autologon.
-
Unzip autologon.zip and run Autologon.exe.
-
Click Agree to accept the Software License Agreement.
-
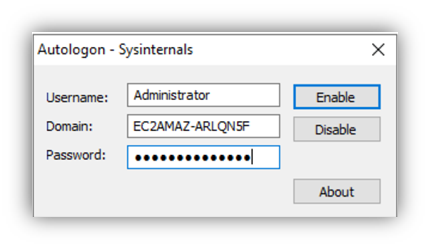
Enter your username, domain, and password. You must enter the same credentials as you currently use to run Cyclone ENTERPRISE. Enter the server’s hostname in the Domain box if your server is not in a domain.
-
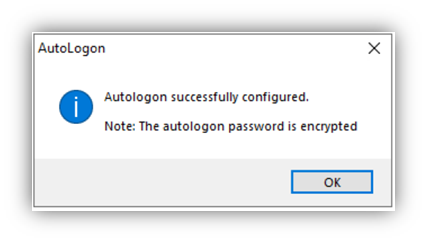
Choose Enable. You will see the following dialog.
-
Open the Task Scheduler program.
-
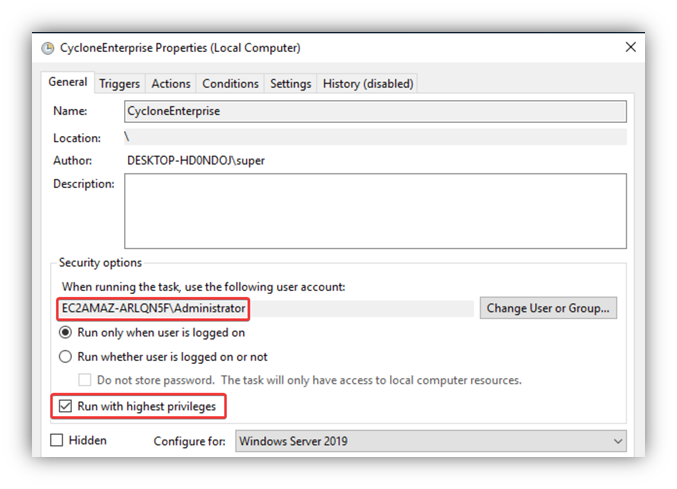
Locate and right-click the CycloneEnterprise entry. Select Properties.
-
On the General tab, ensure that the user account shown is the same as the one you entered in the AutoLogon program. In addition, ensure that the Run with the highest privileges option is enabled.
-
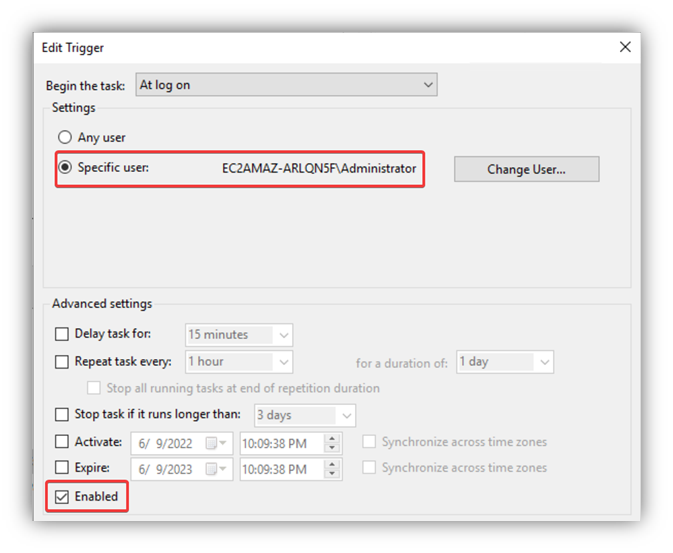
Select the Triggers tab. Choose the At log on item and choose Edit. Select Specific user and ensure the same account is used. Select the Enabled option. Select OK.
-
Select OK to exit the Task Scheduler program. Next, we will reconfigure the CLM licensing service to start without any delay.
-
Open the Services dialog. Locate and select the FLEXnet License Server entry. Right-click Properties.
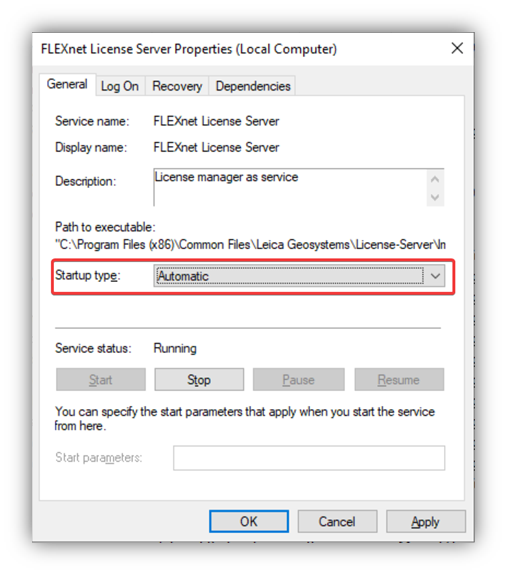
13. Select Automatic in the Startup type box.
14. Click OK to close the Services dialog.
Additional information can be found at https://docs.microsoft.com/en-us/troubleshoot/windows-server/user-profiles-and-logon/turn-on-automatic-logon
Simplified Azure deployment
Cyclone ENTERPRISE 2023.1.0. simplifies the Azure deployment. This step-by-step guideline demonstrated how to deploy Cyclone ENTERPRISE by using the Azure Resource Manager (ARM) templates on Microsoft Azure.
Note: The provided instructions help to reduce the number of steps required for the deployment of Cyclone ENTERPRISE simplifying the process for the users.
Prerequisites
The following is the list of prerequisites:
-
An Azure account.
-
The Azure account should not have limits on applying instances equipped with NVIDIA GPU.
-
The Azure Resource Manager (ARM) template (*.json).
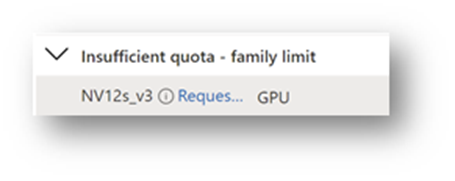
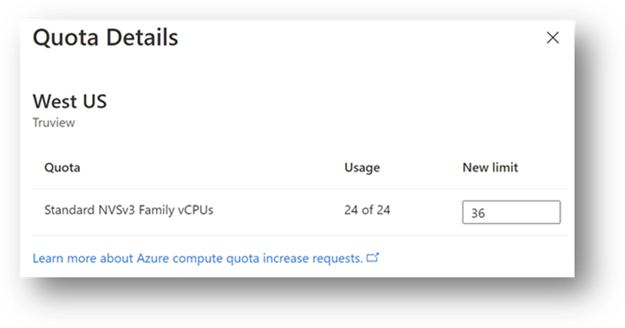
Note: In case of insufficient quota in the account, the quota should be increased to meet the requirements
Deploy an ARM template
The following steps describe how to deploy an ARM template
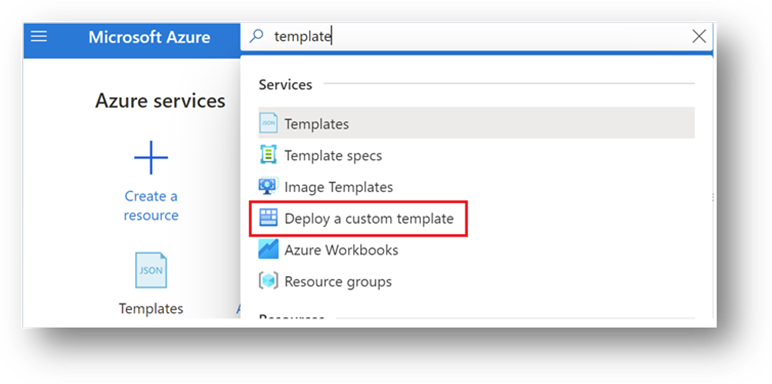
-
Type “templates” in the search bar on top of the Azure dashboard and select Deploy a custom template.
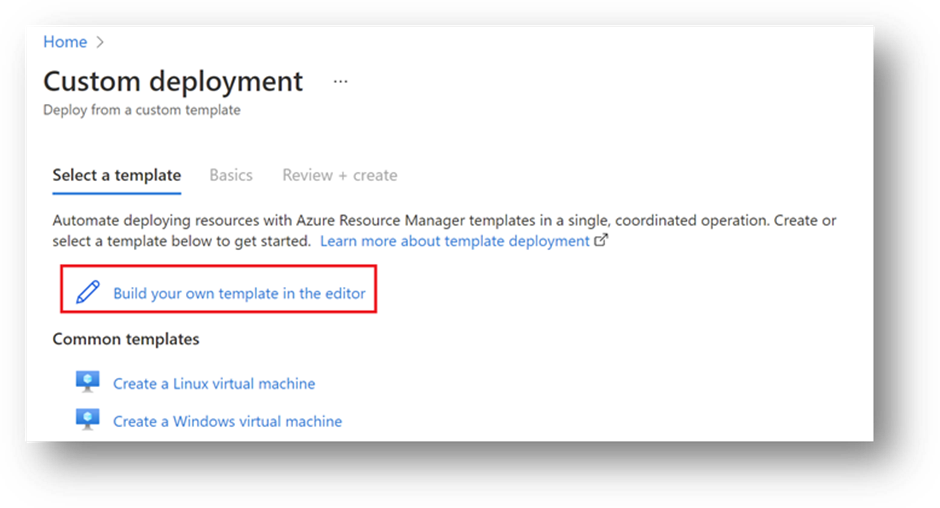
-
Choose Build your template in the editor.
-
Upload prepared the provided template file (.json) into Azure.
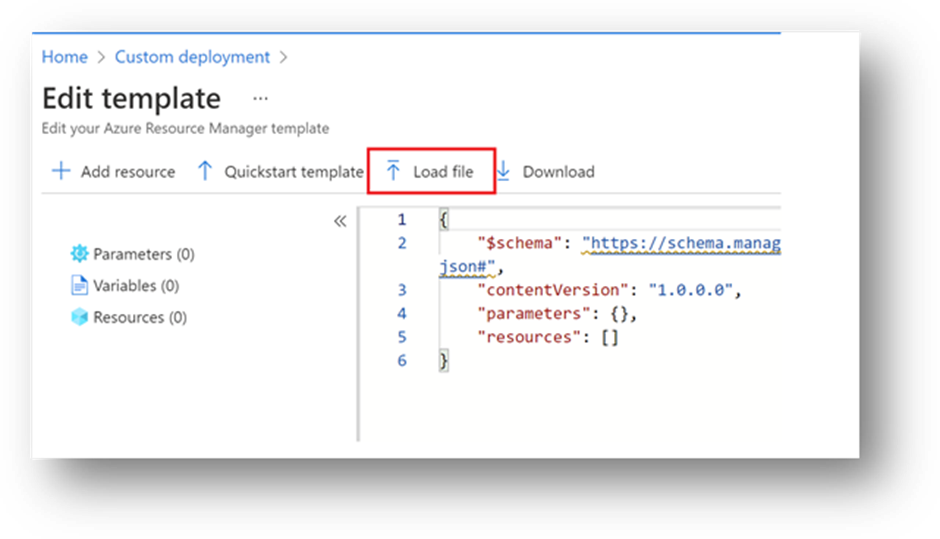
-
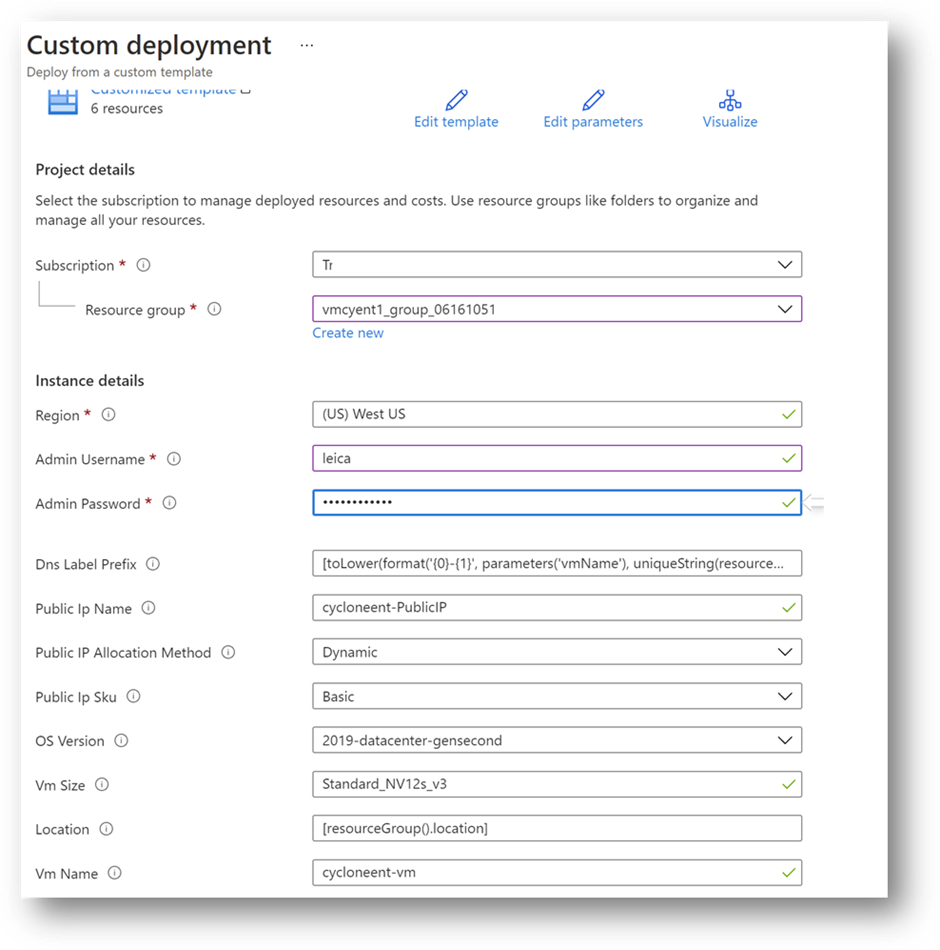
Save the template and input the required parameters.
-
The names of IP/VNet/VMname start with
cycloneent-, by default. -
The default VMSize is “Standard NV12s v3 (12 vCPU, 112 GiB memory)”.
-
The default OS version is Windows Server 2019 datacenter (2nd gen).
-
The default ports allowed within the template are 80/443/3389/5050.
-
This template will deploy the NVIDIA GPU driver extension for this instance.
-
The NVIDIA driver will be installed after the VM instance is deployed.
Note: Avoid using phrases like “Admin” or “Administrator” for the Admin Username. It will fail the templates.
Note: The provided password should meet the minimum security requirements. Otherwise, the template will fail.
Execute an ARM template
The following steps describe how to execute an ARM template
-
Click Review + Create to proceed to the next page, then click Create. The Azure will execute resource deployment automatically.
-
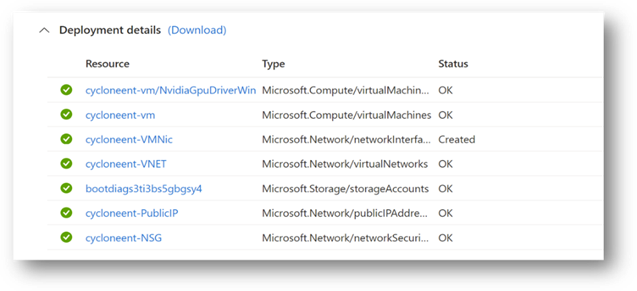
After the template is processed, you will the deployment details.
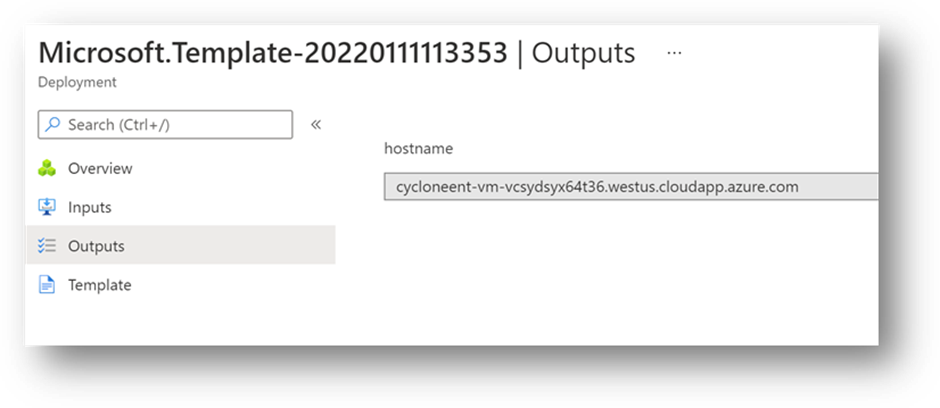
-
If the deployment is successful, click Outputs and copy the public DNS name of the newly deployed VM on Azure. This DNS equals to public IP address, you can use the address to access this server through the remote desktop protocol (RDP).
-
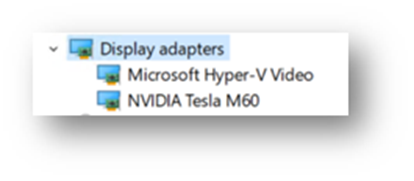
Check the NVIDIA GPU Driver
a. The NVIDIA driver will be installed through the NVIDIA GPU Driver Extension.
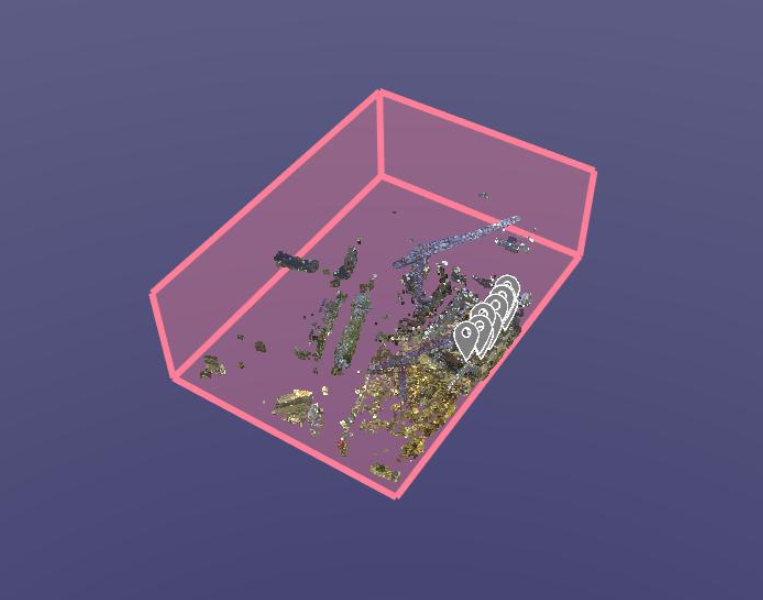
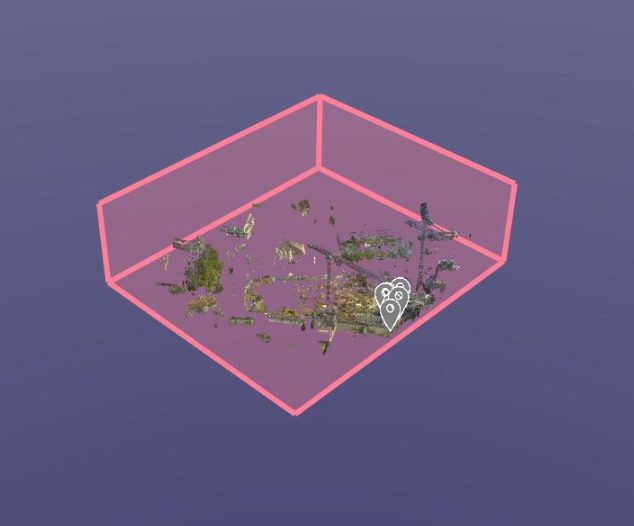
GeoTags Obey Limit Boxes
In the previous version, GeoTags did not follow the clips by limit boxes meaning that while the data was clipped the user would still see GeoTags outside of the clipped data contained in other sections of the project. GeoTags will now obey the Limit Box so only those that fall inside of the clipped space will be visible.
Before
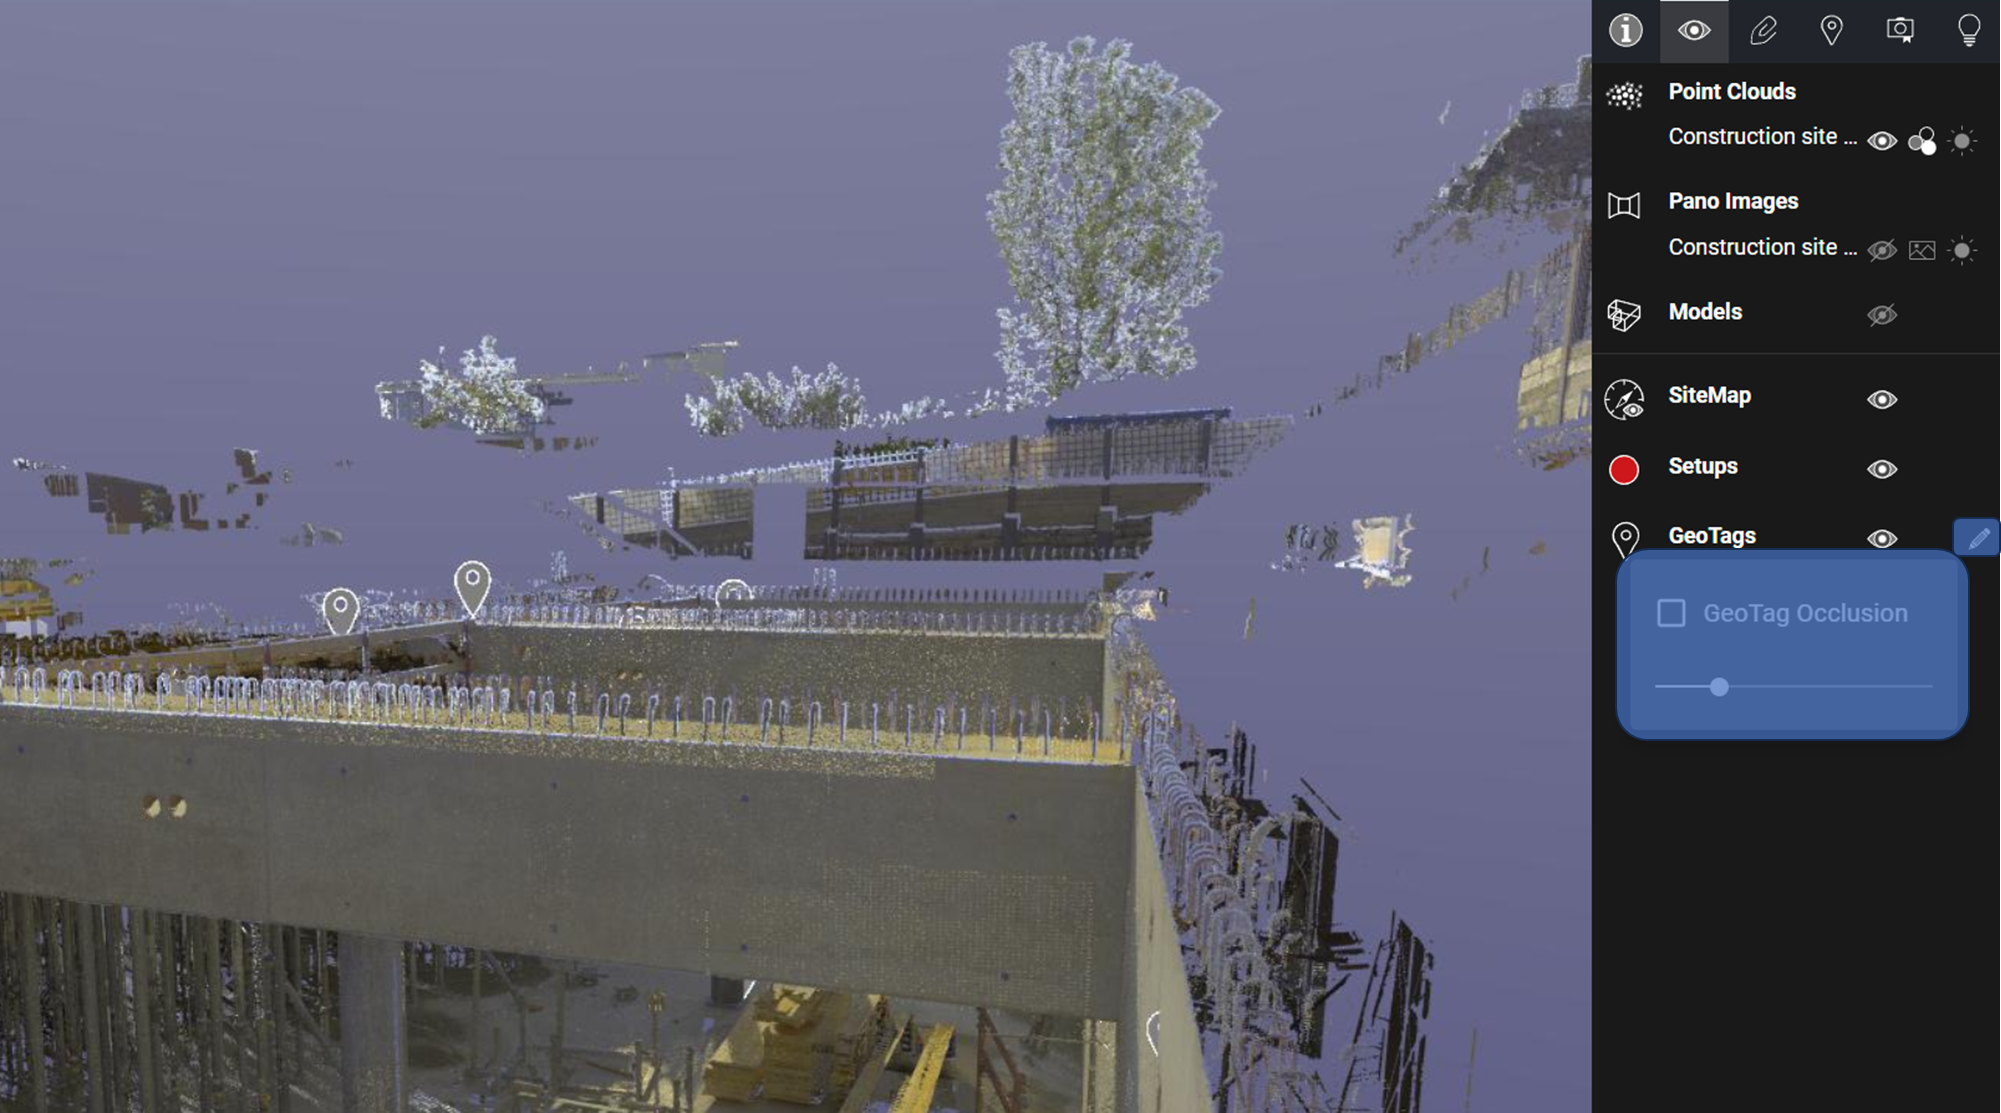
Improved GeoTag Visibility Options
Users now have more control over the visibility of GeoTags in a scene. In addition to a toggle to turn them on/off, the distance at which they become occluded is now definable.
Improved GeoTag Asset handling
The new version of Cyclone ENTERPRISE allows adding GeoTags assets other than the Assets inside the Project by browsing to a local disk.
Now, it is also possible to delete Assets from the Project within the TruView LIVE environment, which was not supported in older versions.
TruView LIVE Improve load performance when reading high-res pano images
TruView LIVE has improved performance for handling high-resolution pano-image, e.g., 4k and 5k resolution. In previous versions panning performance with higher resolution imagery was slower than with lower resolution imagery. This has been addressed in this release.
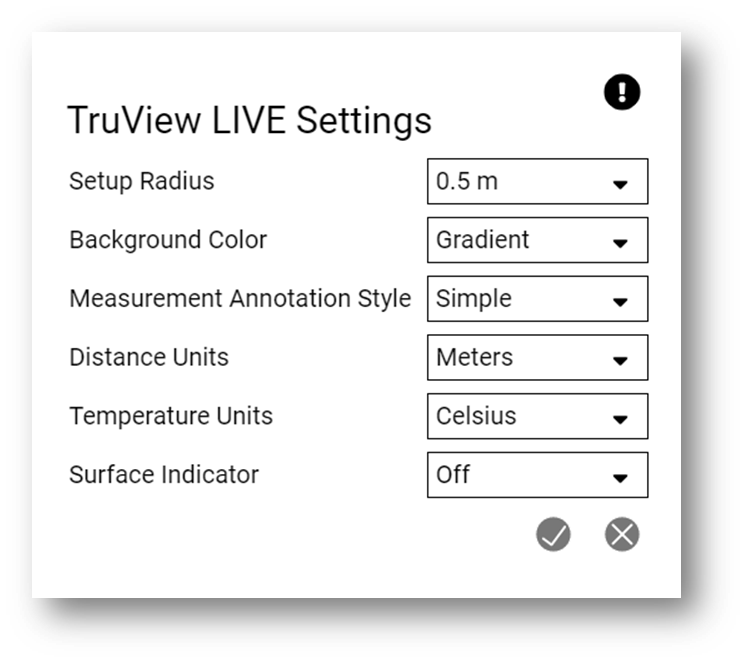
Option to turn off the normal surface indicator
TruView LIVE now has the option to turn off the Surface Indicator. This is recommended when dealing with noisy point cloud data when no measurements on the data are being made.
Bug Fixes
-
User visibly bug - Cyclone ENTERPRISE 2023.1 introduces new limitations on the visibility of users, for the “User” and “PowerUser” roles. The users who have User or PowerUser roles will not have the ability to view other users on the server. This limitation helps to maintain the privacy of the user's information set by the admin roles.
-
Fixed the issue of Asset's preview image getting truncated if the image size was very large.
-
Resolved issue related to model object counts in the projects, as one model object was counted twice.
-
Fixed the issue of the tooltip occasionally obscuring the Setup sphere making it difficult to select a Setup.
-
Resolved the issues related to visualization of standing Setup sphere is some BLK2GO data.
-
Fix the bug related to setting the limitbox size.
-
Fixed the issue that GeoTags could not be saved in some languages when using the Windows IME tool.
-
Fixed the bug when LGS files with capitalized file extensions could not be imported to Cyclone ENTERPRISE
Leica Cyclone ENTERPRISE Compatibility and Upgrades
LGSx File
With the release of Cyclone ENTERPRISE 2023.1.0, a new data architecture has been implemented at the core of our Reality Capture software products and our popular file format, the LGS file. The update provides a next-generation solution for our Leica Reality Capture data. It includes faster publishing, higher compression, and new core architecture that will allow us to build out new capabilities and features to meet your growing needs, like file versioning (i.e., track changes to GeoTags, markups, etc.), in the future.
LGS/LGSx compatibility
A full list of LGS/LGSx compatibility is shown below:
|
Software |
Import/Open |
Export/Save As |
|---|---|---|
|
TruView desktop 2022.1 and older |
LGS |
LGSx |
|
TruView desktop 2023.1 and newer |
LGS/LGSx |
LGSx |
|
Cyclone ENTERPRISE 2022.1 and older |
LGS |
LGS |
|
Cyclone ENTERPRISE 2023.1 and newer |
LGS/LGSx (LGS gets converted to LGSx on import) |
LGSx |
|
TruView Enterprise/Cloud 2022.1.0 and older |
LGS |
LGS |
|
TruView Enterprise/Cloud 2023.1.1 and newer |
LGS/LGSx (LGS gets converted to LGSx on import) |
LGSx |
|
Cyclone CORE 2023.1 |
LGS |
LGS |
|
Cyclone CORE 2023.0.2 |
LGS |
LGS |
|
Cyclone REGISTER 360+ 2023.1 |
LGS/LGSx |
LGSx |
|
Cyclone REGISTER 360+ 2023.0.2 |
LGS |
LGS |
|
Reality Cloud Studio |
LGS/LGSx |
LGSx |
|
CloudWorx 2023.1 and newer |
LGS/LGSx |
N/A |
|
CloudWorx 2023.0 and older |
LGS |
N/A |
Upgrading Cyclone ENTERPRISE to the latest version
You must have Administrator-level privileges on your system to correctly install Leica Cyclone ENTERPRISE software.
First, open the Cyclone ENTERPRISE Launcher utility from the System Tray and STOP the server service. Second, run the new Cyclone ENTERPRISE installer and follow the directions to upgrade to version 2022.0.1 to proceed with the installation.
Upgrading to Cyclone ENTERPRISE 2023.1.0 from JetStream Enterprise 2022.0.0. or earlier
Cyclone ENTERPRISE project data is compatible with JetStream Enterprise projects. If you are upgrading from JetStream Enterprise to Cyclone ENTERPRISE, Cyclone ENTERPRISE will be able to detect the existing JetStream Enterprise projects within your database.
However, you cannot run the 'upgrade' function in the Cyclone ENTERPRISE installer to upgrade JetStream Enterprise to Cyclone ENTERPRISE. You must first uninstall JetStream Enterprise (this will not remove or delete your project data). Once JetStream Enterprise is uninstalled, run the Cyclone ENTERPRISE installer as a new installation. During installation, Cyclone ENTERPRISE will intelligently and automatically detect your former JetStream Enterprise projects and prepare the data for use within Cyclone ENTERPRISE.
After installation is complete, login to Cyclone ENTERPRISE, navigate to Administration | Server | Storage Locations, and Reconnect the identified JetStream Enterprise storage locations to add the projects to Cyclone ENTERPRISE.
Please see the Quick Start Guide or in-product Help for more details on Reconnecting and post-Reconnection best practices. Or, if you have projects in JetStream Enterprise, but wish to move them to a new location as part of your upgrade.
Compatibility with Leica Reality Capture software products
|
|
Cyclone CORE |
Cyclone REGISTER 360 (including BLK Edition) |
CloudWorx
|
TruView
|
TruView LIVE |
Rithm powered by JetStream |
|
Publish to Cyclone ENTERPRISE |
2021.0 and higher |
2021.0 and higher |
n/a |
n/a |
n/a |
n/a |
|
Open Cyclone ENTERPRISE Projects |
n/a |
n/a |
2021.0 and higher |
2021.0 and higher |
2021.0 and higher |
2021.0 and higher |
|
Add Models |
n/a |
n/a |
n/a |
2021.0 and higher |
n/a |
n/a |
|
Edit Models |
n/a |
n/a |
n/a |
2021.0 and higher |
2021.0 and higher |
n/a |
|
Add GeoTags |
* |
* |
2021.0 and higher |
2022.0.0 and higher |
2022.0.0 and higher |
n/a |
|
Edit GeoTags |
n/a |
n/a |
2021.0 and higher |
2021.0 and higher |
2021.0 and higher |
n/a |
|
Add/Edit Snapshots |
n/a |
n/a |
2021.0 and higher |
2021.0 and higher |
2021.0 and higher |
n/a |
|
Access and Download Assets |
n/a |
n/a |
2021.0 and higher |
2021.0 and higher |
2021.0 and higher |
n/a |
*GeoTags can be added from Cyclone CORE and Cyclone REGISTER 360 prior to publishing to Cyclone ENTERPRISE.
Compatibility for Project File Imports
|
Version |
LGS file
|
Cyclone ENTERPRISE 2021.0-2022 |
Cyclone ENTERPRISE 2023.1 and later |
|
1.4.1 |
N/A |
N/A |
|
|
1.5.1 |
· |
· |
|
|
1.6.0 |
· |
· |
|
|
1.6.2 |
· |
· |
|
|
2020 |
· |
· |
|
|
2020.1 |
· |
· |
|
|
2021 |
· |
· |
|
|
2022 |
· |
· |
|
|
LGSx file (published from a product version) |
Cyclone ENTERPRISE 2021.0-2022 |
Cyclone ENTERPRISE 2023.1 and later |
|
|
2023.1 |
N/A |
· |
|
|
JSA file
|
Cyclone ENTERPRISE 2021.0-2022 |
Cyclone ENTERPRISE 2023.1 and later |
|
|
1.4.1 |
· |
· |
|
|
1.5.1 |
· |
· |
|
|
1.6.0 |
· |
· |
|
|
1.6.2 |
· |
· |
|
|
2020 |
· |
· |
|
|
2020.1 |
· |
· |
|
|
2022 |
· |
· |
Deprecated Features
Leica Geosystems strives to provide support for the widest array of operating systems and file formats possible as is reasonable given current technologies and support from third-party partners.
With each release, we review our list of currently supported formats and operating systems in line with industry trends and announced product terminations.
Leica Geosystems may add or terminate support for a file format during any release. Obsolete operating systems will be supported for six months after their announced termination or the next major software release, whichever comes first. Server products will be supported in alignment with Leica’s Client License Manager (CLM) supported servers to guard users against incompatibility.
Cyclone ENTERPRISE 2022.0.1
-
CLM versions prior to 2.5 are no longer supported.
Cyclone ENTERPRISE 2023.1
-
LGS files are no long published. LGSx files will be published in lieu of LGS files and can be consumed across the 2023.1 versions of TruView, Cyclone ENTERPRISE, Cyclone REGISTER 360, the CloudWorx Suite and Reality Cloud Studio.
Known Issues
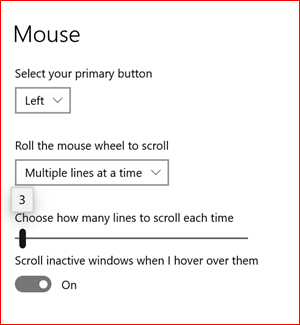
Unexpected Scroll Wheel Behavior
Users may experience a non-responsive zoom wheel or unexpected zooming behavior within TruView and/or TruView LIVE unless their scroll speed is set to 3 (note: this applies to PC users only and presents itself in both TruView and TruView LIVE).
To change the scroll speed:
-
Press the Windows key. Type 'mouse settings'.
-
The mouse setting dialog is shown.
-
Choose 'Multiple lines at a time'.
-
Slide the horizontal scroll bar to 3.
Cyclone REGISTER 360 Publishing Error
When publishing to Cyclone ENTERPRISE fails the error message "Cyclone ENTERPRISE Publish Results: failed" could mean that:
-
The sever has low disk space
-
The network drive is disconnected
Untranslated Phrases
Some phrases may not be available in your language. In this case, they will appear in English. Untranslated phrases will be addressed in the next release.
Cyclone PUBLISHER license not listed in Project Info panel
When a project is published with a Cyclone PUBLISHER license the Publishing License field in the Project Info panel will be blank.
Unable to download published files
If a person with access to the Windows Server deletes a published LGS file from the ‘export’ folder, that file will remain listed on the published projects page though the file no longer exists. This will result in an error stating “No Such file or directory”.
Self-deletion of users
Users may inadvertently delete themselves during active sessions though they receive an error saying it is not possible.
Incorrect Markups shown on a Snapshot during rapid transition
When switching rapidly between many Snapshots, the Markups may lag resulting in Markups from one Snapshot being transposed on another. If this happens, simply, select the desired Snapshot again to re-load its Markups.
Root User's default credentials are not working on first login
The default root password is a temporary password, which is created during installation or user password reset. This temporary password only lasts for 2 days from initial server initialization, and then expires. For example, if the user installs Cyclone ENTERPRISE but doesn't login for more than two days, and then tries to login for the first time the temporary password doesn't work.
Use the root user password reset utility included with installation.
-
Access the Windows instance Cyclone ENTERPRISE is installed on as an Admin-level user.
-
Navigate to the Cyclone ENTERPRISE installation directory: C:\Program Files\Leica Geosystems\Cyclone ENTERPRISE
-
Run ResetPassword.exe from this folder
-
Login again with the default root username and password.
This reset is also valid for 48 hours! Login to reset the password permanently before the 48-hour period expires, or you will need to run the utility again.
Missing 3D and/or Pano Image data
In some situations, a user may open a Project in TruView LIVE and find the SiteMap visible but upon minimizing the SiteMap, no 3D or Pano Image data will be visible. There are two likely reasons for this:
-
Outdated display driver
-
Windows is a non-Server OS
Please reference the Troubleshooting section of the help documentation for complete remediation steps.
Licensing
Users with valid CCP or CCP valid as late as 1 November 2023 can run this new version with no new license required.